Configuring Eclipse for joomla development
From Joomla! Documentation
Install Eclipse[edit]
Install Java[edit]
Eclipse is written in Java, so before you can install Eclipse, you need to make sure you have a recent version of Java running. Note that many Linux distributions include third-party Java runtimes (or JVM's for "Java Virtual Machine"), some of which don't work with Eclipse. The safest thing is to make sure you are running the Sun JRE (Jave Runtime Environment). You can download the latest Java version at www.java.com. If you already have a recent version of the Sun JRE (for example, 1.5 or 1.6), you can skip this step.
Another option for Mac OS X Snow Leopard users is to download the OS X packages from http://www.open.collab.net/downloads/community/ for Subversion after you've installed Subclipse. This will install the appropriate JavaHL library to make the installed JVM work properly.
Download Eclipse[edit]
The next step is to download Eclipse. Unfortunately, as of Eclipse 3.7 (code name Helios), the old "all-in-one" PHP version is no longer maintained. So, the easiest thing is to download and install the Eclipse IDE for Java Developers from here. There are downloads for Windows, Linux, and Mac OS X. When you download, you will be asked to pick a download mirror. At the time of this writing, the name of the Windows 64-bit download is "eclipse-javascript-indigo-SR2-win32-x86_64.zip" and is 132mb.
Installing Eclipse is very easy -- you just unzip the file to a target directory. In Windows, it is best to use a third-party "zip" program to do the unzipping. In some cases, Windows Explorer will not correctly unzip this archive and Eclipse won't run correctly. One good option is 7 Zip, available here.
I created a directory called "c:\eclipse_php" for the target. When the file is extracted, you will see a folder called "eclipse" and under that folder 5 folders and six files.
Once you have the basic Eclipse IDE for JavaScript Web Developers version installed, you then need to use the Eclipse Help system to add PHP and Git support. See Installing Eclipse with PHP and Git for detailed instructions.
Eclipse will use the default Java JVM for your system. In Windows, this is normally the right one (from Sun). In some Linux distributions, the default JVM may be a third-party program that doesn't work correctly with Eclipse. In this case, you can specify the JVM to use by editing the eclipse.ini file in the eclipse folder as as follows, substituting the correct path to your installed Sun version of the Java JVM:
-showsplash
org.eclipse.platform
--launcher.XXMaxPermSize
512M
-vm
/usr/lib/jvm/java-1.5.0-sun/jre/bin/java
-vmargs
-Xms512m
-Xmx512m
Note that the path to the JVM goes on the line below the "-vm". Also note that the file ends with a blank line.
At this point, you should be able to start up Eclipse. Just find the "eclipse.exe" file inside the eclipse folder and double-click to execute it. In Linux: /path/to/your/eclipse/folder/eclipse
Eclipse download for Ubuntu[edit]
- Eclipse can be found in the Ubuntu Software Centre (or Synaptic Package Manager) and when installed from there it places a menu item in the 'Programming' menu.
- After installing Eclipse see Installing Eclipse with PHP and Git for detailed instructions.
Create an Eclipse Workspace[edit]
The first time you launch Eclipse, the screen below displays.

Before we can start using Eclipse, we need to create a workspace. This is the folder where all of the Eclipse files and project information will be stored. Since we will be working on web-based projects, we want our project PHP and HTML files to be visible to XAMPP. So we will create our workspace in the "c:\xampp\htdocs" folder (in linux: "/opt/lampp/htdocs").
To do this, press the Browse button, navigate to the "c:\xampp\htdocs" or "/opt/lampp/htdocs" folder, and press the New Folder button. Create a directory called something like "joomla_development" and make sure it says the same thing in the Folder field. (You can click on a different folder and then click on the new folder to get the name in the Folder field.) The screen should look like the one below.

Press OK. Then we go back to the Workspace Launcher, as shown below.

Before pressing OK, you can check the box so that you won't need to go through this screen each time you start Eclipse.
Now you should see a splash screen and then a "Welcome to Eclipse" screen, as shown below.

Close this window and the normal Eclipse workbench will display, as shown below.

At this point, Eclipse is installed.
Configure Eclipse[edit]
Set Newline Character (Windows/Mac Only)[edit]
Let's do one final configuration setting, which only applies if you are running Windows or Mac. As you may know, Windows and Linux use different characters to terminate lines in text files. Since the Joomla! source code repository is on a Linux machine, we need to tell Eclipse to create Linux-style patch files. Although Mac is Unix based, for the sake of standardization, Mac users should use these settings too. To do this, we'll navigate to Window / Preferences, expand the General tree, and select "Workspace". This is shown in the screenshot below.

Make two changes. Select Other / UTF-8 for the Text file encoding and Other / Unix for the New text file line delimiter, as shown above. Press OK.
At this point, Eclipse is set up and we can start working with PHP files.
Eclipse Terminology[edit]
First, some quick Eclipse terminology. In Eclipse, we talk about the workbench, perspectives, and views. The workbench is just the whole screen. It has an edit area, where we will edit our PHP files, and a series of views around the outside. A view is an area that displays information about a file or some other resource. A perspective is just a pre-packaged layout of views designed for a specific purpose. When we're writing PHP programs, two perspectives are of interest: the PHP perspective and the PHP Debug perspective.
Let's open the PHP perspective. We can select Window / Open Perspective / PHP, as shown below.

Now the workbench displays a different set of views, including the PHP Explorer, in the upper left, and three views in the lower left. Note that Eclipse has pretty good Help, which you can access by pressing F1 or selecting Help / Help Contents from the menu. The screen below shows some of the contents available, including Getting Started, Basic Tutorials, and other useful information.

Create a Project[edit]
Remember that we created a workspace when we launched Eclipse. Before we can write any code, we need to create a project. A project stores a group of related program files. For example, the entire Joomla! application will be one project. We're going to create a test project that we can use to test our setup. We'll select the menu File / New / PHP Project, as shown below.

This will open the first screen in the new project wizard, shown below. Enter the project name, in this case "Test Debug", and press Finish.

Our new project will now show in the PHP Explorer view.
Create and Run a PHP File[edit]
Next, we need to create a PHP file. Select the "Test Debug" project, right click, select New / PHP File, as shown below.

Press the Browse button and select the "Test Project" for the source folder. The New PHP File wizard will display, as shown below. Enter "test.php" for the file name, and press Finish.

An empty PHP file will now display in the editor. Enter the code shown below, and press the Save button in the upper left toolbar to save the "test.php" file.

Now, we're going to execute the script. We'll select the file "test.php" and right-click and select Run As / PHP Web Page, as shown below.

The script will be run in your default browser, and should display as shown below.
If your php files are set by default to open in a text editor, you may get an error. If so, go to Window/Preferences/General/Web Browser and explicitly select your preferred option.

Note that the "phpinfo()" command displays information about your PHP configuration. This is the same screen we saw earlier, when we clicked on the "phpinfo()" link in the XAMPP home page.
Setting up Xdebug[edit]
If you want to enable PHP debugging in Eclipse, see Configuring Eclipse and Xdebug.
Eclipse Tips and Tricks[edit]
Recommended Eclipse Settings[edit]
Here are some additional Eclipse settings and preferences that are recommended.
Eclipse.ini File Settings
When you install Eclipse, it places a file called eclipse.ini in the root folder (where you unzipped the Eclipse archive). This file controls how much memory Eclipse and Java are allowed to use on your PC. By default, these settings are low and do not take advantage of the computer RAM available on most PC's. Editing this file to the values shown below might make Eclipse run substantially faster:
-startup
plugins\org.eclipse.equinox.launcher_1.0.101.R34x_v20080819.jar
-showsplash
org.eclipse.platform
--launcher.XXMaxPermSize
512m
-vmargs
-Xms512m
-Xmx512m
SVN Label Decorators
Navigate to Window / Preferences and select General / Appearance / Label Decorations and make sure the box "SVN" is checked, as shown below. This should be selected by default when Subclipse is installed.

Show Line Numbers
Navigate to Window / Preferences and select General / Editors / Text Editors. Make sure the box "Show Line Numbers" is checked, as shown below. This should be selected by default.

Show SVN Console
This option will display the Subversion commands in the Eclipse console. Navigate to Window / Preferences and select Team / SVN / Console. Check the box "Show SVN console automatically when command is run" is checked, as shown below. This will not be checked by default.

phpEclipse Browser Preview Defaults
If you are using phpEclipse (not Eclipse PDT or EasyEclipse), navigate to PHP Eclipse Web Development / Browser Preview Defaults and uncheck all options.
Customising Shortcut Keys[edit]
If you do a lot of work in Eclipse, it can save you time to make good use of Eclipse shortcut keys. You can customise these keys to work just the way you want. In the example below, we will add a shortcut key for the SVN command "Compare With Base Revision". Here are the steps:
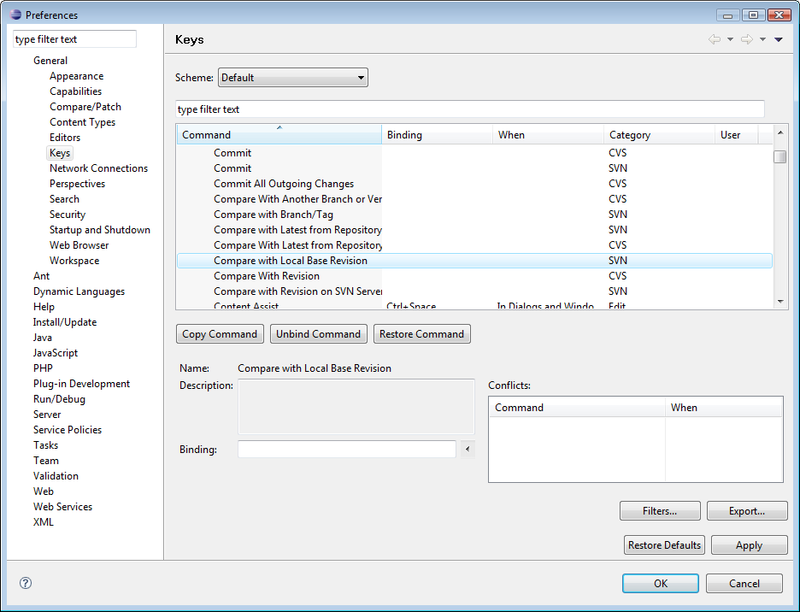
- Select Window / Preferences / General / Keys to show the screen below. Scroll down to the command "Compare With Local Base Revision" and highlight it.
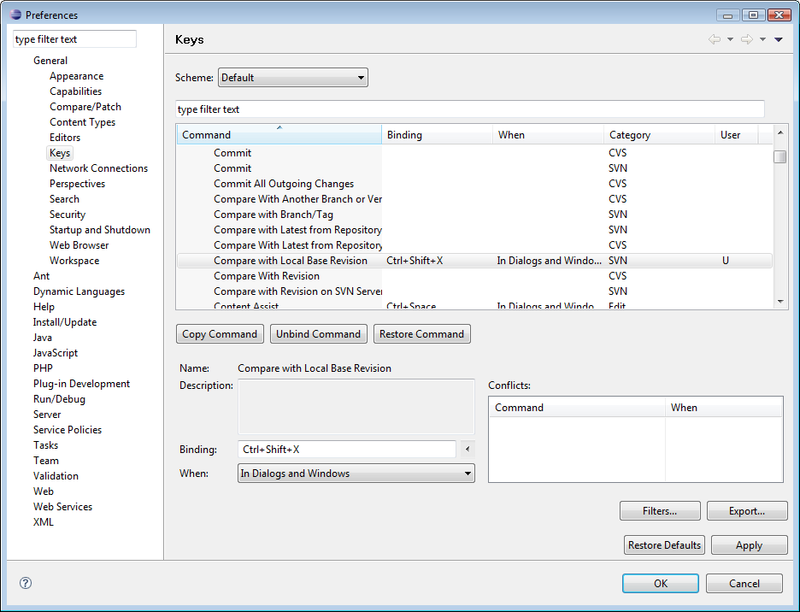
- Click in the Binding field and press Ctrl+Shift+X, as shown below. In the "When" drop-down list, select "In Dialogs and Windows", as shown below. Notice that the "Conflicts" field is empty. If you pick a shortcut key that is already used in Eclipse, it will show here.
- Press OK.


Now, you can highlight a file and open the Compare With Base Revision editor just by pressing Ctrl+Shift+X. Note that some shortcut keys may conflict with other applications on your system, in which case they will not work correctly in Eclipse.
Eclipse Edit Windows[edit]
- You can maximize the edit area in the Eclipse workbench just by double-clicking on the tab for the active window (or by clicking the maximize icon in the upper right corner of the edit area). Double-clicking again restores the edit area.
- You can a second edit window inside the edit area by dragging the active tab to the right-hand edge of the edit area, as shown below.

This will create two edit windows, side by side. You can maximize the entire edit area by double-clicking on the active tab. The workbench will display as shown below, with two edit windows.

To reverse the process, just drag the tab of the right-hand window back to the left window.
Compare With Base Reivsion[edit]
When working with patches, it can often be handy to see the changes you have made to a specific file. To do this, right click on any file in your Joomla! project and select Compare With / Base Revision.

If the local version of the file is different than the base revision, the Eclipse Compare Editor will display in the Edit Area of the workbench, as shown below.

Text Compare[edit]
You can use the Eclipse text compare to compare two different files or different versions of the same file. To compare two different files:
- Highlight both files in the PHP Explorer view.
- Right-click on one of the files and select Compare With / Each Other. This will open the Text Compare window in the edit area.
You can also compare file that aren't part of an Eclipse project. To do this:
- Create a new file in Eclipse by selecting File / New and the file type (for example, HTML, XML, text, PHP). Select a name for the file and the correct folder in your Eclipse project.
- Open the external file you want to compare and copy the contents to the clipboard.
- Inside the Eclipse editor for the new file, paste the contents and save the file.
- Repeat this procedure for the second file to compare.
- Compare the two files using the Compare With / Each other method outlined earlier.
Local History[edit]
Eclipse automatically tracks changes you make to files in the editor and allows you to view and use these prior versions. To see the local history of a file, right-click on the file in the edit window and select Team / Show Local History. This will open the History view as shown below.

Each line is a version of the file at this point in time. With this view, you can:
- Double-click on a line to open the file as it was at that time.
- Right-click on a line and select "Compare Current with Local" to compare the current file version with the version at this time.
Using the Eclipse Text Compare window, you can also revert to the earlier version of the file or just revert some of the changes.
Mouse Hover[edit]
If you hover the mouse on a class or method, the PHPDoc information will show in a tooltip, as shown below. You can press F2 to move the focus to this tooltip to allow scrolling.

If you hold down Ctrl and then hover, the source code of the element will display in the tooltip, as shown below. Again, F2 allows you to scroll the tooltip.

The element also becomes a hyperlink. Clicking on the element will open the element's source file for editing.
Back and Forward Buttons[edit]
You can navigate back and forward, like in a browser, using the Back and Forward buttons in the Eclipse toolbar, shown below.

These let you navigate to previous files you were editing or viewing. You can also use the drop-down menu to go to a specific file and location, as shown below.

Outline View[edit]
This view (by default in the lower left) shows the structure of any classes in the active file. For example, open the file "libraries\joomla\factory.php" for editing. The Outline view will show the methods and fields of the JFactory class, as shown below.

Clicking on a member in the Outline view highlights the declaration of this member in the source file.
PHP Project Outline View[edit]
This view displays a list of constants, classes and functions for all files within the selected project. Selecting an element in the PHP Project Outline view will open the source file in the editor.
Type Hierarchy View[edit]

This is rather a very handy view for joomla development. It's a bit of a mix of Outline View and Project Outline View, but better in many ways. It shows the structure of not only the current class, but all it's parent classes!
Thanks to shengyuan-lu for his stackoverflow answer
PHP Functions View[edit]
This view shows the most commonly used PHP Classes, Constants and Iterators. You can add a function to a source file by double-clicking the desired function. The function will be added at the current cursor location in the active source file.
Code Assist[edit]
Eclipse will attempt to complete common PHP statements and methods for you. Simply type in the first part of the statement and press Ctrl+Space to invoke code assist. For example, open "index.php" for editing and go to line 13. Type "def" and press Ctrl+Space. The screen should display as shown below.

At this point, you can click on any option in the pop-up window to select the desired statement. Click on "defined" and press Enter. The line will now read "defined()". Press Ctrl+Space again and a list of constants will show, as shown below.

You can read more about Code Assist in the "Working with Code Assist" section of the PDT User Guide (PDT User Guide > PDT Help > Getting Started > Basic Tutorials). Code assist is a great feature of Eclipse and can save you a lot of time.
Open PHP Manual[edit]
You can access the PHP Manual for any PHP function by highlighting the function name in an edit window or the PHP Functions view and selecting Open PHP Manual. The PHP manual page for this function will display in a browser window.
Other Manuals[edit]
Other forms of PHP documentation that you can download are available from php.net. This page includes HTML formats and CHM format.
On Windows, the extended CHM format is the most useful as it includes comments from the live PHP references.
A free viewer for Mac OSX 10.5, iChm, is available from robinlu.com (Chmox and xChm are either not maintained or unreliable enough to use). If you are integrating iChm with Eclipse (either with PDT or phpEclipse) you will need to remember to specify the full path to the actual binary, eg (and adjusting the path for the correct location):
/Applications/iChm/Content/MacOSX/iChm /Users/you/php_manual_en.chm
MySQL manuals are available in a variety of formats from dev.mysql.com.
Filter on Problem Window[edit]
If your Problem (or Task) window is not showing you the right problems, you may need to adjust your filter. It can be particularly helpful to adjust the filter to just show the working selection.
To do that click on the down triangle in the upper right corner of the Problem window.

This will display a dropdown menu. Select "Configure Contents". In the "Configure Contents" window, check "Warnings on Selection".

Click "OK".
This screen also gives additional parameters that you could use.