Difference between revisions of "Git for Coders"
From Joomla! Documentation
Dextercowley (talk | contribs) (link to github gui) |
m (→CLI Command) |
||
| (8 intermediate revisions by 6 users not shown) | |||
| Line 1: | Line 1: | ||
=Overview= | =Overview= | ||
| − | This article shows you how to use Git and Github to code and submit changes to the Joomla CMS. If you are not familiar with Git, you may | + | This article shows you how to use Git and Github to code and submit changes to the Joomla CMS. If you are not familiar with Git, you may wish to read the tutorial [[Git_for_Testers_and_Trackers | Git for Testers and Trackers]] first. |
''IMPORTANT NOTE: Git is a very powerful system and there is usually more than one way to accomplish the same thing in Git. This tutorial does not try to cover all of the different ways you could do these tasks. Instead, it covers one (hopefully simple) way to do it. As you become more familiar with Git, you may find other ways that work better for you.'' | ''IMPORTANT NOTE: Git is a very powerful system and there is usually more than one way to accomplish the same thing in Git. This tutorial does not try to cover all of the different ways you could do these tasks. Instead, it covers one (hopefully simple) way to do it. As you become more familiar with Git, you may find other ways that work better for you.'' | ||
| − | The | + | The first step is to set up the remote and local Git repositories. You do this once. Once it is set up, the normal workflow is: |
# Update your local and remote repositories with changes others have committed to the main Joomla CMS repository. | # Update your local and remote repositories with changes others have committed to the main Joomla CMS repository. | ||
# Create a branch for each issue or feature you are working on and commit your changes to the branch in your local repository. | # Create a branch for each issue or feature you are working on and commit your changes to the branch in your local repository. | ||
| Line 11: | Line 11: | ||
# Update the Joomla Issue tracker or Joomla Feature tracker so that others can test your code. | # Update the Joomla Issue tracker or Joomla Feature tracker so that others can test your code. | ||
| − | Each of these steps is explained below. Note that you can use Git from the command line, from | + | Each of these steps is explained below. Note that you can use Git from the command line, from an IDE such as Eclipse (with the eGit plugin), or from a stand-alone tool, such as TortoiseGit. Here we will use the command line and, where applicable, show the equivalent command in Eclipse eGit. |
NOTE: If you want to propose a simple code change, you can do it directly from Github.com, without setting up anything on your local PC. See [[Using_the_Github_UI_to_Make_Pull_Requests|Using the Github UI to Make Pull Requests]]. | NOTE: If you want to propose a simple code change, you can do it directly from Github.com, without setting up anything on your local PC. See [[Using_the_Github_UI_to_Make_Pull_Requests|Using the Github UI to Make Pull Requests]]. | ||
| Line 54: | Line 54: | ||
To create a remote called "upstream" that points to the main CMS repository, enter this command: | To create a remote called "upstream" that points to the main CMS repository, enter this command: | ||
| − | <code>git remote add upstream <nowiki>https://github.com/joomla | + | <code>git remote add upstream <nowiki>https://github.com/joomla/joomla-cms.git</nowiki></code> |
| + | |||
| + | Note, if you get a error like "fatal: Not a git repository (or any of the parent directories): .git", then make sure you've changed directory to the new repository that's been created within the current directory (so one level lower). | ||
===Eclipse Command=== | ===Eclipse Command=== | ||
| Line 114: | Line 116: | ||
====CLI Commands==== | ====CLI Commands==== | ||
| − | <code>git | + | <code>git branch xxx</code> where "xxx" is the new branch name. Note: If you already have a branch you are working on, use the command: <code>git checkout xxx</code>. |
====Eclipse Commands==== | ====Eclipse Commands==== | ||
| Line 163: | Line 165: | ||
# Enter the command: <code>git diff master > my-new-patch.patch</code> | # Enter the command: <code>git diff master > my-new-patch.patch</code> | ||
This will create a patch file in that same folder. (Note that you may want to have Git automatically ignore all patch files. See the section called Git Tips below.) Upload that file to the Joomlacode tracker and add a comment and change the issue status as needed. | This will create a patch file in that same folder. (Note that you may want to have Git automatically ignore all patch files. See the section called Git Tips below.) Upload that file to the Joomlacode tracker and add a comment and change the issue status as needed. | ||
| + | To include changes to binary files in the diff add the <code>--binary</code> option to the command line as follows: | ||
| + | # Enter the command: <code>git diff --binary master > my-new-patch.patch</code> | ||
Note that this method does not require you to push your local branches to Github. | Note that this method does not require you to push your local branches to Github. | ||
| Line 169: | Line 173: | ||
As discussed earlier, the main CMS repository on Github is being changed frequently. It is possible that one or more of these changes could conflict with (or otherwise affect) our work. For this reason, it is very important that we keep our repositories up to date. Otherwise, our patch files and pull requests may not work. As discussed earlier, the way we will do this is by keeping our master branch synchronized with the main CMS repository and then using that to update our working branches. | As discussed earlier, the main CMS repository on Github is being changed frequently. It is possible that one or more of these changes could conflict with (or otherwise affect) our work. For this reason, it is very important that we keep our repositories up to date. Otherwise, our patch files and pull requests may not work. As discussed earlier, the way we will do this is by keeping our master branch synchronized with the main CMS repository and then using that to update our working branches. | ||
| − | In this tutorial we are using the git | + | In this tutorial we are using the git merge command. The merge command merges the changes from a different branch into the current branch. Here we use the merge to merge changes from the master branch into our working branch. For example, say we created a branch (my-branch) on day 1. On day 2, someone does 5 commits to the master branch in the main CMS repository. Now, on day 3 we want to update our branch to be current with these 5 commits. The merge command tries to do this automatically. It looks to see what was changed in the master branch since our last merge and applies those same changes to our current branch ("my-branch"). This will work automatically unless we have made changes that conflict with changes made in the same files in the main repository. In that case, we need to resolve these conflicts before we can finish updating our branch. |
To update a working branch with changes to the main CMS repository, follow these steps. | To update a working branch with changes to the main CMS repository, follow these steps. | ||
| Line 177: | Line 181: | ||
#* Push those changes to your Github repository: <code>git push origin master</code> | #* Push those changes to your Github repository: <code>git push origin master</code> | ||
# Now your local master branch is up to date. Next, change to your working branch: <code>git checkout my-branch</code> | # Now your local master branch is up to date. Next, change to your working branch: <code>git checkout my-branch</code> | ||
| − | # | + | # Make sure your remote repository "my-branch" is up to date with your local repository. Use the command: <code>git push origin my-branch</code>. If the remote repository was already up to date, no harm is done. You will just get a message saying it was already up to date. |
| − | # The system will work for a short time and then indicate whether the | + | # Finally, merge the new changes to the master branch with your working branch. The command is as follows: <code>git merge master</code> |
| + | # The system will work for a short time and then indicate whether or not the merge was successful. If you don't have any changes that conflict with changes from the main CMS repository, the merge will be successful. If one or more of your changes conflicts with the changes that were made in the main repository, any affected files will be flagged as being in conflict. See the Fixing Conflicts section below for more information about this. | ||
| − | You can also use Eclipse for the | + | You can also use Eclipse for the merge by changing to the working branch and selecting Team→Merge→. This will show the following screen. [[File:Git-coders-tutorial-20121027-01.png|frame|none]] Select Local->master as shown above and click Merge. |
== Fixing Conflicts == | == Fixing Conflicts == | ||
| − | A conflict occurs during a | + | A conflict occurs during a merge (or rebase) if the same file has been changed in the local branch and in the master branch in a way that conflicts. If this happens, the file is flagged as being in conflict and the merge process is suspended. To complete the process, you need to: |
# Manually edit each of the flagged. You will see the changes from your branch and the changes from the main repository highlighted in the file. You need to figure out what should be in the file. | # Manually edit each of the flagged. You will see the changes from your branch and the changes from the main repository highlighted in the file. You need to figure out what should be in the file. | ||
# Once you have edited each flagged file, enter the command <code>git add xxx</code> where "xxx" is the name of the flagged file. | # Once you have edited each flagged file, enter the command <code>git add xxx</code> where "xxx" is the name of the flagged file. | ||
| − | Let's look at a simple example. Here we have added a line of code to a file in our branch and someone has added a different line to the same file in the master branch. When we do the | + | Let's look at a simple example. Here we have added a line of code to a file in our branch and someone has added a different line to the same file in the master branch. When we do the merge command, we get the following message. |
| − | $ git | + | $ git merge master |
| − | + | Removing administrator/templates/hathor/html/mod_submenu/default.php | |
| − | |||
| − | |||
| − | |||
| − | |||
| − | |||
| − | |||
Auto-merging administrator/components/com_admin/script.php | Auto-merging administrator/components/com_admin/script.php | ||
| − | CONFLICT (content): Merge conflict in administrator/components/com_admin/script | + | CONFLICT (content): Merge conflict in administrator/components/com_admin/script |
| − | + | php | |
| − | + | Automatic merge failed; fix conflicts and then commit the result. | |
| − | |||
| − | |||
| − | |||
| − | |||
| − | |||
So this tells us we have a conflict in the file <code>administrator/components/com_admin/script.php</code>. If we look at this file in our text editor, we see the following: [[File:Git-coders-tutorial-20121009-17.png|frame|none]] The line under "<<<<<<< HEAD" is from the master branch of the main repository. The line after the "=======" is from our working branch. | So this tells us we have a conflict in the file <code>administrator/components/com_admin/script.php</code>. If we look at this file in our text editor, we see the following: [[File:Git-coders-tutorial-20121009-17.png|frame|none]] The line under "<<<<<<< HEAD" is from the master branch of the main repository. The line after the "=======" is from our working branch. | ||
| Line 211: | Line 205: | ||
At this point, we need to correct the file and remove the "marker" lines. Then we do the command <code>git add administrator/components/com_admin/script.php</code> to tell Git that the conflict is resolved. | At this point, we need to correct the file and remove the "marker" lines. Then we do the command <code>git add administrator/components/com_admin/script.php</code> to tell Git that the conflict is resolved. | ||
| − | Finally, we do the command <code>git | + | Finally, we do the command |
| + | |||
| + | <code>git commit -a</code> | ||
| + | |||
| + | to finish the merge. This commits all of the changes that were applied automatically by the merge as well as the changes we have done manually in fixing the conflicts. | ||
| + | |||
| + | If we want to abandon the merge instead of fixing the conflicts, we can use the following commands to reset our branch back to its state before the merge: | ||
| − | + | <code>git reset --hard</code> | |
| + | |||
| + | <code>git clean -f -d</code> | ||
===Using Eclipse For Conflicts=== | ===Using Eclipse For Conflicts=== | ||
| − | Eclipse is very handy for resolving commits. When you do the command Team→ | + | Eclipse is very handy for resolving commits. When you do the command Team→Merge and there is a conflict, you get the following window. [[File:Git-coders-tutorial-20121027-02.png|frame|none]] You will also see a red square annotation in the PHP Explorer window next to each file with a conflict. |
| − | |||
| − | |||
| − | + | To see all of the files in conflict you can use the Merge Tool. Right click on the PHP project and select Team→Merge Tool. You will see the following option. [[File:Git-coders-tutorial-20121009-20.png|frame|none]] | |
This gives you the option of having Git put in the changes from both sources in the file or letting you compare the changes side by side. If you select Use HEAD version you get a file compare similar to the following. [[File:Git-coders-tutorial-20121009-21.png|frame|none]] | This gives you the option of having Git put in the changes from both sources in the file or letting you compare the changes side by side. If you select Use HEAD version you get a file compare similar to the following. [[File:Git-coders-tutorial-20121009-21.png|frame|none]] | ||
| Line 228: | Line 228: | ||
Once the file has been fixed, select the file (either by right-clicking in the PHP Explorer view or in the editor) and select Team→Add to Index as shown below. [[File:Git-coders-tutorial-20121009-22.png|frame|none]]When you do this, the red square annotation will disappear. | Once the file has been fixed, select the file (either by right-clicking in the PHP Explorer view or in the editor) and select Team→Add to Index as shown below. [[File:Git-coders-tutorial-20121009-22.png|frame|none]]When you do this, the red square annotation will disappear. | ||
| − | Once all the conflicts are resolved, you can finish the | + | Once all the conflicts are resolved, you can finish the merge by right-clicking on the project and selecting Team→Commit. The normal commit screen will show as follows. [[File:Git-coders-tutorial-20121027-03.png|frame|none]] Notice that the files that were in conflict are automatically added to the commit message. Edit the commit message as desired and click the Commit button. At this point, the merge is complete. |
== Saving Your User Name and Password == | == Saving Your User Name and Password == | ||
| Line 270: | Line 270: | ||
[[Category:Bug Squad]] | [[Category:Bug Squad]] | ||
[[Category:Development]] | [[Category:Development]] | ||
| + | [[Category:GitHub]] | ||
Revision as of 17:09, 17 December 2013
Overview[edit]
This article shows you how to use Git and Github to code and submit changes to the Joomla CMS. If you are not familiar with Git, you may wish to read the tutorial Git for Testers and Trackers first.
IMPORTANT NOTE: Git is a very powerful system and there is usually more than one way to accomplish the same thing in Git. This tutorial does not try to cover all of the different ways you could do these tasks. Instead, it covers one (hopefully simple) way to do it. As you become more familiar with Git, you may find other ways that work better for you.
The first step is to set up the remote and local Git repositories. You do this once. Once it is set up, the normal workflow is:
- Update your local and remote repositories with changes others have committed to the main Joomla CMS repository.
- Create a branch for each issue or feature you are working on and commit your changes to the branch in your local repository.
- Update your remote repository on Github with your branches.
- Create a pull request from your Github branch. Alternatively, you can create a patch or diff file from your local branch and post that to the tracker.
- Update the Joomla Issue tracker or Joomla Feature tracker so that others can test your code.
Each of these steps is explained below. Note that you can use Git from the command line, from an IDE such as Eclipse (with the eGit plugin), or from a stand-alone tool, such as TortoiseGit. Here we will use the command line and, where applicable, show the equivalent command in Eclipse eGit.
NOTE: If you want to propose a simple code change, you can do it directly from Github.com, without setting up anything on your local PC. See Using the Github UI to Make Pull Requests.
Setup[edit]
Create Your Forked Repository on Github[edit]
Github allows you to create your own copy of any public repository, including the Joomla CMS. This is your personal copy of the repository and is called a "fork". To create a fork of the Joomla CMS:
- If you haven't already, register on Github.com and log in.
- Navigate to https://github.com/joomla/joomla-cms
- Click on the Fork button in the upper right part of the screen.
Note that you can only create one fork of any given repository. However, as we will see, you can create as many branches (versions) of your repository as you like.
Clone Your Github Repository To Your PC[edit]
At this point, you have your own repository on Github.com. Now you need to create a local repository that is a copy (called a "clone") of the Github repository. To do this:
CLI (command line) Commands[edit]
- Change directory to the directory where you want the Joomla files to be stored (for example,
C:\xampp\htdocs\joomla\my-projector/opt/lampp/htdocs/joomla/my-project). - Enter the command:
git clone https://github.com/<your Github user name>/joomla-cms.git .For example, if your Github user name is "joomla-coder", the command would be:git clone https://github.com/joomla-coder/joomla-cms.git .
You can get the URL for the command above from your repository at Github.com as shown below.

Note that the "." dot just tells Git to put the new repository in the current directory. The system will work for a few minutes while it downloads all of the files. When it is finished, you will have a complete set of Joomla files under version control in the current directory.
Eclipse Commands[edit]
- If you like, you can get the URL from Github as shown below. You will use this later on.

- In Eclipse, open the Git Repositories view and click the button called "Clone a Git Repository and add the clone to this view" as shown below. .

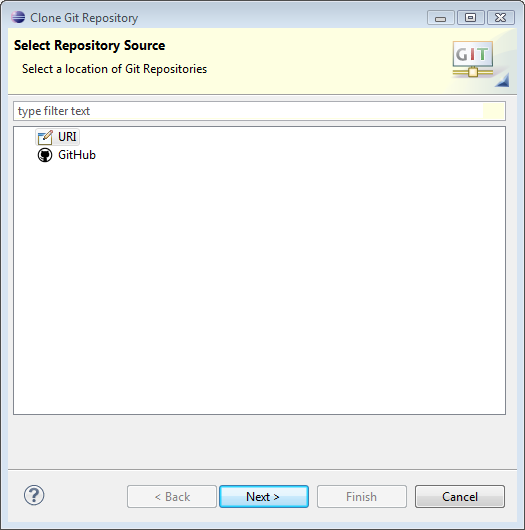
- The window below will show. Select URI and click Next.
- The window below will show. Enter the Github URL for your repository (from step (1) above). Enter your Github user name and password and check the box called "Store in Secure Store".

- Click Next and the window below will show.
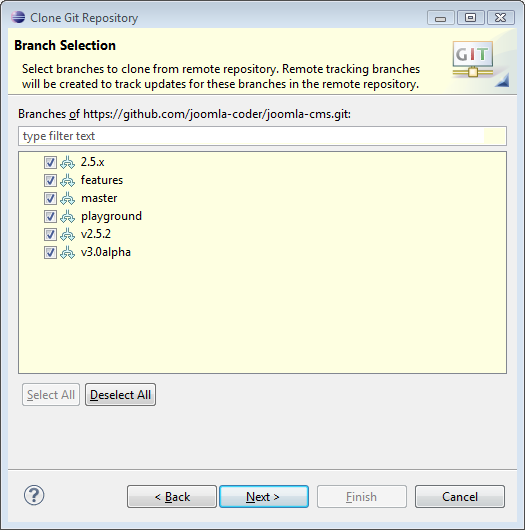
- Click Next to select all branches. The window below will show.

- In Directory, enter the folder where you want the Joomla files to be copied. Keep the default values for Initial branch ("master") and Remote name ("origin") as shown.
- Click Finish. The system will work for a few minutes. When it finishes you will have a clone of the remote repository.


Create an Upstream Remote[edit]
Now we have our local repository. This has a remote called "origin" that points to our personal fork of Joomla on Github.
In a project like Joomla, many users are submitting bug fixes and features. These changes are committed to the main Joomla CMS repository frequently. It is up to each coder to keep their personal repositories up to date with these changes. Fortunately, as we will see, this is easy to do.
The last step in the setup is to create a second remote called "upstream" that points to the main Joomla CMS repository. We will use this remote to pull changes that others make to the main Joomla repository so we can keep our personal repositories up to date.
CLI Command[edit]
To create a remote called "upstream" that points to the main CMS repository, enter this command:
git remote add upstream https://github.com/joomla/joomla-cms.git
Note, if you get a error like "fatal: Not a git repository (or any of the parent directories): .git", then make sure you've changed directory to the new repository that's been created within the current directory (so one level lower).
Eclipse Command[edit]
Unknown at this time.
At this point, you have your personal remote repository (created by "forking" the Joomla CMS project) and your personal local repository (created with CLI or Eclipse). Now you are ready to code patches and features.
Normal Workflow[edit]
Now that we have done our one-time setup, we are ready to start our normal workflow. This is outlined below.
Create a New Feature or Bug Fix Change[edit]
Let's say you are ready to start working on a new bug fix or a new feature. Here are the steps you would normally follow.
- Update your master branches. Update the master branch of your local and Github repositories with the latest CMS changes.
- Create a branch for writing the new code
- In the new branch, code the changes and commit them. Depending on the length of time, you can make multiple commits to the branch.
- When you are ready to propose your code for testing (or when you want others to be able to see it), push the branch to your Github repository.
- When you are ready to submit the code, either:
- Create a pull request on Github, or
- Create a patch or diff file and post to the Joomlacode tracker.
Each of these steps is explained in more detail below.
Update Your Master Branches[edit]
You need to keep your repositories up to date with changes made by others in the main CMS repository. It's easy to do, and here are the steps. These are done more easily with the CLI than with Eclipse.
IMPORTANT NOTE: Make sure you never commit your own code changes to the master branch. If you do, you won't be able to keep it synchronized with the master branch on the main CMS repository.
CLI Commands[edit]
- Make sure you are in your master branch of your local repository (
git checkout master). If you aren't sure, you can use the commandgit statusto see what branch you are on. - Enter the command:
git pull upstream master. You should get a message showing the changes, similar to this:
$ git pull upstream master
From https://github.com/joomla/joomla-cms
 * branch            master     -> FETCH_HEAD
Updating 76feee8..294c62c
Fast-forward
 installation/CHANGELOG                |    3 +++
 installation/language/fr-FR/fr-FR.ini |    2 +-
 2 files changed, 4 insertions(+), 1 deletion(-)
Mark@MARK2009 /c/xampp/htdocs/joomla-coder/joomla-cms (master)
- If your local repository was already up to date, you will get a message like this:
$ git pull upstream master
From https://github.com/joomla/joomla-cms
 * branch            master     -> FETCH_HEAD
Already up-to-date.
- At this point, your local master branch is up to date with the main CMS repository. Now you need to update the master branch of your Github repository. Enter the command:
git push origin master. You should see a message like this:
$ git push origin master
To https://github.com/joomla-coder/joomla-cms.git
   76feee8..294c62c  master -> master
NOTE: If you haven't stored your user name and password, you will be prompted for them after you enter the push command. See below for how to store your credentials so you don't have to type them each time.
At this point, your master branches on your local and Github repositories are up to date with the main CMS repository. Now, when you create a new branch, it will start at this point and be based on the latest code.
Create a Branch for the Code[edit]
In Git, the best practice is to use a branch for each bug fix or feature. (In fact, experienced Git users will often create more than one branch for an individual project, perhaps trying different approaches to the problem.) It is super easy to create, delete, and even combine branches. Use a naming convention that allows you to keep track. For example, you could incorporate the tracker issue number into the branch name (for example, "php-notice-12345").
When you create a new branch, it starts from the branch you are currently on. For this reason, you will normally want to make sure you are in your master branch when creating a new one.
CLI Commands[edit]
git branch xxx where "xxx" is the new branch name. Note: If you already have a branch you are working on, use the command: git checkout xxx.
Eclipse Commands[edit]
- Left-click on the PHP project and select Team→Switch To→New Branch as shown below. . The screen below will show.


- Fill in the name of the new branch and click finish.


Code and Commit to the Branch[edit]
Finally, we are to the fun part! Here we are actually coding and testing our feature or bug fix. The normal workflow is as follows:
- Do some coding.
- Commit your work to your branch.
- Repeat until you are done.
Here are the commands to commit your work to your branch. Make sure you are in the right branch before committing! (Use git status to check.)
CLI Commands[edit]
- To commit all of the changes since the last commit:
git commit -m "My commit message" -a - To undo any file changes since the last commit:
git reset --hard - To remove any added files and folder since the last commit:
git clean -d -f - To change the last commit:
git commit --amend
Eclipse Commands[edit]
- To commit all changes, right-click on project, select Team→Commit to show this window.

- To undo any file changes since the last commit, select Team→Reset and check the Hard Reset Type as shown below.

- To change the last commit, select Team→Commit and check the Amend Previous Commit button (as shown in the Commit Changes screenshot above).


Push Branch to Github[edit]
In the previous workflow, we created the branch and committed changes to our local repository. If we want others to be able to see the branch or to create a pull request, we need to push the branch to our personal repository on Github.
CLI Command[edit]
To push a branch to your personal Github repository: git push origin xxx (where "xxx" is the name of your branch).
Submit Pull Request or Patch File[edit]
There are two ways you can submit a proposed code change to the Joomla CMS project. One is to submit a pull request via Github, the other is to create a patch or diff file. In general, pull requests are preferred for very large changes, whereas both work fine for smaller changes.
Create a Pull Request[edit]
- Navigate to your personal Github repository.
- Select the branch that has the changes for the pull request as shown below.

- Click the Pull Request button on the top of the screen. The screen will show as below.

- The left side shows the base repository and base branch. This will normally be the master branch of the "joomla/joomla-cms" repository. The right side shows the head repository and branch. This will normally be your repository and the branch that has the desired code changes. If you like you can change the commit message and enter in a comment describing this pull request.
- You can review the pull request using the tabs across the top. Clicking the Commits tab shows the commit history for the branch, as shown below.

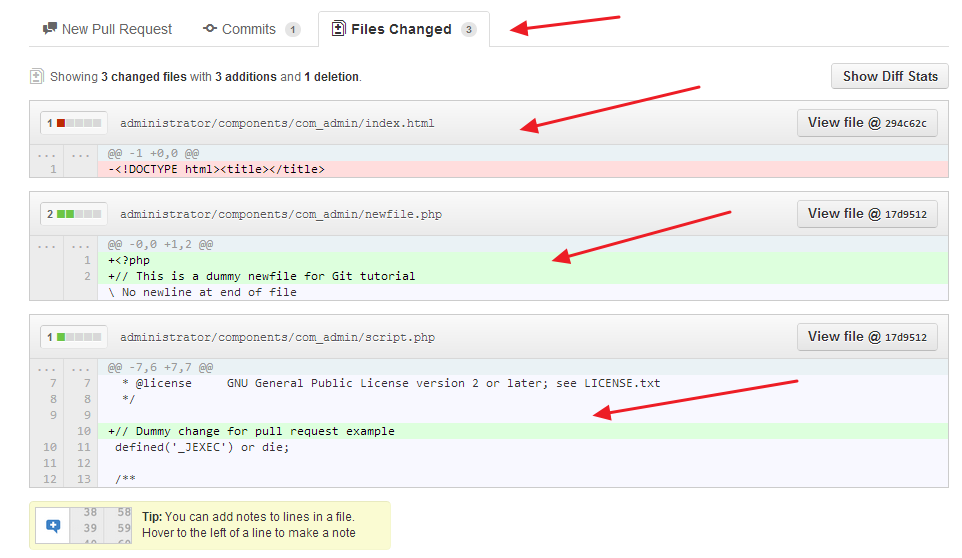
- Clicking the Files Changed tab shows all of the changes made in this branch, as shown here.
- When you are ready to submit the pull request, click the Send Pull Request button at the bottom right of the screen. Github will process the request and then display it as shown below.

- At this point, you should update the Joomlacode tracker. For example, if this code is a fix for a Confirmed issue, you should change the issue status to Pending and add a comment with a link to the pull request (for example, https://github.com/joomla/joomla-cms/pull/494). Also, make sure there are good test instructions so people can test the proposed code.


Create a Patch File[edit]
It is not necessary to create a pull request to submit code changes to Joomla. Another alternative is to create a patch file. This can be done on your local system from the command line as follows:
- In your local system, change to the desired branch.
- Enter the command:
git diff master > my-new-patch.patch
This will create a patch file in that same folder. (Note that you may want to have Git automatically ignore all patch files. See the section called Git Tips below.) Upload that file to the Joomlacode tracker and add a comment and change the issue status as needed.
To include changes to binary files in the diff add the --binary option to the command line as follows:
- Enter the command:
git diff --binary master > my-new-patch.patch
Note that this method does not require you to push your local branches to Github.
Keep Your Repositories Up to Date[edit]
As discussed earlier, the main CMS repository on Github is being changed frequently. It is possible that one or more of these changes could conflict with (or otherwise affect) our work. For this reason, it is very important that we keep our repositories up to date. Otherwise, our patch files and pull requests may not work. As discussed earlier, the way we will do this is by keeping our master branch synchronized with the main CMS repository and then using that to update our working branches.
In this tutorial we are using the git merge command. The merge command merges the changes from a different branch into the current branch. Here we use the merge to merge changes from the master branch into our working branch. For example, say we created a branch (my-branch) on day 1. On day 2, someone does 5 commits to the master branch in the main CMS repository. Now, on day 3 we want to update our branch to be current with these 5 commits. The merge command tries to do this automatically. It looks to see what was changed in the master branch since our last merge and applies those same changes to our current branch ("my-branch"). This will work automatically unless we have made changes that conflict with changes made in the same files in the main repository. In that case, we need to resolve these conflicts before we can finish updating our branch.
To update a working branch with changes to the main CMS repository, follow these steps.
- Update your local master branch.
- Make sure you are on the master branch in your local repository:
git checkout master - Pull changes from the main CMS repository:
git pull upstream master - Push those changes to your Github repository:
git push origin master
- Make sure you are on the master branch in your local repository:
- Now your local master branch is up to date. Next, change to your working branch:
git checkout my-branch - Make sure your remote repository "my-branch" is up to date with your local repository. Use the command:
git push origin my-branch. If the remote repository was already up to date, no harm is done. You will just get a message saying it was already up to date. - Finally, merge the new changes to the master branch with your working branch. The command is as follows:
git merge master - The system will work for a short time and then indicate whether or not the merge was successful. If you don't have any changes that conflict with changes from the main CMS repository, the merge will be successful. If one or more of your changes conflicts with the changes that were made in the main repository, any affected files will be flagged as being in conflict. See the Fixing Conflicts section below for more information about this.
You can also use Eclipse for the merge by changing to the working branch and selecting Team→Merge→. This will show the following screen.

Select Local->master as shown above and click Merge.
Fixing Conflicts[edit]
A conflict occurs during a merge (or rebase) if the same file has been changed in the local branch and in the master branch in a way that conflicts. If this happens, the file is flagged as being in conflict and the merge process is suspended. To complete the process, you need to:
- Manually edit each of the flagged. You will see the changes from your branch and the changes from the main repository highlighted in the file. You need to figure out what should be in the file.
- Once you have edited each flagged file, enter the command
git add xxxwhere "xxx" is the name of the flagged file.
Let's look at a simple example. Here we have added a line of code to a file in our branch and someone has added a different line to the same file in the master branch. When we do the merge command, we get the following message.
$ git merge master
Removing administrator/templates/hathor/html/mod_submenu/default.php
Auto-merging administrator/components/com_admin/script.php
CONFLICT (content): Merge conflict in administrator/components/com_admin/script
php
Automatic merge failed; fix conflicts and then commit the result.
So this tells us we have a conflict in the file administrator/components/com_admin/script.php. If we look at this file in our text editor, we see the following:

The line under "<<<<<<< HEAD" is from the master branch of the main repository. The line after the "=======" is from our working branch.
At this point, we need to correct the file and remove the "marker" lines. Then we do the command git add administrator/components/com_admin/script.php to tell Git that the conflict is resolved.
Finally, we do the command
git commit -a
to finish the merge. This commits all of the changes that were applied automatically by the merge as well as the changes we have done manually in fixing the conflicts.
If we want to abandon the merge instead of fixing the conflicts, we can use the following commands to reset our branch back to its state before the merge:
git reset --hard
git clean -f -d
Using Eclipse For Conflicts[edit]
Eclipse is very handy for resolving commits. When you do the command Team→Merge and there is a conflict, you get the following window.

You will also see a red square annotation in the PHP Explorer window next to each file with a conflict. To see all of the files in conflict you can use the Merge Tool. Right click on the PHP project and select Team→Merge Tool. You will see the following option.

This gives you the option of having Git put in the changes from both sources in the file or letting you compare the changes side by side. If you select Use HEAD version you get a file compare similar to the following.

The left shows the change from the master branch, and the right shows the change from your working branch. At this point, you can either edit the file in the left side (for example, by pulling in the change from the right side) or you can just manually edit the file in conflict.
Once the file has been fixed, select the file (either by right-clicking in the PHP Explorer view or in the editor) and select Team→Add to Index as shown below.

When you do this, the red square annotation will disappear. Once all the conflicts are resolved, you can finish the merge by right-clicking on the project and selecting Team→Commit. The normal commit screen will show as follows.

Notice that the files that were in conflict are automatically added to the commit message. Edit the commit message as desired and click the Commit button. At this point, the merge is complete.
Saving Your User Name and Password[edit]
When you push changes to Github, it must authenticate you based on your Github user name and password. Normally, the system will simply prompt you for your user name and password each time you do a push.
There are a number of ways you can save your credentials so you don't have to enter them each time. One very simple method is to use the git "store" feature.
IMPORTANT NOTE: This feature stores your password in plain text on your local computer. If this is not acceptable, do not use this method.
If it is OK to store your credentials on your PC, at the command line enter the command: git config --global credential.helper store This tells Git to store your credentials in a file called .git-credentials in your home folder ("for example, C:\users\user-name").
The next time you do a push and enter your credentials, they will be stored in that file. After that, you will not need to enter them. Git will use them automatically.
If you want to change your password, simple delete the file and then change your password on Github. The next time you enter your credentials, the new password will be saved.
Git Tips[edit]
Ignoring Files[edit]
Some files we don't want Git to track. One way to have Git ignore files is to use the "exclude" file. An advantage of this approach is that this file sits outside of your Git project and doesn't get committed to the repository. This is handy when you want your master branch to be identical to the CMS master branch, even if you want to add some file types to ignore.
To use this feature, follow these steps:
- Create a folder called
infounder your.gitfolder. (The .git folder will be at the root of your Joomla project.) - Create a text file in this folder called
excludeand enter in the desired file types to exclude.
Here is an example of a file.
*~
.buildpath
.project
.settings/
tests/system/servers/configdef.php
tests/system/screenshots
configuration.php
logs/error.php
cache/*
administrator/cache/*
*.patch
*.diff
As you can see from the example, we can exclude specific file names or use wild cards.
Once you have this file created, Git will ignore any of these files.