Difference between revisions of "Components Banners Clients Edit"
From Joomla! Documentation
m |
|||
| Line 12: | Line 12: | ||
==Details and Options== | ==Details and Options== | ||
| + | ===Details=== | ||
*'''Client Name.''' The name of the client. This is the name that will display in the Name column of the Banner Client Manager. | *'''Client Name.''' The name of the client. This is the name that will display in the Name column of the Banner Client Manager. | ||
*'''Contact Name.''' The name of the banner client. | *'''Contact Name.''' The name of the banner client. | ||
| Line 20: | Line 21: | ||
*'''Track Clicks.''' Whether or not to track the number of times the banner is clicked by web site visitors. | *'''Track Clicks.''' Whether or not to track the number of times the banner is clicked by web site visitors. | ||
*'''ID.''' The internal Joomla! ID number for the banner. This is not configurable. | *'''ID.''' The internal Joomla! ID number for the banner. This is not configurable. | ||
| − | Metadata Options | + | ===Metadata Options=== |
*'''Meta Keywords.''' Optional keywords to be used for displaying specific banners based on the content of the article being viewed. If the banner module parameter 'Search By Keyword' is set to 'Yes', banners whose keywords match the keywords entered for each article will display when that article is being viewed. | *'''Meta Keywords.''' Optional keywords to be used for displaying specific banners based on the content of the article being viewed. If the banner module parameter 'Search By Keyword' is set to 'Yes', banners whose keywords match the keywords entered for each article will display when that article is being viewed. | ||
*'''Use Own Prefix.''' Whether or not to use the banner's prefix or that of the client. Select ''No'' if you want to use the prefix of the banner client. | *'''Use Own Prefix.''' Whether or not to use the banner's prefix or that of the client. Select ''No'' if you want to use the prefix of the banner client. | ||
Revision as of 21:25, 13 January 2011
Overview[edit]
This screen is accessed from the back-end Joomla! administrator panel. It is used to add or edit banner clients.
How to Access[edit]
Navigate to the the Banner Client Manager. To add a new Banner Client, click on the New icon in the toolbar. To edit an existing Banner Client, click on the Client's Name or check the Client's checkbox and press the Edit icon in the toolbar.
Description[edit]
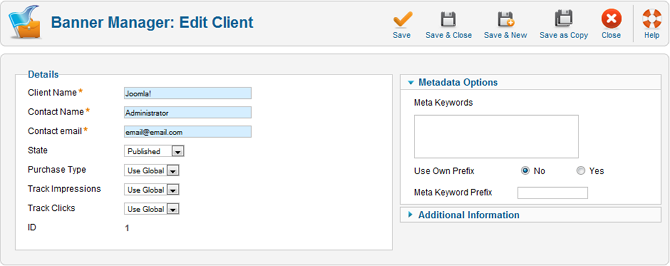
This is where you add a new Banner Client or edit an existing one. Note that you need to create at least one Banner Client before you can create a Banner.
Screenshot[edit]
Details and Options[edit]
Details[edit]
- Client Name. The name of the client. This is the name that will display in the Name column of the Banner Client Manager.
- Contact Name. The name of the banner client.
- Contact E-mail. The e-mail address of the banner client.
- State. The state of the client. Options are Published, Unpublished, Archived and Trash.
- Purchase Type. The purchase type of the banner. This is used to indicate how the banner client purchased the display time for the banner - monthly, yearly, etc...
- Track Impressions. Whether or not to track the number of times the banner is displayed to web site visitors.
- Track Clicks. Whether or not to track the number of times the banner is clicked by web site visitors.
- ID. The internal Joomla! ID number for the banner. This is not configurable.
Metadata Options[edit]
- Meta Keywords. Optional keywords to be used for displaying specific banners based on the content of the article being viewed. If the banner module parameter 'Search By Keyword' is set to 'Yes', banners whose keywords match the keywords entered for each article will display when that article is being viewed.
- Use Own Prefix. Whether or not to use the banner's prefix or that of the client. Select No if you want to use the prefix of the banner client.
- Meta Keyword Prefix. When matching meta keywords, only search for meta keywords with these optional prefixes. This improves performance.
Toolbar[edit]
At the top right you will see the toolbar. Whether you selected to create a new client or edit an existing one will determine what toolbar buttons will be available.
- New client toolbar:
- Edit client toolbar:
- Save. Save your changes and return to editing the client details.
- Save & Close. Save your changes and return to the banner client manager screen.
- Save & New. Save your changes and create a new client.
- Save as Copy (Only available in the client edit screen). Save your changes to a copy of the current client.
- Cancel (Only available in the new client screen). Go back to the main screen of the banner client manager without saving the modifications you made.
- Close (Only available in the banner client edit screen). Go back to the main screen of the banner client manager without saving the modifications you made.
- Help. Opens this help screen.
Related Information[edit]
- To create or edit Banners: Banner - New/Edit
- To work with Banner Categories: Banner Category Manager
- To place Banners on Pages: Module Manager


