Components Weblinks Links
From Joomla! Documentation
Revision as of 17:45, 2 June 2010 by Denis mouraux (talk | contribs) (Added info to the "Permissions Tab" section (inline for now, will create chunks later when the Chunk16 namespace is available))
Overview[edit]
The Web Links Manager allows you to manage links to other web sites and organize them into categories.
How to Access[edit]
Select Components → Weblinks → Links from the drop-down menu on the back-end of your Joomla! installation. Or select the 'Links' link from the Web Links Category Manager.
Description[edit]
The Web Links Manager allows you to add, edit and remove links to other web sites on your Joomla! web site, and organize them into categories. You can then display these links on your site, and optionally let visitors add new links.
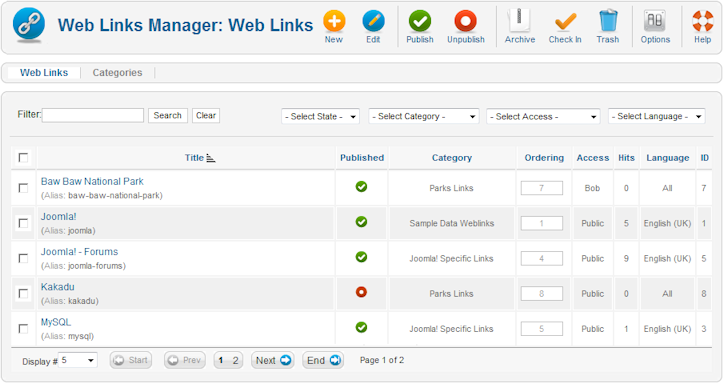
Screenshot[edit]
Column Headers[edit]
- Checkbox. Check this box to select one or more items. To select all items, check the box in the column heading. After one or more boxes are checked, click a toolbar button to take an action on the selected item or items. Many toolbar actions, such as Publish and Unpublish, can work with multiple items. Others, such as Edit, only work on one item at a time. If multiple items are checked and you press Edit, the first item will be opened for editing.
- Title. Web Link Title. Click on the Title to open the Web Link for editing.
- Published. Whether the item has been published or not. You can change the Published state by clicking on the icon in this column.
- Category. The Category this Web Link belongs to. Clicking on the Category title opens the Category for editing. See Web Links Category Manager - Edit.
- Order. The order to display items. If the list is sorted by this column, you can change the order by clicking the arrows or by entering the sequential order and clicking 'Save Order'.
- Access. TBD
- Hits. The number of hits for this Web Link. A hit is the number of times a page has been viewed.
- Language. TBD
- ID. The ID number. This is a unique identification number for this item assigned automatically by Joomla!. It is used to identify the item internally, for example in internal links. You can not change this number.
List Settings[edit]
Filter by Partial Title[edit]
You can filter the list of items by typing in part of the Title or the ID number. Or you can select a combination of Category and Published State.
- Filter. In the upper left corner just above the column headings is a Filter field and two buttons, as shown below: If you have a large number of items on the list, you can use this filter to find the desired item(s) quickly. Enter either part of the title and press 'Go' to display the matching items. You can enter in whole words or part of a word. For example, "ooml" will match all titles with the word "Joomla!" in them. You can also search for a specific item id by entering "id:" followed by the id number. For example, "id:123" will find the item with an id of '123'.
Filter by Access, State, Category and Language[edit]
In the upper right area, above the column headings, are 4 drop-down list boxes as shown below:
The selections may be combined. Only items matching all selections will be displayed in the list.
- Access. TBD
- Select Status. Use the drop-down list box to select the published state: Published, Unpublished, Trashed, or All. For Articles, you may also select Archived. Important: With the default setting of -Select Status-, the screen only shows Published and Unpublished items. If you have the filter set to -Select Status- and you change items to Trashed, the Trashed items will disappear from the screen. However, they have not been permanently deleted. To do that you need to:
- Change the filter to Trashed. The Delete icon will now show in the toolbar.
- Select the items you want to permanently delete.
- Click on the Delete icon.
- You can see all items, regardless of their published state, by selecting All for this filter. You can also re-publish Trashed items by selecting them and clicking on the Publish icon in the toolbar.
- Select Category. Use the drop-down list box to select the desired Category. Only items in this Category will display.
- Language. TBD
Number of Items to Display[edit]
Below the list you'll find:
- Display #. The number of items to display on one page. If there are more items than this number, you can use the page navigation buttons (Start, Prev, Next, End, and page numbers) to navigate between pages. Note that if you have a large number of items, it may be helpful to use the Filter options, located above the column headings, to limit which items display (where applicable).
Toolbar[edit]
At the top right you will see the toolbar:
- New. Click on this button to create a new item. You will enter the New page for this item.
- Edit. Select one item and click on this button to open it in edit mode. If you have more than one item selected (where applicable), the first item will be opened. You can also open an item for editing by clicking on its Title or Name.
- Publish. To publish one or more items, select them and click on this button.
- Unpublish. To unpublish one or more items, select them and click on this button.
- Archive. TBD
- Check In. TBD
- Trash. TBD
- Parameters. Click this button to open the Global Configuration window. This window allows you to set default parameters for this type of item. See Global Configuration.
- Help. Opens this Help Screen.
Global Configuration[edit]
Click the Options button to open the Web links Options window.
Display Tab[edit]
The first tab, shown below, contains display options. These parameters are the default values for Web Links menu items. These setting can be overridden with settings in the Menu Item Manager - New/Edit / Parameters - Component for Web Links screen.
- Save. Press Save to save your settings.
- Cancel. Press Cancel to cancel your changes.
- Description. Show or Hide the Web Links Introduction below.
- Web Links Introduction. Optional text to display above the first Category on the Web Link Category List Layout.
- Hits. Whether to Hide or Show the number of hits for each Web Link.
- Link Descriptions. Hide or Show the Link Description for each Web Link.
- Other Categories. Show also other categories. Note: there must be at least one item assigned in the other category/categories to show it!
- Table Headings. Hide or Show column headings above the fields for the item.
- Target. How to open the link. Options are:
- Parent Window with Browser Navigation. Open the link in the current browser window, allowing Back and Forward navigation.
- New Window with Browser Navigation. Open the link in a new browser window, allowing Back and Forward navigation.
- New Window without Browser Navigation. Open link in a new browser window, not allowing Back and Forward navigation.
- Icon. The Icon to be displayed to the left of the Web Links URL. Select an image file from the drop-down list box. The images are listed from the 'images/M_images' folder.
Permissions Tab[edit]
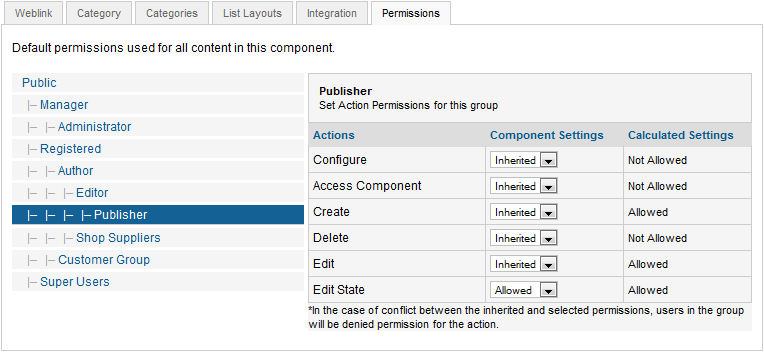
The "Permissions" tab, shown below, lets you specify who can perform each type of action on Web Links:
The Permissions table contains various columns:
- User Groups. Lists the user groups that are available on your Joomla! site. You can specify permissions for each of these groups by using the dropdown controls in the other columns, which represents actions that can be performed by users.
- Admin. Grants users the right to edit this component's Options.
- Manage. Grants users the right to open this component's main screen ("Manager" screen).
- Create. Create new objects (for example, users, menu items, articles, weblinks, and so on).
- Delete. Delete existing objects.
- Edit. Edit existing objects.
- Edit State. Change object state (Publish, Unpublish, Archive, Check In and Trash).
For each user group / action, possible permission options are:
- .... Represents the "Inherit" option, which means that the permission for this group/action is inherited from the site's Global Configuration.
- Deny. Denies this action for this users group.
- Allow. Allows this action for this users group and for child groups.
For more information, please refer to the ACL Tutorial for Joomla 1.6.
Displaying Links on your Site[edit]
One way of displaying links on your site is to use the Weblinks module to list links from a specific category. Another method is to create a menu item of type Weblinks - List All Web Link Categories or Weblinks - List Web Links in a Category to have a page display all Web Links categories, or all inks withing one Web Links category.
Letting Visitors Submit Links[edit]
You might also wish to let visitors submit new Web Links. To do so, simply add a Submit or Edit a Web Link menu item to one of your menus.
Quick Tips[edit]
- You need to add at least one Category for Web Links before you can add your first Web Link. Categories are added using the Web Link Category Manager.
Related Information[edit]
- To add or edit Web Links: Web Link Manager - New/Edit
- To work with Web Links Categories: Web Link Category Manager
- Web Links-related menu items: Weblinks - List Web Links in a Category
- Weblinks module: Weblinks module


