Users User Manager Edit
From Joomla! Documentation
The printable version is no longer supported and may have rendering errors. Please update your browser bookmarks and please use the default browser print function instead.
Allows an administrator to create a new user.
How to access[edit]
To edit an existing user, navigate to the User Manager (Users → User Manager). Then
- Click on the name of the user or
- Click on the check box for the user and click on the edit button.
To create a new user,
- Select Users → User Manager → Add New User from the menu or
- Click on the New button in the User Manager.
Description[edit]
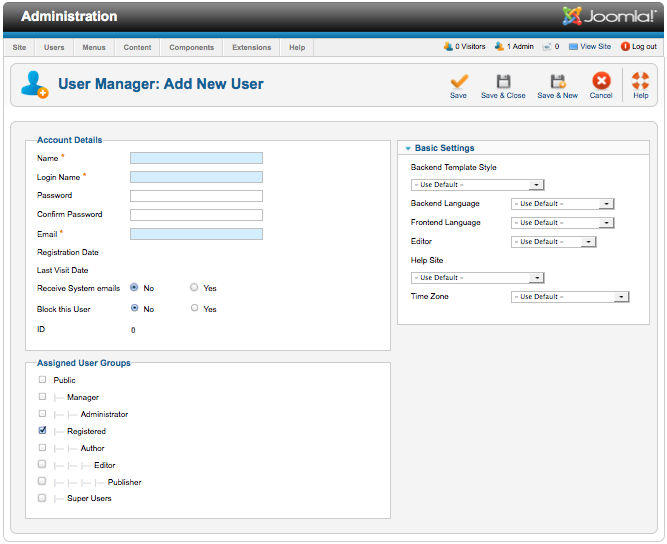
In this screen, you have the ability to create a new user (if you clicked on the 'New' button in the User Manager), or edit an existing user (if you selected a user and clicked on the 'Edit' button in the User Manager, or clicked on the name of a user).
Screenshot[edit]
User Fields[edit]
Account Details
- Name. The (full) name of the user.
- Login Name. The user name that will be entered during login.
- Password. The password that will be entered during login.
- Confirm Password. The same password again (to make sure the password is entered correctly).
- Email. Email address for this user.
- Registration Date. The date this user was registered.
- Last Visit Date. The date this user last logged into the site.
- Receive System E-mails. Here you can select whether to let this user receive the system e-mails or not. Only available when editing Administrators or Super Administrators.
- Block User. Here you can select whether to disable this user or not. Only available when editing Administrators or Super Administrators.
- ID. This is a unique identification number for this item assigned automatically by Joomla!. It is used to identify the item internally, and you cannot change this number. When creating a new item, this field displays 0 until you save the new entry, at which point a new ID is assigned to it.
Assigned User Groups
- Assigned User Groups. Check the box next to each User Group that this user will be a member of. The groups that a user belongs to detemine what actions the user can do on the site and what objects the user can view on the site.
Basic Settings
- Backend Template Style. The template style to use for this user in the administrative backend.
- Back-end Language. Here you can select the back-end language of the user. All installed languages for the back-end will be displayed in the drop-down box. Default is the language set in Language Manager.
- Front-end Language. Here you can select the front-end language of the user. All installed languages for the front-end will be displayed in the drop-down box. Default is the language set in Language Manager.
- Editor. The editor to use for this user.
- Help Site. Set the help site of the user. Default is the Help Server set in the Global Configuration.
- Time Zone. Set the time zone of the user. Default is the Time Zone set in the Global Configuration.
Toolbar[edit]
At the top right you will see the toolbar:
The functions are:
- Save. Saves the user and stays in the current screen.
- Save & Close. Saves the user and closes the current screen.
- Save & New. Saves the user and keeps the editing screen open and ready to create another user.
- Cancel/Close. Closes the current screen and returns to the previous screen without saving any modifications you may have made.
- Help. Opens this help screen.
Quick tips[edit]
- Name, Login Name, and Email are required.
- If you did not fill in a particular language, editor, help site and/or time zone, the default settings from the Global Configuration, Language Manager and/or Template Manager are set.

