Difference between revisions of "Installing Joomla"
From Joomla! Documentation
m (removing RightTOC, not needed and STSVersion notification) |
(A few markup changes.) |
||
| (100 intermediate revisions by 19 users not shown) | |||
| Line 1: | Line 1: | ||
| − | + | {{version|3.x}} | |
| − | + | <noinclude><languages /></noinclude> | |
| + | <translate><!--T:1--> | ||
| + | Installing Joomla! for the first time is very easy. Joomla!’s built-in web installer makes setting up your new site a breeze. | ||
| − | + | == Requirements == <!--T:2--> | |
| + | === Hosting Requirements === | ||
| − | Before we start installing Joomla!, there are a couple prerequisites that need to be met to install Joomla! successfully. These apply whether you have a dedicated server, a shared hosting plan, or are installing a copy on a local computer for testing or development. | + | <!--T:3--> |
| + | Before we start installing Joomla!, there are a couple prerequisites that need to be met to install Joomla! {{ns}} successfully. These apply whether you have a dedicated server, a shared hosting plan server, or are installing a copy on a local computer for testing or development. | ||
| − | + | <!--T:4--> | |
| − | + | You’ll need to meet the following [https://downloads.joomla.org/technical-requirements requirements] to install and use Joomla!</translate> | |
| − | |||
| − | #Download the current release of [ | + | === <translate><!--T:5--> |
| − | #Create a database for use with Joomla! You will need to note basic database information needed when the actual Joomla! installation is started. | + | References</translate> === |
| − | #* Location of | + | <references/> |
| + | <translate> | ||
| + | ==== Recommended ''php.ini'' Settings ==== <!--T:72--> | ||
| + | There are some PHP settings that need to be sufficient for Joomla to install. The settings are usually in a ''php.ini'' or a ''user.ini'' file. Talk to your host about how to change these settings if it is possible to do so. If working on a localhost (XAMPP, MAMP, LAMP and so on) you should not be restricted by these settings and VPS or dedicated hosting should also not be as restrictive. | ||
| + | |||
| + | <!--T:73--> | ||
| + | The suggested values for ''php.ini'' are: | ||
| + | |||
| + | <!--T:74--> | ||
| + | * ''memory_limit'' - '''Minimum:''' 256M | ||
| + | * ''upload_max_filesize'' - '''Minimum:''' 32M | ||
| + | * ''post_max_size'' - '''Minimum:''' 32M | ||
| + | * ''max_execution_time'' - '''Recommended:''' 30 | ||
| + | </translate> | ||
| + | <translate> | ||
| + | == Prepare for Install == <!--T:6--> | ||
| + | You will need to complete two tasks before you can install Joomla! on your server. First, you will need to download the Joomla! package files. Next, you will need to have a database for Joomla! use. | ||
| + | |||
| + | === Downloading and Uploading Joomla! Package Files === <!--T:46--> </translate><!--T:7--> | ||
| + | |||
| + | <!--T:8--> | ||
| + | #<translate><!--T:47--> | ||
| + | Download the current release of [https://downloads.joomla.org/latest Joomla!</translate> {{ns}}] | ||
| + | <translate> | ||
| + | <!--T:9--> | ||
| + | #Move the downloaded Joomla! installation package to the server. Use a [[wikipedia:FTP Client|FTP Client]] to transfer the Joomla! 3.x files to your server. There are several available for use. Here is a detailed [[wp:Comparison_of_FTP_client_software|list of FTP Clients]]. Please make sure you are using an FTP client's official release. | ||
| + | :: Hint - This can be accomplished by simply moving the downloaded package to your server, then unpacking it. Or you can unpack the files on your local computer, then move the Joomla installation over to your server. Either way, the Joomla installation needs to be unpacked in the root folder of your site. | ||
| + | |||
| + | <!--T:75--> | ||
| + | The "root" of your site is the public folder where all web page files are stored so that a user can view the site examples include public_html and htdocs. What your Host uses depends on them.</translate> | ||
| + | |||
| + | {{tip|text=<translate> | ||
| + | <!--T:76--> | ||
| + | Normally you upload your web files to the root folder. This is typically named ''public_html'' but other variations include ''htdocs'' and this depends on what your host has set up on the server. For Joomla purposes, you can load the files directly into ''public_html'' or a sub-folder within it.</translate>|title=<translate> | ||
| + | <!--T:77--> | ||
| + | Your Server's ''root'' Folder</translate>}} | ||
| + | |||
| + | {{warning|title=<translate><!--T:10--> | ||
| + | Warning!</translate>|<translate><!--T:11--> | ||
| + | If you unpack the files on your own computer, then copy them to your server, be sure to move only the folders and files contained '''inside''' the Joomla! package. If you unpack the folders and files into a folder, for example called,</translate> ''Joomla'' <translate><!--T:12--> | ||
| + | and then upload that folder, your site will have to be accessed at</translate> ''yoursitename.com/Joomla'' <translate><!--T:13--> | ||
| + | instead of</translate> ''yoursitename.com''.}} | ||
| + | |||
| + | === <translate><!--T:14--> | ||
| + | Database for Joomla! Installation</translate> === | ||
| + | <translate> | ||
| + | <!--T:15--> | ||
| + | #If you need to create a database, please read '''[[S:MyLanguage/Creating a Database for Joomla!|Create a database for use with Joomla!]]''' first or skip to step #2. | ||
| + | #You will need to note basic database information needed when the actual Joomla! installation is started. | ||
| + | #* Location of database, localhost? Or a specific host's server such as ''dbserver1.yourhost.com''? | ||
#* The database name | #* The database name | ||
#* The database user's name | #* The database user's name | ||
#* The database user's password | #* The database user's password | ||
| − | |||
| − | |||
| − | |||
| − | =Start Install | + | == Start Install == <!--T:16--> |
| − | |||
=== Main Configuration === | === Main Configuration === | ||
| − | With the above requirements met, a database created and the required Joomla! files in place, you are ready to install Joomla!. Start the Joomla! web installer by browsing to the site's domain name | + | With the above requirements met, a database created and the required Joomla! files in place, you are ready to install Joomla!. Start the Joomla! web installer by opening your favorite browser and browsing to the site's domain name. On host installation you will use</translate> ''http://www.yoursitename.com''. <translate><!--T:17--> |
| − | <div style="clear:both; max-width:100%; height:auto; display:inline-block; float:right; margin-left:.3em;">[[File: | + | If your are installing Joomla! locally, you will use</translate> ''http://localhost/path_to_Joomla_files'', <translate> |
| + | <!--T:19--> | ||
| + | and you should see the installation screen</translate>. | ||
| + | <div style="clear:both; max-width:100%; height:auto; display:inline-block; float:right; margin-left:.3em;">[[File:<translate><!--T:20--> | ||
| + | J30_Installation_screen_page_1.png</translate>|border|left|500px]]</div> | ||
| − | Joomla! will try to identify the | + | <translate><!--T:21--> |
| + | Joomla! will try to identify the ''Select Language'' field automatically from your browser's language. You can change this if needed. | ||
| + | <!--T:22--> | ||
Fill in the following information. | Fill in the following information. | ||
| − | *'''Site Name | + | *'''Site Name''': the name of your website — this can be changed at any point later in the [[S:MyLanguage/Help30:Site_Global_Configuration#Site|Site Global Configuration]] page. |
| − | *'''Description | + | *'''Description''': enter a description of the website. This is a ''global fallback'' meta description used on every page which will be used by search engines. Generally, a maximum of 20 to 25 words is optimal. Again, this can be changed on the [[S:MyLanguage/Help30:Site_Global_Configuration#Site|Site Global Configuration]] page at any time. For more on ''metadata'', see [[S:MyLanguage/Help30:Site_Global_Configuration#Metadata_Settings|Global Metadata Settings]] and [[S:MyLanguage/Entering search engine meta-data|Entering search engine meta-data]]. |
| − | *'''Admin Email Address | + | *'''Admin Email Address''': the admin email address. Enter a valid email in case you forget your password. This is the email address where you'll receive a link to change the admin password. |
| − | *'''Admin Username | + | *'''Admin Username''': Joomla! uses a default ''admin'' as the username for the ''SuperUser''. You can leave it as is, change it now (which is a good [[S:MyLanguage/Security_Checklist/Joomla!_Setup#Change the default administrator username|Security measure]]) or use [[S:MyLanguage/Help30:Site_My_Profile|My Profile]] in the ''Administration'' interface to change it later. |
| − | *'''Admin Password | + | *'''Admin Password''': remember that SuperUser has maximum control of the site (Frontend and Backend), so use a unique password. Use [[S:MyLanguage/Help30:Site_My_Profile|My Profile]] in the ''Administrator'' interface to change it later. Confirm the password in the ''Confirm Admin Password'' box. |
| − | *'''Site Offline | + | *'''Site Offline''': click the Yes or No box. Yes - this means when installation is complete, your Joomla! website will display the 'Site is offline' message when you browse to</translate> ''yoursitename.com'' <translate><!--T:23--> |
| + | to view the home page. No - this means the site is live when you browse to</translate> ''yoursitename.com'' <translate><!--T:24--> | ||
| + | to view the home page. You can use the [[S:MyLanguage/Help30:Site_Global_Configuration#Site|Site Global Configuration]] in the ''Administrator'' interface to change the Offline status at any time. | ||
| + | |||
| + | <!--T:25--> | ||
| + | When everything on the first page is completed, click the ''Next'' button to proceed:</translate> | ||
| + | |||
| + | {{-}} | ||
| − | + | <translate>== Database Configuration == <!--T:26--> | |
| − | =Database Configuration= | + | === Configuration Settings === |
| − | === | + | You will need to enter the information about the database you will use for Joomla! now. It was suggested to write this information down under ''Prepare for Install'' tab. You may also read or review [[S:MyLanguage/Creating a Database for Joomla!|Creating a Database for Joomla!]].</translate> |
| − | You will need the information about the database | + | <div style="clear:both; max-width:100%; height:auto; display:inline-block; float:right; margin-left:.5em;">[[File:<translate><!--T:27--> |
| − | <div style="clear:both; max-width:100%; height:auto; display:inline-block; float:right; margin-left:.5em;">[[File: | + | J30_Installation_screen_page_2.png</translate>|border|left|500px]]</div> |
| − | |||
| − | |||
| − | |||
| − | |||
| − | |||
| − | |||
| − | |||
| − | |||
| − | + | <translate><!--T:28--> | |
| + | For simplification, these instructions are a reference to installing with a [[wikipedia:MySQLi|MySQLi]] database. The instructions on the installation page are self explanatory, but here they are again: | ||
| + | * '''Database Type''': MySQLi is the common database used | ||
| + | * '''Hostname''' Where is your database located? Common is ''localhost'', but some hosts use a specific database server such as</translate> ''dbserver1.yourhost.com'' | ||
| + | <translate> | ||
| + | <!--T:29--> | ||
| + | * '''Username''': the username used to connect to the database | ||
| + | * '''Password''': the password for the database's username | ||
| + | * '''Database Name''': the name of the database | ||
| + | * '''Table Prefix''': one is generated automatically, but you can change it. For example, <code>jos3_</code> can be used. Just don't forget to put the underscore character</translate> (_) <translate><!--T:30--> | ||
| + | at the end of the prefix. | ||
| + | * '''Old Database Process''': should the installer backup or delete existing tables during the installation of new tables? Click, Yes or No to select the choice.</translate> | ||
| − | + | <translate><!--T:31--> | |
| + | All these choices can be edited on the [[S:MyLanguage/Help30:Site_Global_Configuration#Server|Site Global Configuration]] page, under Server options after the installation is completed. Note, you will break your installation if you change these settings after installation unless you have a complete copy of the current database being used by the Joomla! installation. Common uses would be to update the username and password of the database or to complete a move of an existing installation to a new host with different parameters. | ||
| − | < | + | <!--T:32--> |
| − | =Finalise= | + | When all the information has been filled in, click the ''Next'' button to proceed:</translate> |
| + | {{-}} | ||
| + | <translate> | ||
| + | |||
| + | == Finalise == <!--T:33--> | ||
=== Overview === | === Overview === | ||
| − | It is now time to finalise the Joomla! installation. The last page of the web | + | It is now time to finalise the Joomla! installation. The last page of the web browser installation contains all the information about the installation. This includes the options (at the top) for installing sample data and the installation's configurations (at the bottom). |
==== Install Sample Data and Email Configurations ==== | ==== Install Sample Data and Email Configurations ==== | ||
| − | The first options are for automatically installing sample content to the website and emailing the configuration settings. | + | The first options are for automatically installing sample content to the website and emailing the configuration settings.</translate> |
| − | <div style="clear:both; max-width:100%; height:auto; display:inline-block; float:right; margin-left:.3em;">[[File: | + | <div style="clear:both; max-width:100%; height:auto; display:inline-block; float:right; margin-left:.3em;">[[File:<translate><!--T:34--> |
| − | If you are new to Joomla! it would be | + | J30_Installation_screen_page_3_top.png</translate>|border|left|500px]]</div> |
| + | <translate><!--T:35--> | ||
| + | If you are new to Joomla! it would be beneficial to install some sample data to see how Joomla! works. You can at this time choose to have the configuration settings emailed to you. If the ''Email Configuration'' choice is selected, the ''Email Password'' choice will appear. The email password is off by default for security. You can choose to have the password included; just click Yes. | ||
| + | <!--T:36--> | ||
Time to check the configurations of your install and the environment of the installation. | Time to check the configurations of your install and the environment of the installation. | ||
| + | </translate> | ||
| + | {{-}} | ||
| + | <translate> | ||
| − | + | == Configuration Check == <!--T:37--> | |
| − | =Configuration Check= | ||
==== Checking Your Configurations ==== | ==== Checking Your Configurations ==== | ||
| − | If everything is in order, you will see the install at the top of the overview page. If not, this is the place to check and see what may be causing an issue. | + | If everything is in order, you will see the install at the top of the overview page. If not, this is the place to check and see what may be causing an issue.</translate> |
| − | <div style="clear:both; max-width:100%; height:auto; display:inline-block; float:right; margin-left:.3em;">[[File: | + | <div style="clear:both; max-width:100%; height:auto; display:inline-block; float:right; margin-left:.3em;">[[File:<translate><!--T:38--> |
| + | J30_Installation_screen_page_3_bottom.png</translate>|border|left|500px]]</div><translate> | ||
| + | <!--T:39--> | ||
The '''section''' is broken into 4 groups: | The '''section''' is broken into 4 groups: | ||
| − | *'''Main Configuration | + | * '''Main Configuration''': all the website specific information, such as the website name, description, admin username, etc. |
| − | *'''Database Configuration | + | * '''Database Configuration''': contains the information about the database Joomla! will use. |
| − | *'''Pre-Installation Check | + | * '''Pre-Installation Check''': these requirements must all be shown as Yes, otherwise you will not be able to install Joomla! With the exception of the PHP Version, the rest are usually controlled in the [[wikipedia:INI_file|php.ini]]. You may need assistance from your host in correcting these settings or checking to see if it is possible to adjust them. |
| − | *'''Recommended Settings | + | * '''Typical PHP settings''' that might cause the install to fail and may need adjusting include: ''memory_limit'', ''max_execution_time'', ''post_max_size'' and ''upload_max_filesize''. For more information, see [http://php.net/manual/en/configuration.file.php PHP configuration file] file. |
| + | * '''Recommended Settings''': these are settings are recommended in your PHP configuration, but will not prevent Joomla! from being installed. Refer to the above instructions on how they may be changed. | ||
| − | If everything is correct and all checks are passed, you may now click the | + | <!--T:40--> |
| + | If everything is correct and all checks are passed, you may now click the ''Install'' button in the top right corner of the ''Overview'' page. This will start the actual installation process. | ||
| − | After you click the | + | <!--T:41--> |
| + | After you click the ''Install'' button, you should see a progress bar with additional information of the installation. Once the installation completes, you should see the success page.</translate> | ||
| − | < | + | {{-}} |
| − | =Finishing Up= | + | <translate> |
| + | == Finishing Up == <!--T:42--> | ||
=== Success and Finishing Up the Installation === | === Success and Finishing Up the Installation === | ||
| − | Congratulations! Joomla! 3 is now installed | + | Congratulations! Joomla! 3 is now installed. If you want to start using Joomla! right way without [[S:MyLanguage/J3.x:Installing_Joomla#Installing_Extra_Languages|installing extra languages]] there is one last step to complete the installation. You must delete the ''Installation Folder''. Click on ''Remove Installation folder'' and a success message will appear. Now you can navigate to the ''Administrator''. Log in by clicking ''Administrator'' or go right to your site by clicking ''Site''.</translate> |
| − | <div align="center" style="max-width:100%; height:auto;">[[File: | + | <div align="center" style="max-width:100%; height:auto;">[[File:<translate><!--T:43--> |
| + | J30_Installation_screen_page_4.png</translate>|border|700px]]</div> | ||
| − | == | + | <translate>=== Installing Extra Languages === <!--T:48--></translate> |
| − | < | + | [[File:<translate><!--T:49--> |
| − | < | + | J3x_Install_Extra_Steps.png</translate>|right|400px|border]] |
| − | <noinclude>[[Category:Installation]][[Category:Joomla! 3.0]]</noinclude> | + | |
| + | <translate><!--T:50--> | ||
| + | Before you complete your installation by deleting the ''Installation Folder'', click on:</translate> | ||
| + | |||
| + | :'''{{rarr}} <translate><!--T:51--> | ||
| + | Extra steps: Install languages</translate>''' | ||
| + | |||
| + | <translate><!--T:52--> | ||
| + | This will continue the installation of Joomla! by taking you to a new installation page.</translate> | ||
| + | {{-}} | ||
| + | |||
| + | <translate>==== Install Languages ==== <!--T:53--></translate> | ||
| + | <translate><!--T:54--> | ||
| + | A list of language packs is displayed.</translate> | ||
| + | |||
| + | [[File:<translate><!--T:55--> | ||
| + | J3x_Language_Installation_screen_page_1.png</translate>|right|450px|border]] | ||
| + | |||
| + | <translate><!--T:56--> | ||
| + | Check the language or language packs you wish to install. Remember:</translate> | ||
| + | <translate> | ||
| + | <!--T:57--> | ||
| + | * Language packs included in custom distributions will not be listed at this stage. They are already installed. | ||
| + | * A version of the packs proposed will match the Joomla Major version (3.0.x, 3.1.x, etc.). The minor version of the pack may not correspond, e.g. you are installing version 3.3.3 and a 3.3.2 language pack is shown. | ||
| + | * Unmatched language packs in the above example may have untranslated strings. | ||
| + | * The unmatched language packs will be offered as an update when the packs are updated by the registered Translation teams. The available update will be shown in the Control panel as well as in {{rarr|Extensions Manager,Update}}. This behavior is similar to {{rarr|Extensions Manager,Install Languages}}. | ||
| + | |||
| + | <!--T:58--> | ||
| + | Click ''Next'' and a progress bar will be display while the language pack or packs are downloaded.</translate> | ||
| + | |||
| + | <translate>==== Choose Default Language ==== <!--T:59--></translate> | ||
| + | <translate><!--T:60--> | ||
| + | When the download is complete, choose the default language for the Site and the Administrator interface.</translate> | ||
| + | |||
| + | <translate> | ||
| + | <!--T:61--> | ||
| + | * Make your choices for default languages.</translate>{{-}}[[File:<translate><!--T:62--> | ||
| + | J3x_Language_Installation_screen_page_2.png</translate>|border]]{{-}} | ||
| + | |||
| + | <translate><!--T:63--> | ||
| + | You may also choose to activate the multilingual features of Joomla! at this time too.</translate> | ||
| + | <translate> | ||
| + | <!--T:64--> | ||
| + | * Click ''Yes'' next to ''Activate the multilingual feature'' | ||
| + | * Two additional choice will appear.</translate>{{-}}[[File:<translate><!--T:65--> | ||
| + | J3x_Language_Installation_screen_page_2_multilingual.png</translate>|600px|border]]{{-}} | ||
| + | <translate> | ||
| + | <!--T:66--> | ||
| + | * '''Install localised content''', yes or no. This will automatically create one content category for each language installed and one featured article with dummy content for each content category installed. | ||
| + | * '''Enable the language code plugin''', yes or no. If enabled, the plugin will add the ability to change the language code in the generated HTML document to improve SEO.</translate> | ||
| + | |||
| + | <translate><!--T:67--> | ||
| + | When you completed all the choices of language installation, click ''Next'' to proceed.</translate> | ||
| + | |||
| + | <translate>==== Finalise ==== <!--T:68--></translate> | ||
| + | <translate><!--T:69--> | ||
| + | You will now be presented with a similar ''Congratulations! Joomla! is now installed.'' screen. The difference will be a notation of the default Administrator and Site language settings, if they were set. You will also not see the ''Extra Steps'' message in the bottom right.</translate> | ||
| + | |||
| + | [[File:<translate><!--T:70--> | ||
| + | J3x_Language_Installation_screen_page_3.png</translate>|center|850px|border]] | ||
| + | |||
| + | <translate><!--T:71--> | ||
| + | Now you can delete the ''Installation Folder''. Click on ''Remove Installation folder'' and a success message will appear. Now you can navigate to the ''Administrator''. Log in by clicking ''Administrator'' or go right to your site by clicking ''Site''.</translate> | ||
| + | |||
| + | <translate> | ||
| + | ==Related Information== <!--T:78--> | ||
| + | </translate> | ||
| + | <translate> | ||
| + | <!--T:79--> | ||
| + | [https://downloads.joomla.org/technical-requirements Technical requirements for Joomla 4]</translate> | ||
| + | |||
| + | <noinclude> | ||
| + | [[Category:Installation{{#translation:}}]] | ||
| + | [[Category:Joomla! 3.x{{#translation:}}]] | ||
| + | [[Category:Joomla! 3.0{{#translation:}}]] | ||
| + | [[Category:Joomla! 3.1{{#translation:}}]] | ||
| + | [[Category:Joomla! 3.2{{#translation:}}]] | ||
| + | [[Category:Joomla! 3.3{{#translation:}}]] | ||
| + | [[Category:Joomla! 3.4{{#translation:}}]] | ||
| + | [[Category:Joomla! 3.5{{#translation:}}]] | ||
| + | [[Category:Joomla! 3.6{{#translation:}}]] | ||
| + | [[Category:Joomla! 3.7{{#translation:}}]] | ||
| + | [[Category:Joomla! 3.8{{#translation:}}]] | ||
| + | [[Category:Joomla! 3.9{{#translation:}}]] | ||
| + | [[Category:Joomla! 3.10{{#translation:}}]] | ||
| + | </noinclude> | ||
Latest revision as of 19:00, 4 October 2022
Installing Joomla! for the first time is very easy. Joomla!’s built-in web installer makes setting up your new site a breeze.
Requirements[edit]
Hosting Requirements[edit]
Before we start installing Joomla!, there are a couple prerequisites that need to be met to install Joomla! 3.x successfully. These apply whether you have a dedicated server, a shared hosting plan server, or are installing a copy on a local computer for testing or development.
You’ll need to meet the following requirements to install and use Joomla!
References[edit]
Recommended php.ini Settings[edit]
There are some PHP settings that need to be sufficient for Joomla to install. The settings are usually in a php.ini or a user.ini file. Talk to your host about how to change these settings if it is possible to do so. If working on a localhost (XAMPP, MAMP, LAMP and so on) you should not be restricted by these settings and VPS or dedicated hosting should also not be as restrictive.
The suggested values for php.ini are:
- memory_limit - Minimum: 256M
- upload_max_filesize - Minimum: 32M
- post_max_size - Minimum: 32M
- max_execution_time - Recommended: 30
Prepare for Install[edit]
You will need to complete two tasks before you can install Joomla! on your server. First, you will need to download the Joomla! package files. Next, you will need to have a database for Joomla! use.
Downloading and Uploading Joomla! Package Files[edit]
- Download the current release of Joomla! 3.x
- Move the downloaded Joomla! installation package to the server. Use a FTP Client to transfer the Joomla! 3.x files to your server. There are several available for use. Here is a detailed list of FTP Clients. Please make sure you are using an FTP client's official release.
- Hint - This can be accomplished by simply moving the downloaded package to your server, then unpacking it. Or you can unpack the files on your local computer, then move the Joomla installation over to your server. Either way, the Joomla installation needs to be unpacked in the root folder of your site.
The "root" of your site is the public folder where all web page files are stored so that a user can view the site examples include public_html and htdocs. What your Host uses depends on them.
Normally you upload your web files to the root folder. This is typically named public_html but other variations include htdocs and this depends on what your host has set up on the server. For Joomla purposes, you can load the files directly into public_html or a sub-folder within it.
If you unpack the files on your own computer, then copy them to your server, be sure to move only the folders and files contained inside the Joomla! package. If you unpack the folders and files into a folder, for example called, Joomla and then upload that folder, your site will have to be accessed at yoursitename.com/Joomla instead of yoursitename.com.
Database for Joomla! Installation[edit]
- If you need to create a database, please read Create a database for use with Joomla! first or skip to step #2.
- You will need to note basic database information needed when the actual Joomla! installation is started.
- Location of database, localhost? Or a specific host's server such as dbserver1.yourhost.com?
- The database name
- The database user's name
- The database user's password
Start Install[edit]
Main Configuration[edit]
With the above requirements met, a database created and the required Joomla! files in place, you are ready to install Joomla!. Start the Joomla! web installer by opening your favorite browser and browsing to the site's domain name. On host installation you will use http://www.yoursitename.com. If your are installing Joomla! locally, you will use http://localhost/path_to_Joomla_files, and you should see the installation screen.

Joomla! will try to identify the Select Language field automatically from your browser's language. You can change this if needed.
Fill in the following information.
- Site Name: the name of your website — this can be changed at any point later in the Site Global Configuration page.
- Description: enter a description of the website. This is a global fallback meta description used on every page which will be used by search engines. Generally, a maximum of 20 to 25 words is optimal. Again, this can be changed on the Site Global Configuration page at any time. For more on metadata, see Global Metadata Settings and Entering search engine meta-data.
- Admin Email Address: the admin email address. Enter a valid email in case you forget your password. This is the email address where you'll receive a link to change the admin password.
- Admin Username: Joomla! uses a default admin as the username for the SuperUser. You can leave it as is, change it now (which is a good Security measure) or use My Profile in the Administration interface to change it later.
- Admin Password: remember that SuperUser has maximum control of the site (Frontend and Backend), so use a unique password. Use My Profile in the Administrator interface to change it later. Confirm the password in the Confirm Admin Password box.
- Site Offline: click the Yes or No box. Yes - this means when installation is complete, your Joomla! website will display the 'Site is offline' message when you browse to yoursitename.com to view the home page. No - this means the site is live when you browse to yoursitename.com to view the home page. You can use the Site Global Configuration in the Administrator interface to change the Offline status at any time.
When everything on the first page is completed, click the Next button to proceed:
Database Configuration[edit]
Configuration Settings[edit]
You will need to enter the information about the database you will use for Joomla! now. It was suggested to write this information down under Prepare for Install tab. You may also read or review Creating a Database for Joomla!.

For simplification, these instructions are a reference to installing with a MySQLi database. The instructions on the installation page are self explanatory, but here they are again:
- Database Type: MySQLi is the common database used
- Hostname Where is your database located? Common is localhost, but some hosts use a specific database server such as dbserver1.yourhost.com
- Username: the username used to connect to the database
- Password: the password for the database's username
- Database Name: the name of the database
- Table Prefix: one is generated automatically, but you can change it. For example,
jos3_can be used. Just don't forget to put the underscore character (_) at the end of the prefix. - Old Database Process: should the installer backup or delete existing tables during the installation of new tables? Click, Yes or No to select the choice.
All these choices can be edited on the Site Global Configuration page, under Server options after the installation is completed. Note, you will break your installation if you change these settings after installation unless you have a complete copy of the current database being used by the Joomla! installation. Common uses would be to update the username and password of the database or to complete a move of an existing installation to a new host with different parameters.
When all the information has been filled in, click the Next button to proceed:
Finalise[edit]
Overview[edit]
It is now time to finalise the Joomla! installation. The last page of the web browser installation contains all the information about the installation. This includes the options (at the top) for installing sample data and the installation's configurations (at the bottom).
Install Sample Data and Email Configurations[edit]
The first options are for automatically installing sample content to the website and emailing the configuration settings.

If you are new to Joomla! it would be beneficial to install some sample data to see how Joomla! works. You can at this time choose to have the configuration settings emailed to you. If the Email Configuration choice is selected, the Email Password choice will appear. The email password is off by default for security. You can choose to have the password included; just click Yes.
Time to check the configurations of your install and the environment of the installation.
Configuration Check[edit]
Checking Your Configurations[edit]
If everything is in order, you will see the install at the top of the overview page. If not, this is the place to check and see what may be causing an issue.

The section is broken into 4 groups:
- Main Configuration: all the website specific information, such as the website name, description, admin username, etc.
- Database Configuration: contains the information about the database Joomla! will use.
- Pre-Installation Check: these requirements must all be shown as Yes, otherwise you will not be able to install Joomla! With the exception of the PHP Version, the rest are usually controlled in the php.ini. You may need assistance from your host in correcting these settings or checking to see if it is possible to adjust them.
- Typical PHP settings that might cause the install to fail and may need adjusting include: memory_limit, max_execution_time, post_max_size and upload_max_filesize. For more information, see PHP configuration file file.
- Recommended Settings: these are settings are recommended in your PHP configuration, but will not prevent Joomla! from being installed. Refer to the above instructions on how they may be changed.
If everything is correct and all checks are passed, you may now click the Install button in the top right corner of the Overview page. This will start the actual installation process.
After you click the Install button, you should see a progress bar with additional information of the installation. Once the installation completes, you should see the success page.
Finishing Up[edit]
Success and Finishing Up the Installation[edit]
Congratulations! Joomla! 3 is now installed. If you want to start using Joomla! right way without installing extra languages there is one last step to complete the installation. You must delete the Installation Folder. Click on Remove Installation folder and a success message will appear. Now you can navigate to the Administrator. Log in by clicking Administrator or go right to your site by clicking Site.

Installing Extra Languages[edit]

Before you complete your installation by deleting the Installation Folder, click on:
- → Extra steps: Install languages
This will continue the installation of Joomla! by taking you to a new installation page.
Install Languages[edit]
A list of language packs is displayed.

Check the language or language packs you wish to install. Remember:
- Language packs included in custom distributions will not be listed at this stage. They are already installed.
- A version of the packs proposed will match the Joomla Major version (3.0.x, 3.1.x, etc.). The minor version of the pack may not correspond, e.g. you are installing version 3.3.3 and a 3.3.2 language pack is shown.
- Unmatched language packs in the above example may have untranslated strings.
- The unmatched language packs will be offered as an update when the packs are updated by the registered Translation teams. The available update will be shown in the Control panel as well as in Extensions Manager → Update. This behavior is similar to Extensions Manager → Install Languages.
Click Next and a progress bar will be display while the language pack or packs are downloaded.
Choose Default Language[edit]
When the download is complete, choose the default language for the Site and the Administrator interface.
- Make your choices for default languages.
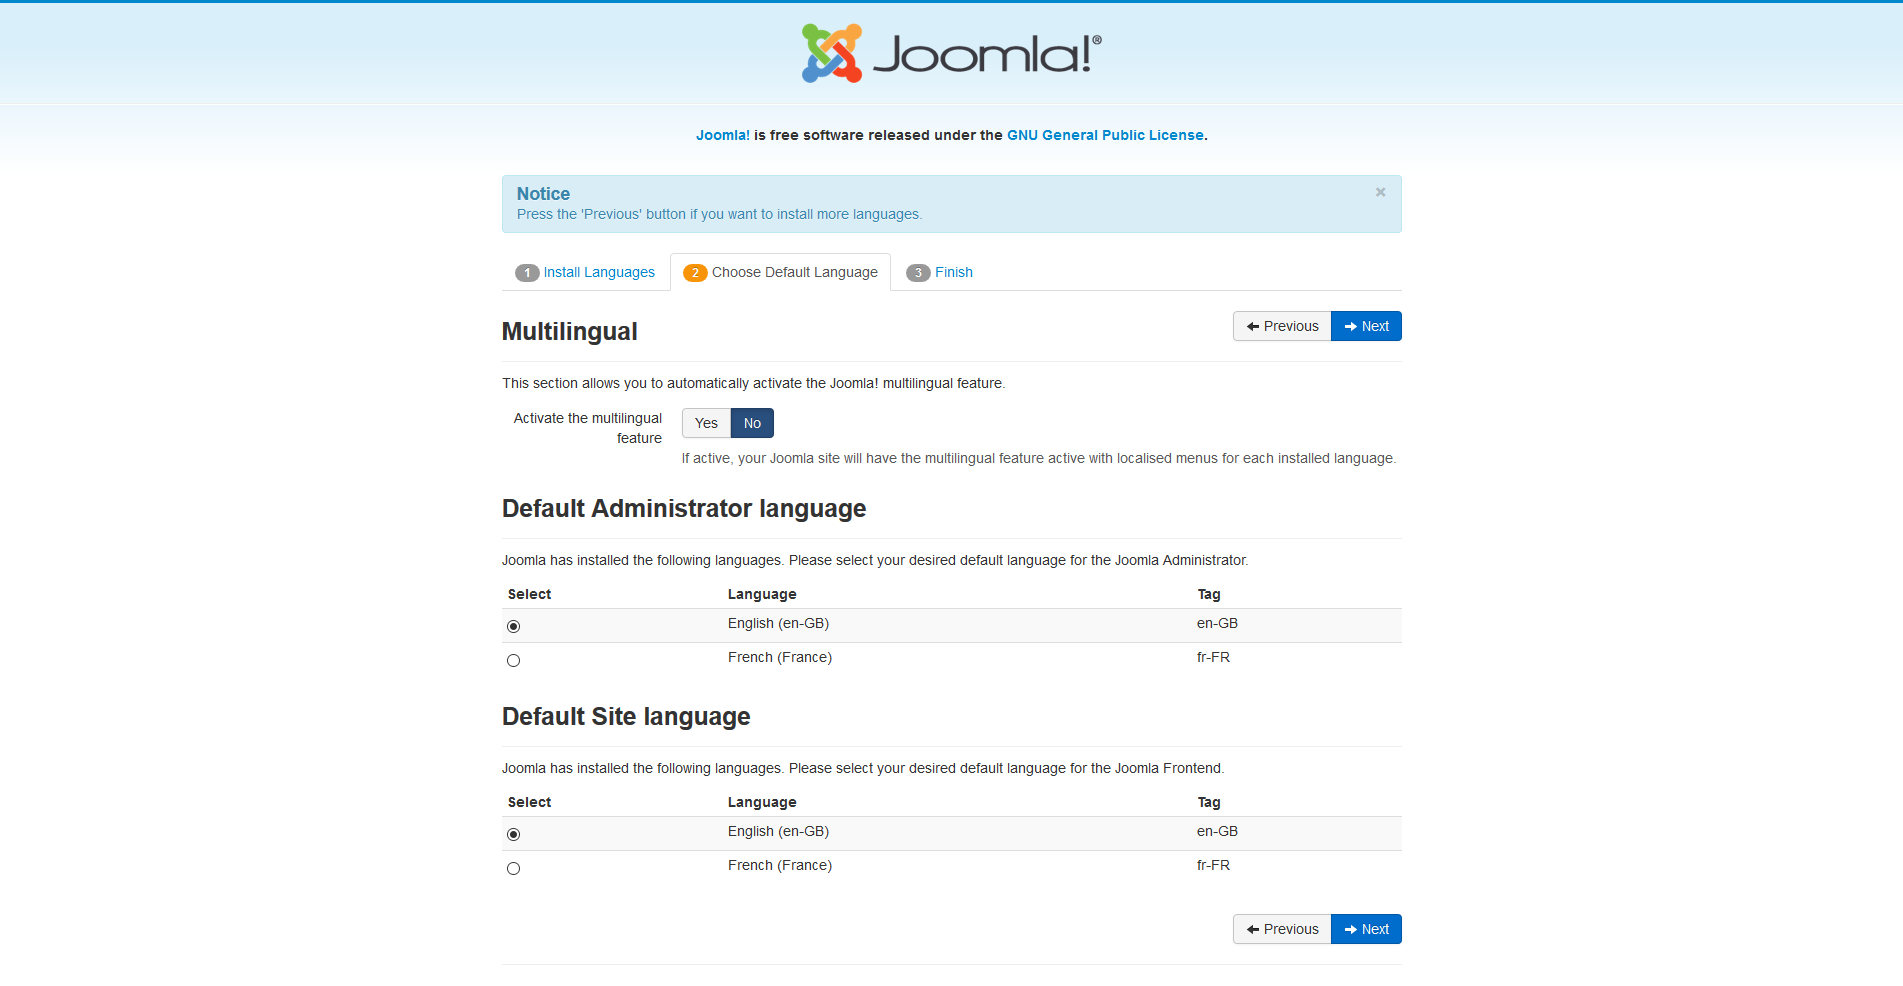

You may also choose to activate the multilingual features of Joomla! at this time too.
- Click Yes next to Activate the multilingual feature
- Two additional choice will appear.

- Install localised content, yes or no. This will automatically create one content category for each language installed and one featured article with dummy content for each content category installed.
- Enable the language code plugin, yes or no. If enabled, the plugin will add the ability to change the language code in the generated HTML document to improve SEO.

When you completed all the choices of language installation, click Next to proceed.
Finalise[edit]
You will now be presented with a similar Congratulations! Joomla! is now installed. screen. The difference will be a notation of the default Administrator and Site language settings, if they were set. You will also not see the Extra Steps message in the bottom right.

Now you can delete the Installation Folder. Click on Remove Installation folder and a success message will appear. Now you can navigate to the Administrator. Log in by clicking Administrator or go right to your site by clicking Site.