تغییر دادن قالب جوملا!
From Joomla! Documentation
Templates are just a group of XML, PHP, HTML and image files that are stored in the templates directory of your site. You can edit these files directly or use the Template Manager.
پیش از شروع
Before you start hacking away at a default installed template or any other template you may have installed, remember that any updates of the Joomla core files may contain new copies of the default Joomla templates. Similarly, editing an installed template means you may have to re-install it to reset it to the original state at installation.
Unless you take steps to protect your work, modifications could be lost when upgrading Joomla. Likewise, you may want to preserve an installed template in case you have any problems with modifications to it.
There are options in the Template Manager to Duplicate and Copy an existing template style or the actual template and template files. This page refers to the methods available to make a full copy of your template. This includes the style and all the template files of a template.
Template Style and Template copying are not the same. You can make a copy of the template style but you are not protected from overwriting the actual template files. Style copying simply adds another entry made in the _template_styles table of the database. This is useful is you want to check a web site design with different fonts, colors, widths or logos if these template style parameters exist. The template files are not duplicated into another uniquely-named directory and they will be overwritten during an upgrade.
Copy the Template
To preserve your changes you need to Copy the template with all its files and styles. This procedure makes references to creating a full copy (an exact duplicate) of the template including all the files. In order to make a copy, you must be on the Customise Template view.
There are two methods available for accessing the Template Manager: Customise Template. The Customise Template interface allows for editing the actual code found in the template files, creating template overrides and template file manipulation.
One-Click or Switch to Template View
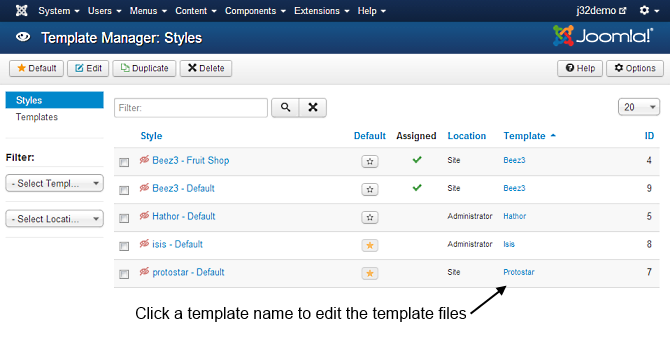
Styles column refers to changing the available parameters of a template, such as color, font-color, logo, etc. These are dependent on the parameters a template maker made available and are a convenience for quick changes. Template - column refers to editing the actual template files.
To access the Template Customise feature:
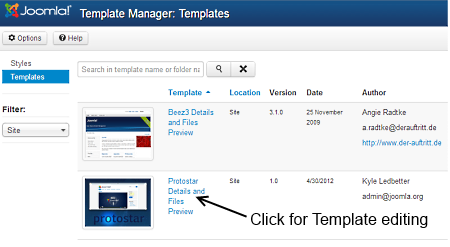
- Directly - Click the template name in the column Template
- Indirectly - Styles will be highlighted, click on Templates below it which will turn the view to Template Manager:Templates, see image below.
Customisation View
You should now be looking at the image below, Template Manager: Customise Template.
Copy an Existing Template
The Easy Way
Create a new template by copying an existing template:
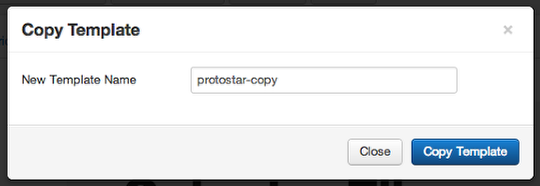
- Click on Copy Template in Toolbar in Template Manager: Customise Template view.
- Provide a new name and click on Copy Template
- The template is completely copied. This includes styles and all the template files.
Manually
- Create a new /templates/my_template directory.
- Copy the contents of the original template directory to the my_template directory.
- Go to the root /language/en-GB directory.
- Copy /language/en-GB/en-GB.tpl_original_template.ini to en-GB.tpl_my_template.ini
- Copy /language/en-GB/en-GB.tpl_original_template.sys.ini to en-GB.tpl_my_template.sys.ini
- Go to the /language/en-GB directory in the template's directory, if it exists.
- Copy /language/en-GB/en-GB.tpl_original_template.ini to en-GB.tpl_my_template.ini
- Copy /language/en-GB/en-GB.tpl_original_template.sys.ini to en-GB.tpl_my_template.sys.ini
- Open the templateDetails.xml file in the my_template directory and change all references, if they exist, for the original template directory to the new directory my_template.
<name>My_Template</name><language tag="en-GB">en-GB.tpl_my_template.ini</language>
<language tag="en-GB">en-GB.tpl_my_template.sys.ini</language><param name="template_header" type="folderlist" directory="templates/my_template/styles/header" default="" label="Header Templates" description="HEADER TEMPLATES DESCRIPTION" />
<param name="template_background" type="folderlist" directory="templates/my_template/styles/background" default="" label="Background Templates" description="BACKGROUND TEMPLATES DESCRIPTION" />
<param name="template_elements" type="folderlist" directory="templates/my_template/styles/elements" default="" label="Primary Elements" description="PRIMARY ELEMENTS DESCRIPTION" />Discover the New Template
When manually copying a template, the new template must be introduced to your Joomla site through the discovery process.
- Go to Administrator → Extensions → Extension Manager → Discover
- Click the Discover icon.
- Select your new template.
- Click Install.
If successful, the new template will now be available in Administrator → Extensions → Template Manager
- Make the new template the default template.
- View the site to verify it.
Finding Errors
You might have problems as a result of copying an existing template to a new template. Because of the way that Joomla handles file names, you might be tripped up by a capitalization error, for example.
Joomla contains some useful debugging tools. To see what is happening while working on a site, there are three settings that you should change.
- Administration > Site > Global Configuration > System > Debug Settings > Debug System > Yes (Default = No)
- Administration > Site > Global Configuration > System > Debug Settings > Debug Language > Yes (Default = No)
- Administration > Site > Global Configuration > Server > Server Settings > Error Reporting > Maximum (Default = System Default)
With the Debug Language set to Yes, for instance, you will see the success or failure of language file loading on each page of the Administrator. Open the Joomla Debug Console > Language Files Loaded panel to view the report.


