Configuration du composant utilisateurs
From Joomla! Documentation
Description
Utilisateur Options configuration allows setting of parameters used globally pour tous les utilisateurs.
Contrôler le
- utilisation de Captcha,
- enregistrement autorisé et type d'enregistrement,
- groupe d'utilisateurs par défaut nouveaux utilisateurs,
- remise à zéro du compteur de mots de passe ou de noms d'utilisateur, et plus d'options pour les utilisateurs.
How to Access
- Select Utilisateurs → Gestion from the dropdown menu of the Administrator Panel
- Click the Paramètres button in the barre d'outils.
Screenshot
Form Fields
Paramètres d'utilisateur
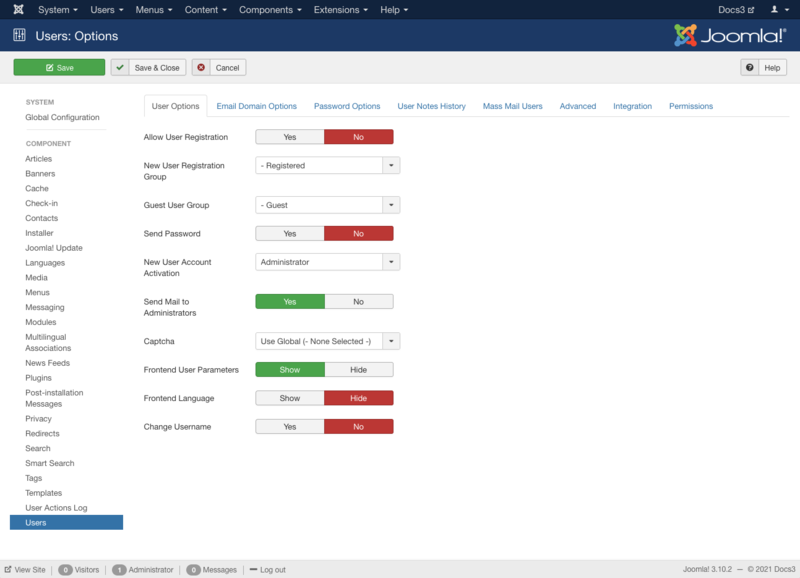
- Autoriser l'enregistrement des utilisateurs. Oui ou Non. Si le paramètre est réglé sur Oui, les utilisateurs peuvent s'inscrire à partir de la partie frontale du site en utilisant le lien Créer un compte fourni sur le module de connexion. Si cette option est définie sur Non, le lien "Créer un compte" ne s'affichera pas.
- Groupe d'enregistrement des nouveaux utilisateurs. Le groupe auquel les utilisateurs sont affectés par défaut lorsqu'ils s'inscrivent sur le site. La valeur par défaut est Enregistré.
- 'Groupe d'utilisateurs invités. Le groupe auquel les invités sont affectés. (Les invités sont des visiteurs du site qui ne sont pas connectés.) Ce groupe est défini par défaut sur "Invité". Si vous le changez en un groupe différent, il est possible de créer du contenu sur le site qui est visible pour les invités mais pas pour les utilisateurs connectés. Voir Autoriser l'accès à certains éléments de menu et modules uniquement aux invités.
- Inclure mot de passe. Si 'Oui' est coché, le mot de passe initial de l'utilisateur sera inclus dans le mail envoyé lors de l'inscription.
- Activation d'un nouveau compte utilisateur.
**None: User account will be active immediately with no action required. **Self: User will receive an email with an activation link. The account will be activated when the user clicks the activation link. **Administrator: User will receive an email with an activation link. When the user clicks this link, the Site Admin will be notified via email and the Site Admin needs to activate the user's account.
*Send Mail to Administrators. Send email notification to administrators with User Account Activation set to None or Self.
*Captcha. Use Captcha for User Account Registration and Username or User Password reminders.
*Frontend User Parameters. Show or Hide. If set to Show, users will be able to modify their language and editor preferences from the frontend of the site. If set to Hide, the user will not be able to change these settings.
*Frontend Language. Default site language.
*Change Username. Allow user to change Username.
Email Domain Options
Enter a list of allowed and disallowed email domains. By default, all domains are allowed.
Password Options
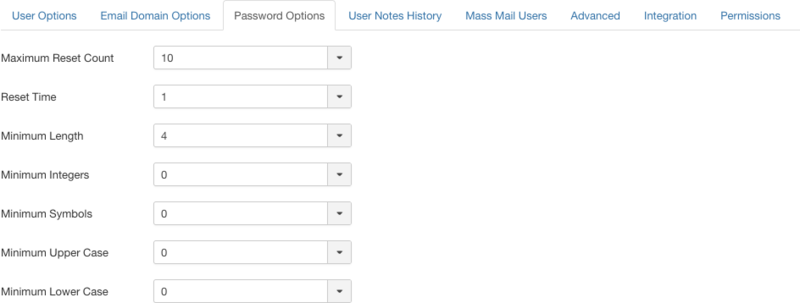
*Maximum Reset Count. The maximum number of password resets allowed within the time period. Zero indicates no limit.
*Reset Time. The time period, in hours, for the reset counter.
*Minimum Lenght. Set the minimum lenght for a password.
*Minimum Integers. Set the minimum number of integers that must be included in a password.
*Minimum Symbols. Set the minimum number of symbols (such as !@#$) required in a password.
*Minimum Upper Case. Set the minimum number of upper case alphabetical characters required for a password.
*Minimum Lower Case. Set the minimum number of lower case alphabetical characters required for a password.
===User Notes History===
- Enable Versions. (Yes/No) Whether or not to save version history for articles and categories.
- Maximum Versions. The maximum number of versions to store.
- If a article or category is saved and the maximum number of versions has been reached, the oldest version will be deleted automatically.
- If set to '0', then versions will never be deleted automatically. Also, specific versions may be flagged as "Keep Forever" and will not be deleted automatically.Note: Versions may be deleted manually using the 'Delete' button in Version History.
===Mass Mail Users===
*Subject Prefix. Enter optional text to be inserted automatically before the subject of the mass email.
*Mailbody Suffix. Enter optional text to be inserted automatically after the body of the email (for example, a signature).
Advanced
*Advanced Users Permissions. Display the Advanced Users Permissions Reports.
*Advanced Groups Permissions. Display the Advanced Groups Permissions Reports.
Integration
- [[Image:Help38-Users-Options-Integration-screen-en.png|800px|none]]
- Routing
- URL Routing. This is configured for the Articles component.
- Legacy: Ensures full comptability for existing sites.
- Modern: Enables advanced features but may change your URLs.
- Custom Fields
- Enable Custom Fields. (Yes/No) Enable the creation of custom fields.
Permissions
Manage the permission settings for user groups.
To change the permissions for utilisateurs, do the following.
- 1. Select the Group by clicking its title located on the left.
- 2. Find the desired Action. Possible Actions are:
- Configure ACL & Options. Users can edit the options and permissions of utilisateurs.
- Configure Options Only. Users can edit the options except the permissions of utilisateurs.
- Access Administration Interface. Users can access user administration interface of utilisateurs.
- Create. Users can create content of utilisateurs.
- Delete. Users can delete content of utilisateurs.
- Edit. Users can edit content of utilisateurs.
- Edit State. Users can change the published state and related information for content of utilisateurs.
- Edit Custom Field Value. Allows users in the group to edit any value of custom fields submitted in utilisateurs.
- 3. Select the desired Permission for the action you wish to change. Possible settings are:
- Inherited: Inherited for users in this Group from the Global Configuration permissions of ce site.
- Allowed: Allowed for users in this Group. Note that, if this action is Denied at one of the higher levels, the Allowed permission here will not take effect. A Denied setting cannot be overridden.
- Denied: Denied for users in this Group.
- 4. Click Save in Toolbar at top. When the screen refreshes, the Calculated Setting column will show the effective permission for this Group and Action.
Toolbar
At the top left you will see the toolbar.
The functions are: Les fonctions sont les suivantes :
- Save. Saves the Options des utilisateurs and stays in the current screen.
- Save & Close. Saves the Options pour les utilisateurs and closes the current screen.
- Cancel. Closes the current screen and returns to the previous screen without saving any modifications you may have made.
- Help. Opens this help screen.
Quick Tips
N'oubliez pas que ces choix sont appliqués de manière globale.
Related Information
* User Manager: Viewing Access Levels
* Access Control List Tutorial


