Banner: Kunden bearbeiten
From Joomla! Documentation
Beschreibung
Banner-Kunden bearbeiten oder erstellen. Es muß zumindest ein Banner-Kunde erstellt sein, bevor ein Banner erstellt werden kann.
Wie darauf zugreifen
- Select Components → Banners → Clients in the Administrator menu.
- To create a new Client click the New button in the Toolbar.
- To edit an existing Client click the name in the Client column.
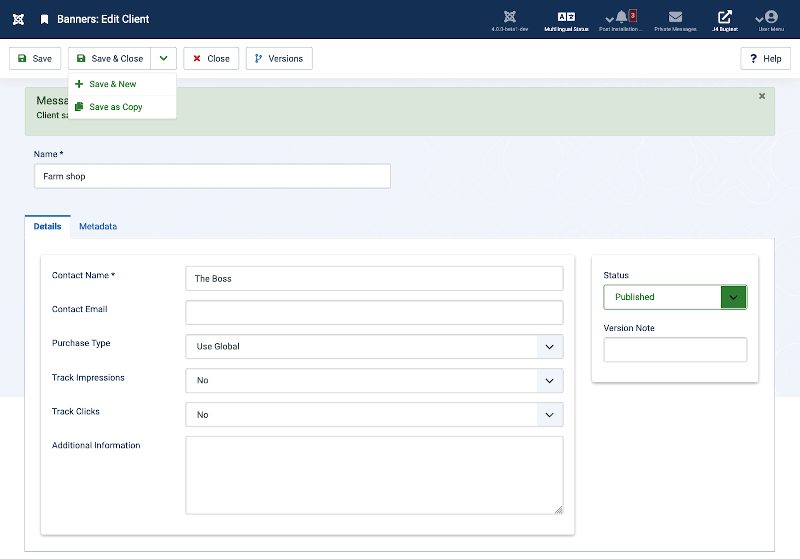
Screenshot
Form Fields
- Name. The name of this client.
Details Tab
- Contact Name. The name of the contact person for this client.
- Contact E-mail. The e-mail address of the banner client.
- Purchase Type. The purchase type of the banner. This is used to indicate how the banner client purchased the display time for the banner - monthly, yearly, etc...
- Track Impressions. Whether or not to track the number of times the banner is displayed to web site visitors.
- Track Clicks. Whether or not to track the number of times the banner is clicked by web site visitors.
- Additional Information. Enter any extra information you want to save for this client.
- Status: Published status of the item. Possible values are:
- Published: The item is published. This is the only state that will allow regular website users to view this item.
- Unpublished: The item is unpublished.
- Archived: The item has been archived.
- Trashed: The item has been sent to the Trash.
- Version Note. Optional field to identify this version of the item in the item's Version History window.
Metadata Tab
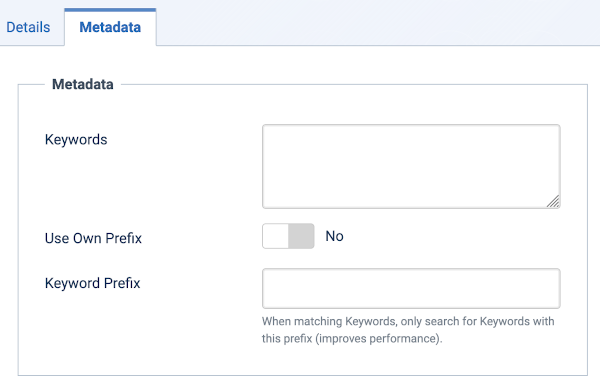
- Keywords. Optional entry for keywords. Must be entered separated by commas (for example, "cats, dogs, pets") and may be entered in upper or lower case. (For example, "CATS" will match "cats" or "Cats"). Keywords can be used in several ways:
- To help Search Engines and other systems classify the content of the Article.
- In combination with Banner tags, to display specific Banners based on the Article content. For example, say you have one Banner with an ad for dog products and another Banner for cat products. You can have your dog Banner display when a User is viewing a dog-related Article and your cat Banner display for a cat-related Article. To do this, you would:
- Add the keywords "dog" and "cat" to the appropriate Articles.
- Add the Tags "dog" and "cat" to the appropriate Banners in Banners: Edit.
- Set the Banner module Parameter 'Search By Tags' to "Yes" in Site Modules: Banners.
- For articles only, in combination with the 'Articles - Related' module, to display Articles that share at least one keyword in common. For example, if the current Article displayed has the keywords "cats, dogs, monkeys", any other Articles with at least one of these keywords will show in the 'Articles - Related' module.
- Use Own Prefix. Whether or not to use the banner's prefix or that of the client. Select No if you want to use the prefix of the banner client.
- Meta Keyword Prefix: When matching meta keywords, only search for meta keywords with these optional prefixes. This improves performance.
Toolbar
At the top of the page you will see the toolbar shown in the Screenshot above. The functions are:
- Save. Saves the item and stays in the current screen.
- Save & Close. Saves the item and closes the current screen.
- Save & New. Saves the item and keeps the editing screen open and ready to create another item.
- Save as Copy. Saves your changes to a copy of the current item. Does not affect the current item. This toolbar icon is not shown if you are creating a new item.
- Cancel. Closes the current screen and returns to the previous screen without saving any modifications you may have made. Or
- Close. Closes the current screen and returns to the previous screen without saving any modifications you may have made. This toolbar icon is not shown if you are creating a new item.
- Versions. Opens the Item Version History window to show any prior versions of this item. This allows you to view older versions of this item and, if desired, restore from an older version. See Version History for more information.
- Help. Opens this help screen.
Related Information
- To create or edit Banners: Banner - New/Edit
- To work with Banner Categories: Banner Category Manager
- To place Banners on Pages: Module Manager

