Tags: New or Edit
From Joomla! Documentation
Description[edit]
Used to add or edit tags which can be used to display content by tag name on your Joomla! website.
How to Access[edit]
- Select Components → Tags in the Administrator menu. Then
- Select the 'New' button in the Toolbar to create a new Tag.
- Select a Tags's Title from the Title column of the list to edit an existing tag.
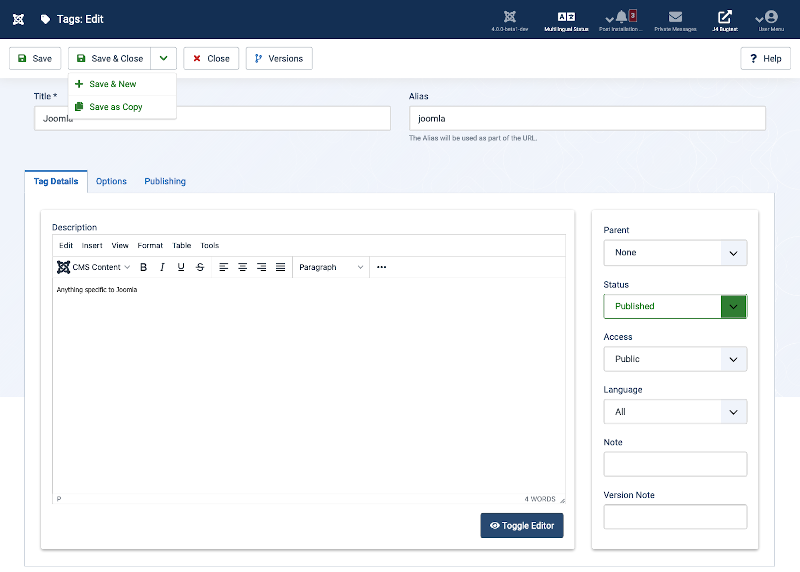
Screenshot[edit]
Form Fields[edit]
- Title. The Name of this item. This field is required.
- Alias. The internal name of the item. Normally, you can leave this blank and Joomla will fill in a default value Title in lower case and with dashes instead of spaces. Learn more.
Tag Details Tab[edit]
- Description. State the purpose of this tag.
Tag Details Sidebar[edit]
- Parent. The item (category, menu item, and so on) that is the parent of the item being edited.
- Status. The published status of the item.
- Access. The viewing Access Level for this item.
- Language. Item language.
- Note. This is normally for the site administrator's use (for example, to document information about this item) and does not show in the Frontend of the site.
- Version Note. Optional field to identify this version of the item in the item's Version History window.
Options Tab[edit]
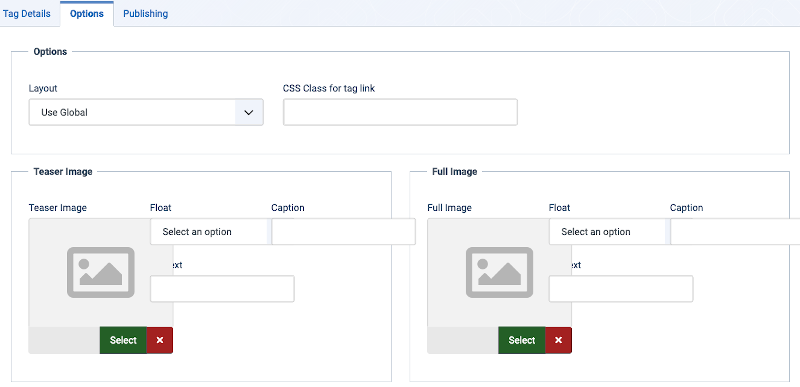
Options Panel
- Layout. Use a layout from the supplied component view or overrides in the templates.
- CSS Class for tag link. Add specific CSS classes for the tag link. If empty 'label label-info' will be added by the default tag layout.
Images Panels
- Teaser Image. The image that will be displayed as part of the list.
- Float. Float attribute for the image.
- Alt. Alt text for the image.
- Caption. The caption for the image.
- Full Image. An image that will be displayed in the single tag view.
Publishing Tab[edit]
- Created Date. Date the item(Article, Category, Weblink, etc.) was created.
- Created By. Name of the Joomla User who created this item. This will default to the currently logged-in user. If you want to change this to a different user, click the Select User button to select a different user.
- Created by Alias. This optional field allows you to enter in an alias for this Author for this Article. This allows you to display a different Author name for this Article.
- Modified Date. Date of last modification.
- Modified By. Username who performed the last modification.
- Hits. The number of times an item has been viewed.
- ID. This is a unique identification number for this item assigned automatically by Joomla. It is used to identify the item internally, and you cannot change this number. When creating a new item, this field displays "0" until you save the new entry, at which point a new ID is assigned to it.
- Meta Description. An optional paragraph to be used as the description of the page in the HTML output. This will generally display in the results of search engines. If entered, this creates an HTML meta element with a name attribute of 'description' and a content attribute equal to the entered text.
- Keywords. Optional entry for keywords. Must be entered separated by commas (for example, "cats, dogs, pets") and may be entered in upper or lower case. (For example, "CATS" will match "cats" or "Cats"). Keywords can be used in several ways:
- To help Search Engines and other systems classify the content of the Article.
- In combination with Banner tags, to display specific Banners based on the Article content. For example, say you have one Banner with an ad for dog products and another Banner for cat products. You can have your dog Banner display when a User is viewing a dog-related Article and your cat Banner display for a cat-related Article. To do this, you would:
- Add the keywords "dog" and "cat" to the appropriate Articles.
- Add the Tags "dog" and "cat" to the appropriate Banners in Banners: Edit.
- Set the Banner module Parameter 'Search By Tags' to "Yes" in Site Modules: Banners.
- For articles only, in combination with the 'Articles - Related' module, to display Articles that share at least one keyword in common. For example, if the current Article displayed has the keywords "cats, dogs, monkeys", any other Articles with at least one of these keywords will show in the 'Articles - Related' module.
- Author. Optional entry for an Author name within the metadata. If entered, this creates an HTML meta element with the name attribute of 'author' and the content attribute as entered here.
- Robots. The instructions for web 'robots' that browse to this page.
- index, follow: Index this page and follow the links on this page.
- noindex, follow: Do not index this page, but still follow the links on the page. For example, you might do this for a site map page where you want the links to be indexed but you don't want this page to show in search engines.
- index, nofollow: Index this page, but do not follow any links on the page. For example, you might want to do this for an events calendar, where you want the page to show in search engines but you do not want to index each event.
- noindex, nofollow: Do not index this page or follow any links on the page.
- Use Global: Set in Global Configuration: Metadata Settings.
Toolbar[edit]
At the top of the page you will see the toolbar shown in the Screenshot above. The functions are:
- Save. Saves the item and stays in the current screen.
- Save & Close. Saves the item and closes the current screen.
- Save & New. Saves the item and keeps the editing screen open and ready to create another item.
- Save as Copy. Saves your changes to a copy of the current item. Does not affect the current item. This toolbar icon is not shown if you are creating a new item.
- Close. Closes the current screen and returns to the previous screen without saving any modifications you may have made. This toolbar icon is not shown if you are creating a new item.
- Versions. Opens the Item Version History window to show any prior versions of this item. This allows you to view older versions of this item and, if desired, restore from an older version. See Version History for more information.
- Help. Opens this help screen.


