Banners: Options
From Joomla! Documentation
Description[edit]
Banner Options used globally for all banners.
How to Access[edit]
- Select Components → Banners from the Administrator menu. Then...
- Select the Options button in the Toolbar. The Options button is available in Banners, Categories, Clients and Tracks pages.
Screenshot[edit]
Form Fields[edit]
Client Tab[edit]
- Purchase Type. (Unlimited/Yearly/Monthly/Weekly/Daily) This is used to indicate how the banner client purchased the display time for the banner
- Track Impressions. (Yes/No) Whether or not to count how many times a Banner is displayed.
- Track Clicks. (Yes/No) Whether or not to count how many times a Banner is clicked.
- Meta Keyword Prefix. When matching keywords (for matching Banners to Articles based on Keywords), only search for keywords with this prefix. This can improve performance.
History Tab[edit]
This section allows you to set version history options for Banners, Banner Clients, and Banner Categories.
- Enable Versions. (Yes/No). Whether or not to save version history for this component. If No, version history will not be saved for component items or for this component's categories.
- Maximum Versions. The maximum number of versions to store for an item. If an item is saved and the maximum number of versions has been reached, the oldest version will be deleted automatically. If set to 0, then versions will never be deleted automatically. Also, specific versions may be flagged as "Keep Forever" and will not be deleted automatically. Note that versions may be deleted manually using the Delete button in the Version History screen.
Permissions Tab[edit]
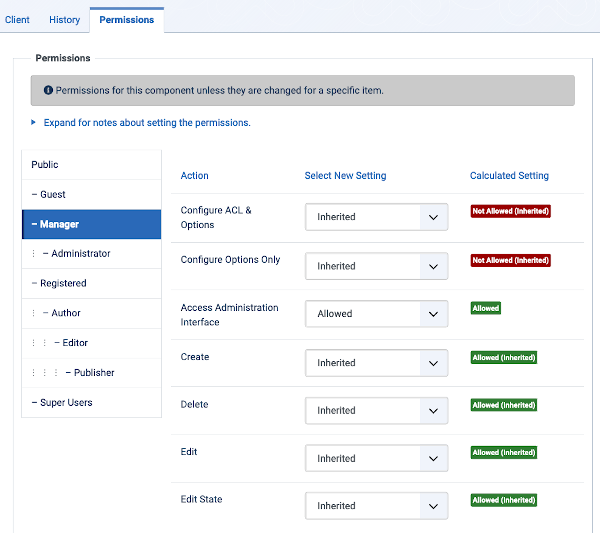
This section shows permissions configuration for Banners. The screen shows as follows.
To change the permissions for this extension, do the following.
- Select the Group by clicking its title located on the left.
- Find the desired Action. Possible Actions are:
- Configure ACL & Optons. Users can edit the options and persimissions of this extension.
- Configure Optons Only. Users can edit the options exept the persimissions of this extension.
- Access Administration Interface. Users can access user administration interface of this extension.
- Create: Users can create content of this extension.
- Delete: Users can delete content of this extension.
- Edit: Users can edit content of this extension.
- Edit State: User can change the published state and related information for content of this extension.
- Edit Own: Users can edit own created content of this extension.
- Select the desired permission for the action you wish to change. Possible settings are:
- Inherited: Inherited for users in this Group from the Global Configuration permissions of this extension.
- Allowed: Allowed for users in this Group. Note that, if this action is Denied at one of the higher levels, the Allowed permission here will not take effect. A Denied setting cannot be overridden.
- Denied: Denied for users in this Group.
- Click Save in Toolbar at top. When the screen refreshes, the Calculated Setting column will show the effective permission for this Group and Action.
Toolbar[edit]
At the top of the page you will see the toolbar shown in the Screenshot above. The functions are:
- Save. Saves the item and stays in the current screen.
- Save & Close. Saves the item and closes the current screen.
- Close. Closes the current screen and returns to the previous screen without saving any modifications you may have made. This toolbar icon is not shown if you are creating a new item.
- Help. Opens this help screen.
Quick Tips[edit]
- Remember, these choices are applied globally.


