Een menu-item toevoegen dat naar een artikel verwijst
From Joomla! Documentation
De volgende handleiding toont hoe u een nieuw item in het hoofdmenu aanmaakt dat verwijst naar het artikel genaamd Beginnen. Gebaseerd op deze informatie bent u in staat een nieuw menu-item toe te voegen aan alle door u gedefinieerde menu's die verwijzen naar ieder artikel dat u eerder op uw site heeft aangemaakt.
Indien u momenteel niet ingelogd bent op het beheer paneel, dan moet u dat doen. Indien u al ingelogd bent, dan hoeft u deze stap niet te voltooien.
1. Open een nieuw venster in de browser en en typ de URL in, die lijkt op http://www.uw-site-naam-hier.com/administrator of, indien u Joomla! heeft geïnstalleerd op uw lokale computer http://localhost/uw-site-naam-hier/administrator. Hier moet u inloggen als Administrator of Super gebruiker.
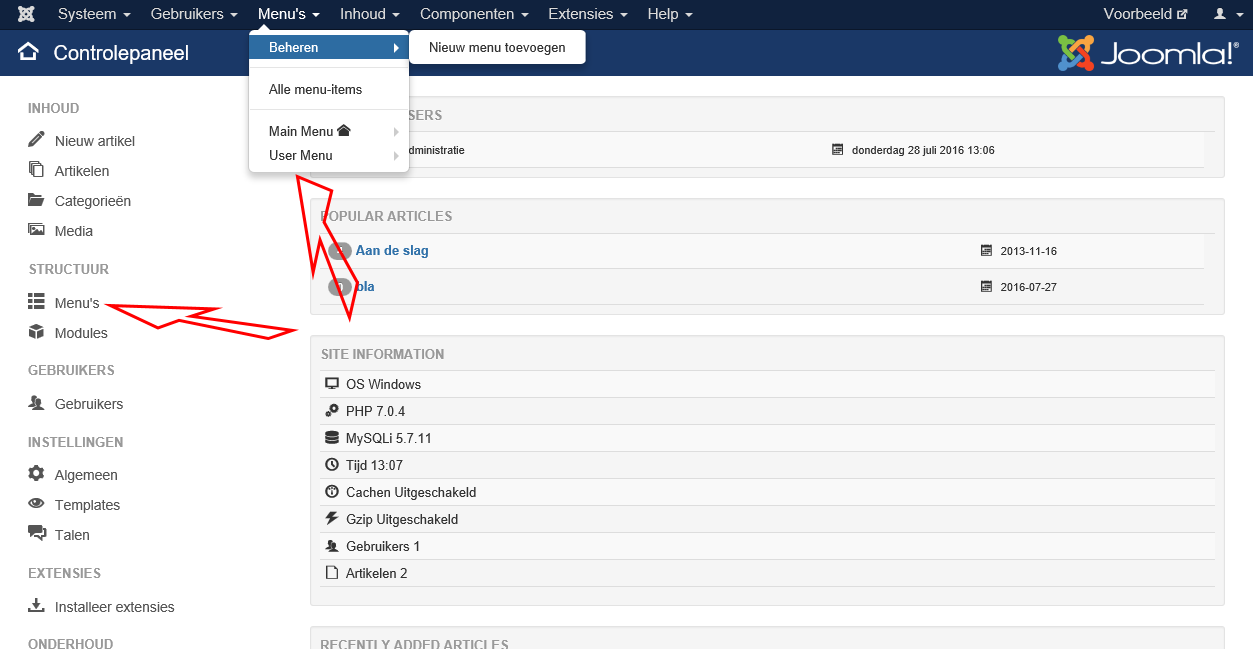
2. Selecteer, binnen het beheer paneel van de site, Menu's uit de menubalk links boven. Kies uit de lijst het menu dat u wilt gebruiken. Het menu kan het Hoofdmenu zijn dat standaard beschikbaar is, of een ander menu. Dit opent Menubeheer Menu-items. U kunt ook Menubeheer selecteren uit de linker kolom en het menu dat u nodig heeft uit de aangeboden lijst selecteren.
3. Selecteer, in de werkbalk, link boven Nieuw (aangegeven door het groene icoon met het plus teken). Dit opent het menu-item: [Nieuw] pagina.
4. Klik, vanaf de menu-item pagina, op de selectielijst voor het Menu-itemtype.
5. Kies, vanuit de getoonde lijst Artikelen.
6. Kies Individueel artikel in de eerder uitgeklapte artikelen sectie.
7. Klik, terug op de Menu-item pagina, op de selectielijst van het Selecteer artikel veld.
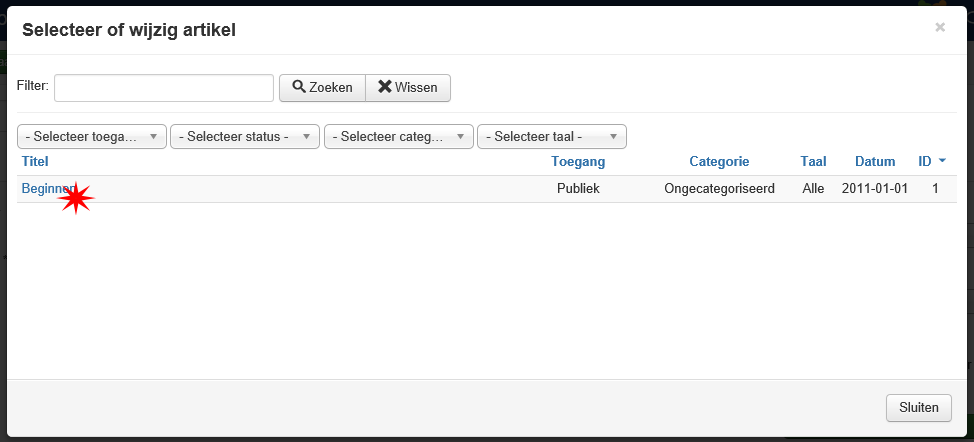
8. Een lijst met uw artikelen zal verschijnen Selecteer een artikel door op de titel te klikken. U kunt het aantal verkleinen, indien u een groot aantal artikelen heeft, met behulp van de filter hulpmiddelen boven aan het scherm.
We zijn er bijna. Vol houden!
Tabbladen
Vul, op de nieuwe pagina de verschillende velden zoals hieronder opgesomd, in. Let op dat de "Verplichte" velden worden aangegeven door een asterisk(*) naast het label.
Tabblad Gegevens
- Menutitel
Dit wordt de tekst die getoond wordt voor het nieuw toegevoegde menu-item. Laten we, in dit bijzondere geval het woord Voorbeeld gebruiken. Let op: "Menutitel" is een verplicht veld. - Alias
Meestal laat u dit leeg en Joomla zal dit automatisch voor u invullen. De inhoud van dit veld zal de pagina URL bepalen indien SEF geactiveerd is. - Locatie menu
Dit zou al op Hoofdmenu moeten staan (of het menu dat u eerder heeft gekozen). Hier heeft u de mogelijkheid om het item naar een ander menu te verplaatsen, indien gewenst. Dit veld is handig indien u de locatie later wilt wijzigen. Let op: "Locatie menu" is een verplicht veld. - Hoofditem
Hier geeft u op waar het nieuwe menu-item geplaatst moet worden. U kunt het instellen op Menu-item root (bovenste item) of een sub-item van een al bestaand item. We kiezen voor Menu-item root. - Status
If you wish your new item to be shown on your site, set this to Published. If you would like to make this menu item invisible from the site, simply set this to Unpublished. It will not delete the item but will make it invisible to your visitors. If you would like to remove this menu item from the site, simply set this to Trashed. It will not delete the item but will put it in the Trash, from this you can delete it. - Volgorde Druk op de 'Opslaan' knop boven aan de pagina en de 'Volgorde' drop-down zal zichtbaar worden. Het nieuwe menu-item zal standaard naar onderste van de lijst verwijzen, maar u kunt dat veranderen door "Eerst", "Laatst" of een ander menu-item in de lijst te kiezen om de positie te wijzigen.
- Standaard pagina U kunt deze optie selecteren als u dit menu-item de startpagina wilt maken.
- Toegang
Deze optie bepaalt wie in staat is dit nieuwe menu-item te zien:- Publiek - Alle bezoekers
- Geregistreerd - Alleen geregistreerde gebruikers
- Speciaal - Gebruikers gekoppeld aan elke groep naast "Geregistreerd"
- Doelvenster
Hier kunt u opgeven hoe het artikel geopend moet worden. Het kan zijn hetzelfde browser venster (Hoofd), een nieuw browser venster (Nieuw venster met menubalk) of een pop-up venster (Nieuw venster zonder menubalk) - Templatestijl - Selecteer een specifiek template voor dit menu-item, of laat het op 'Gebruik standaard' voor het standaard template.
- Taal - Selecteer een specifieke taal of laat op de standaard "Alle".
Opties tabblad
Klik nu op het Opties tabblad boben aan de pagina. Hier staan meer opties voor het tonen van uw menu-item. Als u besluit alle opties te ontdekken, dan vindt u hulp via de tool-tips die verschijnen als u uw muis over de labels beweegt.

Merk op dat deze opties "Gebruik algemeen" bevatten. Als dit gekozen is, dan worden de instellingen van de 'Artikelbeheer opties' gebruikt.
""Opties"'
- Toon titel - (Gebruik algemeen/Toon/Verberg). Het al dan niet tonen van de Artikel titel.
- Gelinkte titels - (Gebruik algemeen/Ja/Nee). Als de titel van het artikel wordt getoond, het tonen als link naar het artikel.
- Toon introtekst - (Gebruik algemeen/Toon/Verberg). Indien op 'Toon' ingesteld, dan wordt de intro tekst van een artikel getoond als een artikel wordt geselecteerd - Indien op 'Verberg' ingesteld, wordt alleen het artikel na de "Lees meer" getoond.
- Plaatsing van artikelinformatie - (Gebruik algemeen/Boven/Onder/Verdelen). Positie van 'Artikel informatie'. Zet het artikel informatie blok boven of onder de tekst, of splitst het in twee gescheiden blokken. Eén blok er boven en de ander er onder.
- Toon categorie - (Gebruik algemeen/Toon/Verberg). Het al dan niet tonen van de categorie van een artikel.
- Link categorie - (Gebruik algemeen/Ja/Nee). Indien de categorie van het artikel getoond wordt, of het een link is naar een Categorie weergave - (lijst of blog) van die categorie.
- Toon hoofdcategorie - (Gebruik algemeen/Toon/Verberg). Het al dan niet tonen van de hoofdcategorie van een artikel.
- Link hoofdcategorie - (Gebruik algemeen/Ja/Nee). Indien de hoofdcategorie van een artikel getoond wordt, of het een link is naar een Categorie weergave - (lijst of blog) van die categorie.
- Toon auteur - (Gebruik algemeen/Toon/Verberg) Het al dan niet tonen van de auteur van een artikel.
- Link auteur - (Gebruik algemeen/Ja/Nee). Indien de auteur van een artikel getoond wordt, of die als link naar een Contactpersoon getoond moet worden. Merk op dat de auteur als contactpersoon ingesteld moet zijn in Contactpersonenbeheer → Bewerk.
- Toon aanmaakdatum - (Gebruik algemeen/Toon/Verberg). Het al dan niet tonen van de aanmaakdatum van een artikel.
- Toon aanpassingsdatum - (Gebruik algemeen/Toon/Verberg). Het al dan niet tonen van de aanpassingsdatum van een artikel.
- Toon publicatiedatum - (Gebruik algemeen/Toon/Verberg). Het al dan niet tonen van de publicatiedatum van een artikel.
- Toon navigatie - (Gebruik algemeen/Toon/Verberg). Het al dan niet tonen van de navigatie link (bijvoorbeeld het volgende en vorige artikel) indien u door artikelen bladert.
- Toon beoordelen - (Gebruik algemeen/Toon/Verberg). Het al dan niet tonen van een beoordeel icoon bij een artikel.
- Toen iconen - (Gebruik algemeen/Toon/Verberg). Indien op 'Toon' dan wordt het print en e-mail icoon gebruikt in plaats van tekst.
- Toon afdruk icoon - (Gebruik algemeen/Toon/Verberg). Toon of verberg de print-artikel knop.
- Show Email Icon - (Use Global/Hide/Show). Show or Hide the Email Article button.
- Show Hits - (Use Global/Hide/Show). Show or Hide the number of times the article has been hit (displayed by a user).
- Show Unauthorised Links - (Use Global/No/Yes). If Yes, the Intro Text for restricted articles will show. Clicking on the "Read More" link will require users to log in to view the full article content.
- Positioning of the Links - (Use Global/Above/Below). If Above, links are shown above the content. Otherwise they are shown below the content.
Link Types Tab
Click on the tab labeled Link Types
This section will let you customize the way the page containing the article will be displayed. If you decide to explore all your options, you will find good help in the tool tips that appear when you move your mouse over the labels.

Link Types
- Link Title Attribute - An optional, custom description for the title attribute of the menu hyperlink.
- Link CSS Style - An optional, custom style to apply to the menu hyperlink.
- Link Image - An optional image to be used with the menu hyperlink. The image you would like to associate with the item must be stored in the images/ folder. You can upload your own image using the Media Manager or by FTP.
- Add Menu Title - (Yes/No). If the optional image is added, adds the menu title next to the image. Default is 'Yes'.
Page Display Tab
Click on the tab labeled Page Display. You will find good help in the tool tips that appear when you move your mouse over the labels.

Page Display
- Browser Page Title - If this parameter is left blank, Joomla! will generate a Browser Page Title automatically. This can be used to override the page title set in the article. Don't forget that page titles are one of the most important points when it comes to search engine optimization (SEO)! Use them wisely.
- Show Page Heading - Display (Yes) or not (No) the page title set in the previous parameter.
- Page Heading - Optional alternative text for the Page heading.
- Page Class - This allows you to generate unique CSS classes for this page. This comes in useful when you would like to change the look of the page to differentiate it from the rest of the site. If you don't need this, simply leave the field empty.
Metadata Tab
Click on the tab labeled Metadata. This is where you can customize your meta tags for SEO optimization. You will find good help in the tool tips that appear when you move your mouse over the labels.

Metadata
- Meta Description - An optional paragraph to be used as the description of the page in the HTML output. This will generally display in the results of search engines.
- Meta Keywords - An optional comma-separated list of keywords and/or phrases to be used in the HTML output.
- Robots - (Use Global/Index, Follow/No index, follow/Index, No follow/No index, no follow). Robots Instructions
- Secure
This is for specifying the SSL security for your page:- On - As a secure page
- Off - As a standard page
- Ignore - Displayed as the other pages - secure or not.
Module Assignment Tab
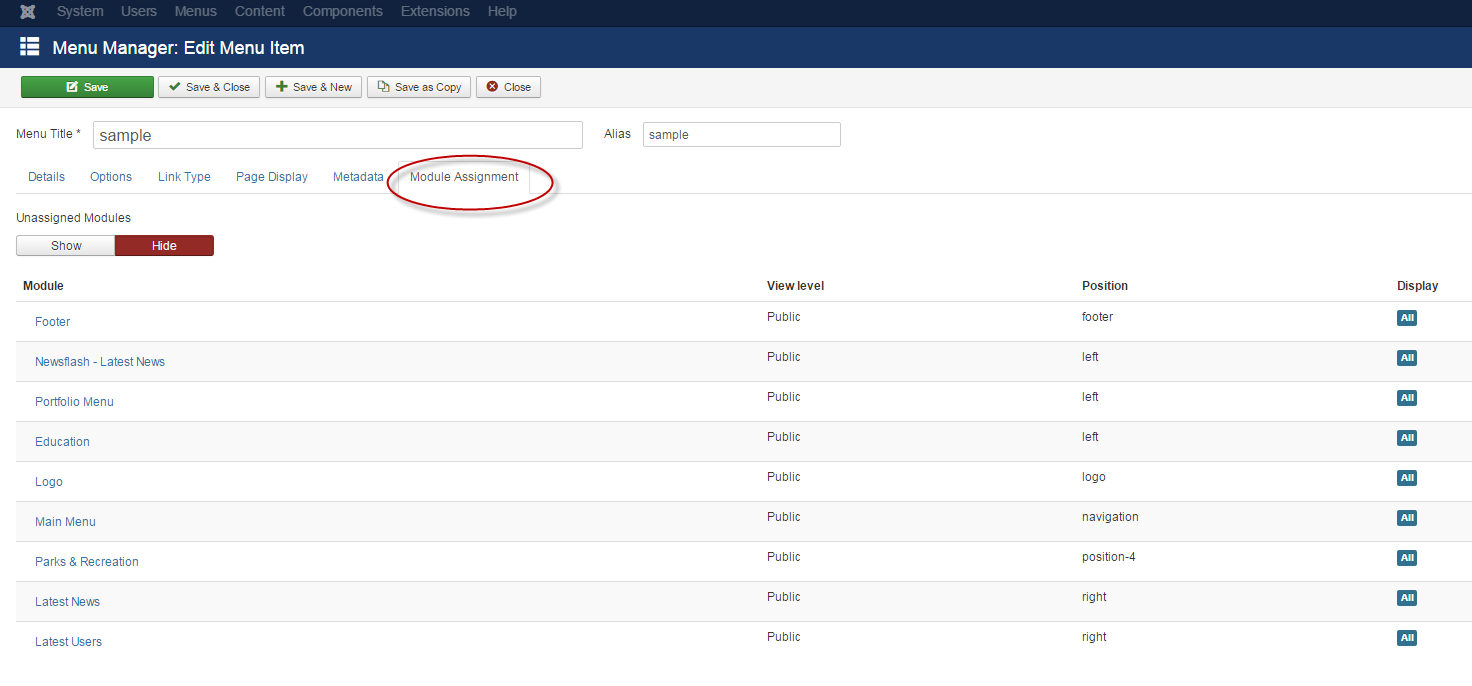
Click on the tab labeled Module Assignment. In this area, you can make adjustments to modules. Please see this link for specific information on the options available in the Module area.
Extensions_Module_Manager_Menu

Once you are done, click the Save button in the upper-right corner. This will save your work. This will save the new item and place it as the last element (or sub-element, in case of sub-menu items) in the menu. After the first save you can change the item order position within the menu.
The Save and Close button options are described below the image.

- Save - Saves the menu item and stays in the current screen.
- Save & Close - Saves the menu item and closes the current screen.
- Save & New - Saves the menu item and keeps the editing screen open and ready to create another menu item.
- Save as Copy - Saves your changes to a copy of the current menu item. Does not affect the current menu item. This toolbar icon is not shown if you are creating a new menu item.
- Close - Closes the current screen and returns to the previous screen without saving any modifications you may have made.
Now, go back to the front-end and refresh the page. You should be able to see your new menu item.
Please note that you might need to log in as a registered user or administrator to view the new item. It all depends on the Access Level you have set (see above). When you click the new item, the article will be opened.


