Configuring Eclipse for joomla development
From Joomla! Documentation
Install Eclipse[edit]
Install Java[edit]
Eclipse is written in Java, so before you can install Eclipse, you need to make sure you have a recent version of Java running. Note that many Linux distributions include third-party Java runtimes (or JVM's for "Java Virtual Machine"), some of which don't work with Eclipse. The safest thing is to make sure you are running the Sun JRE (Jave Runtime Environment). You can download the latest Java version at www.java.com. If you already have a recent version of the Sun JRE (for example, 1.5 or 1.6), you can skip this step.
Another option for Mac OS X Snow Leopard users is to download the OS X packages from http://www.open.collab.net/downloads/community/ for Subversion after you've installed Subclipse. This will install the appropriate JavaHL library to make the installed JVM work properly.
Download Eclipse=[edit]
The next step is to download Eclipse. Unfortunately, as of Eclipse 3.7 (code name Helios), the old "all-in-one" PHP version is no longer maintained. So, the easiest thing is to download and install the Eclipse IDE for JavaScript Web Developers from here. There are downloads for Windows, Linux, and Mac OS X. When you download, you will be asked to pick a download mirror. At the time of this writing, the name of the Windows 64-bit download is "eclipse-javascript-indigo-SR2-win32-x86_64.zip" and is 132mb.
Installing Eclipse is very easy -- you just unzip the file to a target directory. In Windows, it is best to use a third-party "zip" program to do the unzipping. In some cases, Windows Explorer will not correctly unzip this archive and Eclipse won't run correctly. One good option is 7 Zip, available here.
I created a directory called "c:\eclipse_php" for the target. When the file is extracted, you will see a folder called "eclipse" and under that folder 5 folders and six files.
Once you have the basic Eclipse IDE for JavaScript Web Developers version installed, you then need to use the Eclipse Help system to add PHP and Git support. See Installing Eclipse with PHP and Git for detailed instructions.
Eclipse will use the default Java JVM for your system. In Windows, this is normally the right one (from Sun). In some Linux distributions, the default JVM may be a third-party program that doesn't work correctly with Eclipse. In this case, you can specify the JVM to use by editing the eclipse.ini file in the eclipse folder as as follows, substituting the correct path to your installed Sun version of the Java JVM:
-showsplash
org.eclipse.platform
--launcher.XXMaxPermSize
512M
-vm
/usr/lib/jvm/java-1.5.0-sun/jre/bin/java
-vmargs
-Xms512m
-Xmx512m
Note that the path to the JVM goes on the line below the "-vm". Also note that the file ends with a blank line.
At this point, you should be able to start up Eclipse. Just find the "eclipse.exe" file inside the eclipse folder and double-click to execute it. In Linux: /path/to/your/eclipse/folder/eclipse
Eclipse download for Ubuntu[edit]
- Eclipse can be found in the Ubuntu Software Centre (or Synaptic Package Manager) and when installed from there it places a menu item in the 'Programming' menu.
Alternative (Easy) Installation[edit]
An alternative way to install Eclipse with the phpEclipse environment is to use EasyEclipse for PHP. This includes everything you need (including Subclipse) in one simple install for most platforms. The following instructions are not applicable for EasyEclipse for PHP.
Create an Eclipse Workspace[edit]
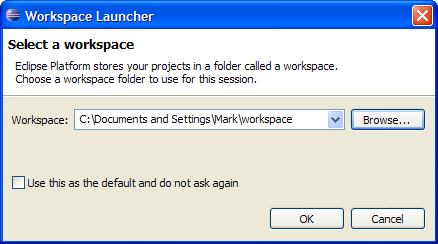
The first time you launch Eclipse, the screen below displays.
Before we can start using Eclipse, we need to create a workspace. This is the folder where all of the Eclipse files and project information will be stored. Since we will be working on web-based projects, we want our project PHP and HTML files to be visible to XAMPP. So we will create our workspace in the "c:\xampp\htdocs" folder (in linux: "/opt/lampp/htdocs").
To do this, press the Browse button, navigate to the "c:\xampp\htdocs" or "/opt/lampp/htdocs" folder, and press the New Folder button. Create a directory called something like "joomla_development" and make sure it says the same thing in the Folder field. (You can click on a different folder and then click on the new folder to get the name in the Folder field.) The screen should look like the one below.
Press OK. Then we go back to the Workspace Launcher, as shown below.
Before pressing OK, you can check the box so that you won't need to go through this screen each time you start Eclipse.
Now you should see a splash screen and then a "Welcome to Eclipse" screen, as shown below.
Close this window and the normal Eclipse workbench will display, as shown below.
At this point, Eclipse is installed.


