Difference between revisions of "Creating A VPS Testing Server"
From Joomla! Documentation
Jasondavis87 (talk | contribs) |
Jasondavis87 (talk | contribs) |
||
| Line 49: | Line 49: | ||
[[File:Creating_A_VPS_Testing_Server_-_pic_3.jpg|frameless|none]] | [[File:Creating_A_VPS_Testing_Server_-_pic_3.jpg|frameless|none]] | ||
| − | Click next to go to the next page. On then | + | Click next to go to the next page. On then next page, decide how much memory to dedicate to the Virtual Machine. Try to give CentOS atleast 1gig of RAM. '''Note: You can do the recommended 512 MB if you want, however the CentOS installation process will be different.''' |
[[File:Creating_A_VPS_Testing_Server_-_pic_4.jpg|frameless|none]] | [[File:Creating_A_VPS_Testing_Server_-_pic_4.jpg|frameless|none]] | ||
| + | |||
| + | Click next to go to the next page. On the next page, you will click next again because we will be creating a new virtual hard drive for use with the new virtual machine. | ||
| + | |||
| + | [[File:Creating_A_VPS_Testing_Server_-_pic_5.jpg|frameless|none]] | ||
| + | |||
| + | After clicking next, you will begin the Virtual Hard disk creation and you will see the screen below. I suggest using '''VDI (VirtualBox Disk Image)''', but you can select another if you'd like. | ||
| + | |||
| + | [[File:Creating_A_VPS_Testing_Server_-_pic_6.jpg|frameless|none]] | ||
| + | |||
| + | Click next to go to the next page. You will next select the disk storage details. Dynamic or fixed allocation. You can read the screen for what each does, however i suggest going fixed for speed reasons. | ||
| + | |||
| + | [[File:Creating_A_VPS_Testing_Server_-_pic_7.jpg|frameless|none]] | ||
| + | |||
| + | Next, your going to select the name and size for the virtual hard disk. I always name the disk the same name as the testing server and I usually use 8gigs minimum for the virtual hard disk unless i know i'm going to need more. | ||
| + | |||
| + | [[File:Creating_A_VPS_Testing_Server_-_pic_8.jpg|frameless|none]] | ||
| + | |||
| + | Next, your going to put your hard disk settings to work and actually create the virtual hard disk. Click Create to finalize the virtual hard disk creation. | ||
| + | |||
| + | [[File:Creating_A_VPS_Testing_Server_-_pic_9.jpg|frameless|none]] | ||
| + | |||
| + | After that is completed, you will be taken back to the "Create New Virtual Machine" page, where you will finalize the other options you selected for the virtual Machine: | ||
| + | |||
| + | [[File:Creating_A_VPS_Testing_Server_-_pic_10.jpg|frameless|none]] | ||
Revision as of 21:55, 7 August 2012
This article is actively undergoing a major edit for a short while.
As a courtesy, please do not edit this page while this message is displayed. The user who added this notice will be listed in the page history. This message is intended to help reduce edit conflicts; please remove it between editing sessions to allow others to edit the page.
If this page has not been edited for several hours, please remove this template, or replace it with {{underconstruction}} or {{incomplete}}.
Introduction[edit]
I didn't find any information on this on the wiki so i figured I'd add this to the Joomla! Docs. This tutorial will explain how to set up a testing server for use with Joomla! and the Eclipse IDE.
Prerequisites & Outlook[edit]
This tutorial will use the following software to give you a complete testing server environment.
Host System: Windows 7 x64
- Items to install:
- PHP
- Phing
- Eclipse PDT
Guest System: Cent OS 6.3 x64
- Items to install:
- OS
- XAMPP with XDebug
- Samba Server
Why Testing Server[edit]
Do you have a website that's live and you need to constantly upgrade your website, however since your website is live, you dont want to edit the actual website, resulting in the site crashing from time to time or not working. Getting a testing server allows you to do all your testing without affecting the live server. Then you upload your completed update to the Live Server once completed.
Why a VPS[edit]
Nine times out of ten, your server is on a Linux based system, but you are not. Sometimes testing between Windows or Mac based systems and then switching over to a Linux based system can cause issues. I.e. carriage returns, etc. So your testing server should be on a Linux based system ( or whatever the actual server is ).
Step 1. Creating the Guest Testing Server[edit]
This tutorial assumes you are using Windows 7, which release doesn't matter.
The server virtualization platform[edit]
To setup the testing server, the first thing you need is Oracle VM VirtualBox. This software will virtualize another "guest" operating system on your machine while its running. At the time of writing this tutorial, I'm using version: 4.1.18. Download the version for windows hosts and install it on your computer.
The server software[edit]
Your also going to need a Cent OS iso to use to install the Guest OS. At the time of writing, the latest version of CentOS is version 6.3. The Link i used to download is http://www.gtlib.gatech.edu/pub/centos/6.3/isos/x86_64/. NOTE: this is for 64 bit computers. Alternatively, you can go to the CentOS Downloads Page and choose your download place.
Creating the server[edit]
Open up Oracle VM VirtualBox. You will see the window below:
Click on the New Button in the top left corner of the window to begin creating your VirtualBox. You will see the following screen:
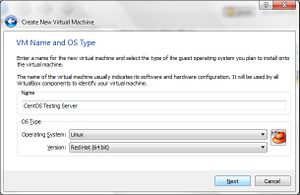
Click next to go to the next page. On the next page Enter A name for the testing server and Make sure that the Operating System and Version show "Linux" and "Red Hat (64 bit)" like below:
Click next to go to the next page. On then next page, decide how much memory to dedicate to the Virtual Machine. Try to give CentOS atleast 1gig of RAM. Note: You can do the recommended 512 MB if you want, however the CentOS installation process will be different.
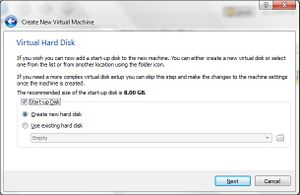
Click next to go to the next page. On the next page, you will click next again because we will be creating a new virtual hard drive for use with the new virtual machine.
After clicking next, you will begin the Virtual Hard disk creation and you will see the screen below. I suggest using VDI (VirtualBox Disk Image), but you can select another if you'd like.
Click next to go to the next page. You will next select the disk storage details. Dynamic or fixed allocation. You can read the screen for what each does, however i suggest going fixed for speed reasons.
Next, your going to select the name and size for the virtual hard disk. I always name the disk the same name as the testing server and I usually use 8gigs minimum for the virtual hard disk unless i know i'm going to need more.
Next, your going to put your hard disk settings to work and actually create the virtual hard disk. Click Create to finalize the virtual hard disk creation.
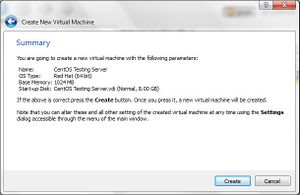
After that is completed, you will be taken back to the "Create New Virtual Machine" page, where you will finalize the other options you selected for the virtual Machine:


