GS/BackEnd
From Joomla! Documentation
Revision as of 08:56, 25 September 2011 by Mvangeest (talk | contribs) (moved BackEnd to GS/BackEnd: Moved page to keep related pages together)
The mechanics of using the Back-end[edit]
Using 'localhost'[edit]
Another document in this series tells you how to download an instance of Joomla! on your own computer. Localhost installation on your own computer. This is a very good way to explore how the Back-end works because you can try things without doing any harm to an established site. An instance of Joomla! with the sample data is particularly valuable here.
Login to the Back-end[edit]
- Enter the address of the site that you are going to use.
- The localhost site with sample data is a good place to start - and if you have a localhost installation on your own computer, then use it:-
http://localhost/joomla15/administrator - If you are using an established site - the address is the one for the Site itself (the Front-end) with the addition of 'administrator'
- Enter the Username and password that you have for the site.
- The username is not necessarily 'admin' although this is the default. On many site the administrators have usernames that do not indicate that they are administrators - for security reasons.
- Logging out: This returns you to the Administrator login screen.
- Most sites log you out automatically if you have not done anything on the site for a defined length of time - usually about 15 minutes. This is for security.
- Logging out yourself:
- Click on the Logout link in the top-right corner of the Administrator screen.
The Control Panel[edit]
This is the entry point to the Back-end and when you login to it, the Control Panel opens.
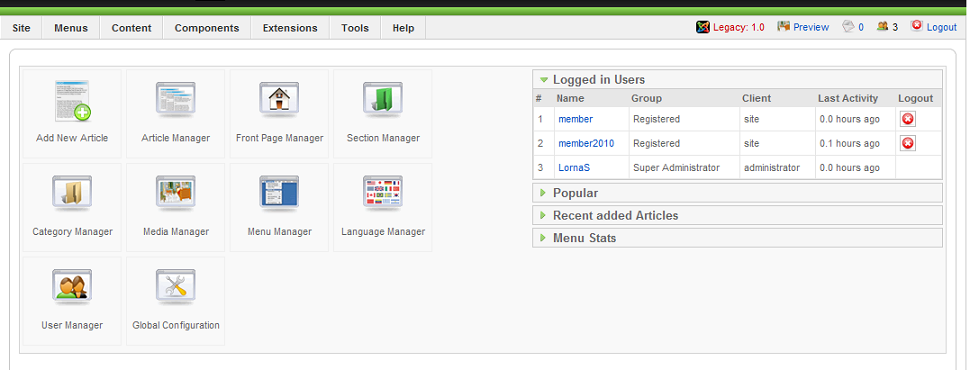
This shows the Control Panel of an established site. Here there are two visitors logged in to the site and note that the Super Administrator, logged in to the Administator page, has a username which does not include 'admin'.
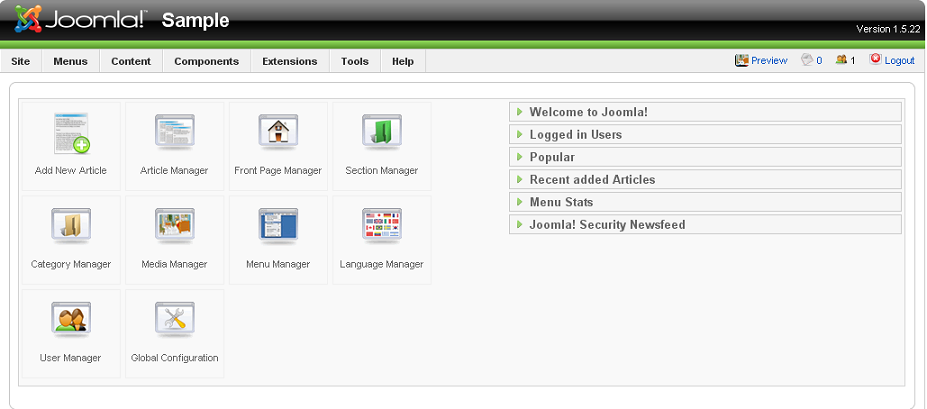
This shows the Control Panel for the Sample data inlocalhost. Here all the options to the right (Site Information) are closed, although the 'Joomla! Welcome screen is set to display by default. This is almost the same as the other Control panel apart from some additional Site Information choices and illustrates that most Administrator pages appear much the same - which is reasonable because they all do much the same tasks.
The whole Control Panel is roughly divided into three sections:-
- Control icons are in the main part of the screen
- Menus are along the top
- Site Information is to the right
The Control Icons on the main part of the screen[edit]
This provides administrators with a quick way to access the most frequently used tasks to manage the whole web site.
Explore each of these to give you a sense of what an Administrator can do. The on-line Help for each one is comprehensive.
- Article Manager and Add New Article
- The Article Manager is where you can add and manage all the articles for your web site. You can publish, unpublish, edit, archive and much else.
- Section Manager
- The Section Manager is the place where you can edit existing Sections and create new ones.
- Category Manager
- The Category Manager is where you can edit existing Categories and create new ones. Articles in Joomla! are organized into Sections and Categories. Categories are the second level of organization underneath Sections. Every Section contains one or more Categories.
- Media Manager
- The Media Manager is a tool for uploading or deleting files in the /images/ directory on your web server. You can upload new files, delete existing ones and create sub-directories.
- Menu Manager
- The Menu Manager allows you add and alter Joomla!'s menus.
- User Manager
- This allows you to look at a list of users and sort them in different ways. You can also edit and create users.
- Language Manager
- You can set the default Language for both the Front-end and Back-end of your Joomla! web site in Language Manager
- Global Configuration (available to Super-Administrators)
- The Global Configuration Manager allows you to configure the Joomla! site with various settings.
An example in detail - Article Manager[edit]
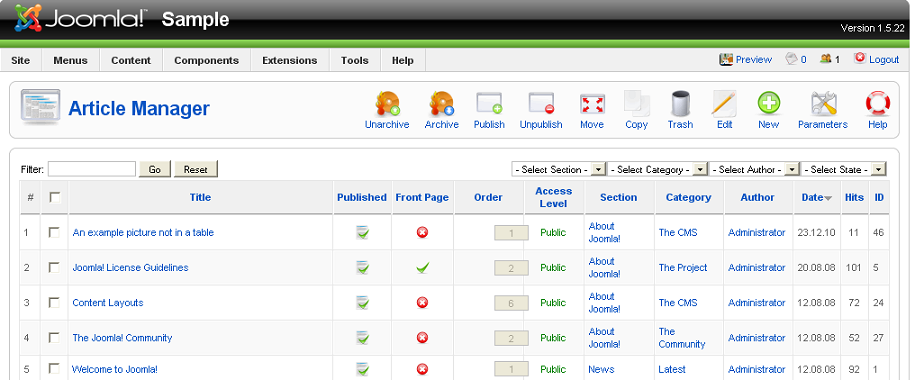
All the various manager interfaces are similar and are designed to show key information and can be used for many tasks. This illustrates how Mangement pages work. Normally the items being managed (such as Users or Sections) are listed and there are icons for doing various tasks
To Note in particular:
- Filter: this allows you to find something by typing in all or part of a name.
- Sorting columns: you can order Articles by clicking on the header of each column
- Find Articles in the heirachy: There are pull-down lists to select Articles by Category / Section / Author. This is useful for a large site
- Icons at the top: There are icons to allow various manipulations of content - such as Publish, Trash (ie delete) Edit and New.
- Help gives full information about the Article Manager.
- Click the icon to use the Help which is good and comprehensive. There are similar Help facilites in the menus of all the main Manager functions.
An example of a Workspace page[edit]
Once you open a specific task in the Manager page, you are usually taken to a page with a Workspace layout. This can work in any site to which you hav e access - the examples use the localhost sample data.
- Navigate back to the main Control Panel interface. From the Menu:-
- Select Site / Control Panel
To view an example of a Workspace screen:-
- Open Manage Categories
The Management screen is similar to that for Articles in that it lists Categories and allows you to manipulate them. To see the Workspace:-
- Choose any Category
- Click on the Tick box
- To edit
- Click on the Edit icon
Editing a Category - a similar but blank one displays for adding a new one.
The key elements allow you to alter (or enter) information required. There is more about the organisation of Sections and Categories in another document in this series.
Site Information[edit]
The display here can vary according to how the site has been set up. Four display by default - see earlier screen cross reference. The Site information for the Sample data in localhost shows that they give a very useful overview of the activity on the site.
- Open each choice and explore what is shows
They give a summary about:-
- Logged in Users: who is logged in (you can also log them out from this screen)
- Popular: shown in the screen shot: the most popular articles with the numbers of hits and the date they were created
- Recent added Articles: new content
- Menu stats: hits on the Menus
In the sample data there are also two addition ones (Welcome to Joomla! and Joomla! Security) which give information about Joomla! Welcome to Joomla! is open by default when the Administor part of the site is accessed.
[edit]
These give access to all the functionality available in the site. The exact content of the Menus, and especially the Component Menu, depends on how the site has been set up. For example, this shows the basic menus under Components as they are on the Sample data.
If extra features (Extensions) have been added, they too appear on the menu. Here is an an established site where some Extensions (notably an editor JCE and Community Builder) have been installed which can be viewed through the menu system
- Look at each menu in turn
When you begin, you won't necessarily understand or remember it all. But pulling down the menus and seeing what is there shows you what more you will need to find out to progress.


