Screen.modules.edit.15
From Joomla! Documentation
This article or section is in the process of an expansion or major restructuring. You are welcome to assist in its construction by editing it as well. If this article or section has not been edited in several days, please remove this template.
This article was last edited by Dextercowley (talk| contribs) 15 years ago. (Purge)
How to Access[edit]
Navigate to the Module Manager and either press the "New" button on the toolbar or click on a Module Name.
Description[edit]
This is where you create new Modules or edit existing Modules. When you create a new Module, you will select the Module Type. This will determine what type of content this Module can display. If you edit and existing Module, the Module Type will already be determined. Note that you cannot change the Module Type of an existing Module.
Screenshot[edit]
Note that if you install one or more Joomla! Extensions, these Extensions may add new Module Types. In this case, your screen will show additional Types.
Module Types[edit]
When a new Module is created, the Module:[New] screen displays all of the Module Types available for new new Module. A standard Joomla! installation includes 20 Module Types. These are described below.
Archived Content[edit]
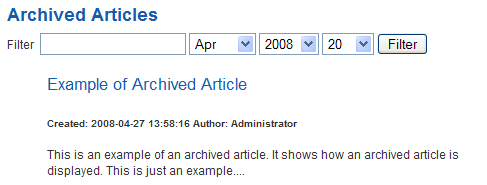
This Module shows Articles that have been set to Archived. The Articles are available behind a Month/Year directory list, as shown in the example below.
Selecting a month link shows a screen like the one below.
Articles are stored by creation date not archival date. Only those months and years with archived Articles will be displayed. This list is generated automatically.
The Module Type name for this is "mod_archive". This module does not relate to any other component. This Module provides functionality that is similar to the Archived Article List Layout available on the Menu Item Manager New / Edit screen.
Module Parameters
- Count. The number of Articles to display.
- Module Class Suffix. A suffix applied to the CSS class of the Module. This allows you to create customized CSS styles that will apply just to this module. You would then modify the "template.css" file of your template to apply styling to this new class.
- Enter this parameter with a leading space to create a new CSS class for this module. Enter the parameter without a leading space to change the CSS class name for this module.
- See the tutorial Using Class Suffixes in Joomla! 1.5/1.6 for more information.
Advanced Parameters
- Caching. Use Global/No Caching. Whether or not to cache the content of this Module. A setting of "Use Global" will use the Cache Settings from the Global Configuration screen.
Banner[edit]
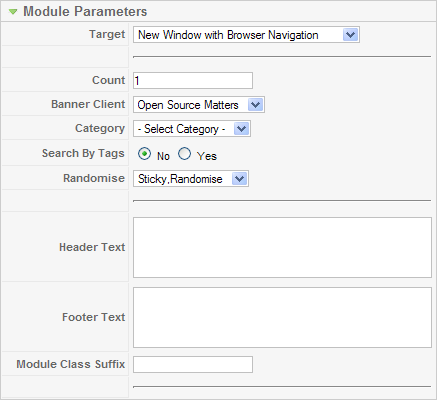
This Module allows you to show active Banners from the Banner Component created in the Banner Manager screen. The Module Type name for this is "mod_banners".
Module Parameters
- Target. How to open the link. Options are:
- Parent Window with Browser Navigation. Open the link in the current browser window, allowing Back and Forward navigation.
- New Window with Browser Navigation. Open the link in a new browser window, allowing Back and Forward navigation.
- New Window without Browser Navigation. Open link in a new browser window, not allowing Back and Forward navigation.
- Count. The number of Banners to display.
- Banner Client. The Client for this Banner Module. Select from the drop-down list box of Banner Clients. Banner Clients are created in the Banner Client Manager screen.
- Category. The Category for this Banner Module. Select from the drop-down list box of Banner Categories. Banner Categories are created in the Banner Category Manager screen.
- Search By Tags. Whether or not to select the Banner by matching the Banner Tags to the current Article keywords.
- Randomise. Sticky, Ordering / Sticky, Randomise. "Sticky, Ordering" means that the Banners will display in order. "Sticky, Randomise" means that the Banners will display in random order.
- Header Text. Text to display before the Banner group.
- Footer Text. Text to display after the Banner group.
- Module Class Suffix. A suffix applied to the CSS class of the Module. This allows you to create customized CSS styles that will apply just to this module. You would then modify the "template.css" file of your template to apply styling to this new class.
- Enter this parameter with a leading space to create a new CSS class for this module. Enter the parameter without a leading space to change the CSS class name for this module.
- See the tutorial Using Class Suffixes in Joomla! 1.5/1.6 for more information.
Advanced Parameters
- Caching. Use Global/No Caching. Whether or not to cache the content of this Module. A setting of "Use Global" will use the Cache Settings from the Global Configuration screen.
- Cache Time. The length of time, in minutes, before the Module is re-cached.
Breadcrumbs[edit]
This Module shows a set of navigation links that illustrates where you are inside the web site and allows you to navigate back. An example is shown below:
The Module Type name for this is "mod_breadcrumbs". This Module does not relate to any other component.
Module Parameters
- Show Home. Whether or not to show the Home page in the Breadcrumbs path.
- Text for Home entry. The text to display for the Home page in the Breadcrumbs.
- Text Serarator. The text to use to separate navigation elements. If blank, ">>" is used.
- Module Class Suffix. A suffix applied to the CSS class of the Module. This allows you to create customized CSS styles that will apply just to this module. You would then modify the "template.css" file of your template to apply styling to this new class.
- Enter this parameter with a leading space to create a new CSS class for this module. Enter the parameter without a leading space to change the CSS class name for this module.
- See the tutorial Using Class Suffixes in Joomla! 1.5/1.6 for more information.
Advanced Parameters
- Caching. The only valid value is "Never".
- Cache Time. The length of time, in minutes, before the Module is re-cached.
Custom HTML[edit]
This allows you to create a Module that contains any valid HTML code. There are many cases where you might want to put free-form HTML inside a web page. For example, you might want to create an HTML Image Map or you might want to copy HTML code from PayPal, Amazon, or some other site.
The Custom HTML Module allows you to create a self-contained HTML unit and then put it in any valid location on a page.
Custom Output
When you create or edit a Custom HTML Module, an editor session is opened using your default editor.
- Important Note: The TinyMCE editor does not allow you to enter certain HTML tags. To work around this, you can temporarily change your User's editor to "No Editor", create the Custom HTML Module, and then change the editor back to TinyMCE. Another option is to use an editor from an Extension that allows HTML code to be entered.
An example of a Custom HTML editor session is shown below. Note that the "No Editor" option is being used.
Module Parameters
- Module Class Suffix. A suffix applied to the CSS class of the Module. This allows you to create customized CSS styles that will apply just to this module. You would then modify the "template.css" file of your template to apply styling to this new class.
- Enter this parameter with a leading space to create a new CSS class for this module. Enter the parameter without a leading space to change the CSS class name for this module.
- See the tutorial Using Class Suffixes in Joomla! 1.5/1.6 for more information.
Feed Display[edit]
This Module shows an RSS News Feed from a website. An example is shown below:
The Module Type name for this Module is "mod_feed". This Module is not related to the News Feeds Component or the News Feeds Layouts in the Menu Items - New/Edit screen but is an alternative that allows a feed to display in a Module position.
Module Parameters
- Module Class Suffix. A suffix applied to the CSS class of the Module. This allows you to create customized CSS styles that will apply just to this module. You would then modify the "template.css" file of your template to apply styling to this new class.
- Enter this parameter with a leading space to create a new CSS class for this module. Enter the parameter without a leading space to change the CSS class name for this module.
- See the tutorial Using Class Suffixes in Joomla! 1.5/1.6 for more information.
- Feed URL. The URL address of the RSS news feed.
- RTL Feed Whether or not the feed is in a language that reads from right to left.
- Feed Title. Whether or not to display the Feed Title.
- Feed Description. Whether or not to display the Feed Description.
- Feed Image. Whether or not to display the Feed Image.
- Items. The number of news feed items to display.
- Item Description. Whether or not to show the Description or Into Text of individual items.
- Word Count. The maximum number of words to display in the Item Description. A value of 0 will display the entire Item Description.
Advanced Parameters
- Caching. Use Global/No Caching. Whether or not to cache the content of this Module. A setting of "Use Global" will use the Cache Settings from the Global Configuration screen.
- Cache Time. The length of time, in minutes, before the Module is re-cached.
[edit]
This Module displays the web site copyright and Joomla! license information, as shown in the example below:
The Module Type name for this Module is "mod_footer". It is not related to any other component.
Module Parameters
- Caching. Use Global/No Caching. Whether or not to cache the content of this Module. A setting of "Use Global" will use the Cache Settings from the Global Configuration screen.
Latest News[edit]
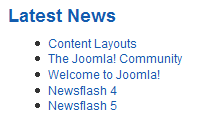
This Module shows a list of the most recently published Articles. An example is shown below:
The Module Type name for this is "mod_latest". It is not related to any other component.
Module Parameters
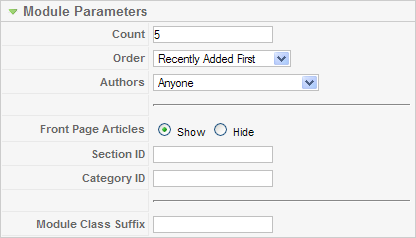
- Count. The number of Articles to show.
- Order. Recently Added First or Recently Modified First. Whether to show the Articles based on the date added or the date modified.
- Authors. Anyone, Added or modified by Me, or Not added or modified by me. Optional filter to limit the display to Articles based on whether they were authored or modified by the current user. Only applies if a user is logged in to the site.
- Front Page Articles. Show or Hide Articles published to the Front Page.
- Section ID. Optional filter to select Articles only from specific Sections. Include one or more Section ID numbers, separated by a comma (for example, "12,15").
- Category ID. Optional filter to select Articles only from specific Categories. Include one or more Category ID numbers, separated by a comma (for example, "12,15").
- Module Class Suffix. A suffix applied to the CSS class of the Module. This allows you to create customized CSS styles that will apply just to this module. You would then modify the "template.css" file of your template to apply styling to this new class.
- Enter this parameter with a leading space to create a new CSS class for this module. Enter the parameter without a leading space to change the CSS class name for this module.
- See the tutorial Using Class Suffixes in Joomla! 1.5/1.6 for more information.
Login[edit]
This Module displays a username and password Login form. It also displays a link to retrieve a forgotten password. An example is shown below:
The Module Type name for this is "mod_login". If User registration is enabled in the User Settings of the Global Configuration screen, then the link "Create an Account" will be shown to invite Users to self-register.
This module is not related to any other component. Similar functionality can also be provided with a Menu Item of type Default Login Layout. See the Menu Item New/Edit screen for more information.
Module Parameters
- Caching. Caching is not allowed, so "Never" is always selected.
- Module Class Suffix. A suffix applied to the CSS class of the Module. This allows you to create customized CSS styles that will apply just to this module. You would then modify the "template.css" file of your template to apply styling to this new class.
- Enter this parameter with a leading space to create a new CSS class for this module. Enter the parameter without a leading space to change the CSS class name for this module.
- See the tutorial Using Class Suffixes in Joomla! 1.5/1.6 for more information.
- Pre-text. Optional text or HTML to display above the login form.
- Post-text. Optional text or HTML to display below the login form.
- Login Redirection Page. The page to load after a successful login. Select from the drop-down list box. If no page is selected, the home page will be used.
- Logout Redirection Page. The page to load after a successful logout. Select from the drop-down list box. If no page is selected, the home page will be used.
- Greeting. Whether or not to show the simple greeting text, for example, "Hi Administrator".
- Name/Username. Whether to use the user's Name or Username in the simple greeting.
- Encrypt Login Form. Whether or not to encrypt the login form using SSL. Do not enable this option if Joomla! is not accessible using the "https://" prefix.
Menu[edit]
This Module allows you to place your Menus on the page. Every Joomla! website has at least one Menu that is created in the Menu Manager screen. The Menu Module allows you place all or part of the selected Menu at the desired position and on the desired web pages. The name for this Module is "mod_mainmenu".
Module Parameters[edit]
The Menu Module has the following Module Paramters:
- Menu Name. The name of the Menu created in the Menu Manager screen. The default is "mainmenu". Note that you can have more than one Menu Module with the same Menu Name specified here (for example, if you are using Start and End Levels).
- Menu Style. The style of the menu. The options are as follows:
- List. Joomla! 1.5 List style. This is the style used by the menus in the Sample website.
- Legacy Vertical. Compatible with Joomla! 1.0 vertical style.
- Legacy Horizontal. Compatible with Joomla! 1.0 horizontal style.
- Legacy Flat List. Compatible with Joomla! 1.0 flat list style.
Start and End Levels
Start and End Levels can be used to display different parts of one menu at different locations. For example, say you have one Menu with three levels as follows:
- Menu Item 1
- Menu Item 2
- Menu Item 2.1
- Menu Item 2.1.1
- Menu Item 2.1.2
- Menu Item 2.2
- Menu Item 2.1
- Menu Item 3
Using Start Level and End Level, you could show this one Menu as three different small menus on your pages. To do this, you would:
- Create a "Main" menu with a Start Level of 0 and End Level of 1. This Module would display on all Menu Selections.
- Your "Middle" Menu Module would have Start Level of 1 and End Level of 2. It would only display Menu Items 2.1 and 2.2. It could be placed at a different Position than the "Main" menu and might only display on Menu Selection pages for Menu Items 2, 2.1, 2.1.1, 2.1.2, and 2.2.
- The "Third" Menu Module would have Start Level of 2 and End Level of 3, so it would only display Menu Items 2.1.1 and 2.1.2. It could be placed at a different Position from the other Menu Modules. It might only have a Menu Assignment for the Menu Items 2.1, 2.1.1, and 2.1.2.
In this way, you can have one large, multi-level Menu but break it up into separate Modules. Also, doing a Menu in this manner has the advantage of making the Breadcrumbs Module display in a hierarchical manner.
- Start Level. Optional level to start the display of the Menu. Default is 0 for the Top Level.
- End Level. Optional level to end the display of the Menu. Default is 0, which will display all levels of the menu.
- Always show sub-menu Items. Whether or not to show sub-menu items when the parent is not active. If "No", a sub-menu Item will only display when the parent Item is clicked. If "Yes", sub-menu Items will always display in the menu.
- Target Position. Optional Javascript values, in pixels, to position a Popup window (for example, "top=50,left=50,width=200,height=300"). This is used in some templates to specify the location of drop-down or pop-up menus.
Advanced Parameters[edit]
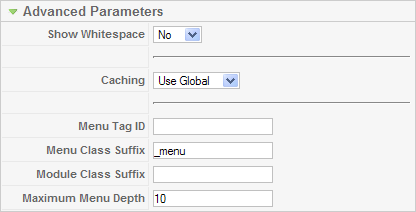
- Show Whitespace. Whether or not to show whitespace in the rendered XHTML. Whitespace includes spaces, tabs, newlines, and other formatting characters that don't affect the XHTML content. Note that this setting does not affect the appearance of the page. It only affects the appearance of the XHTML source code (for example, if you look at the source code from your browser).
- Caching. Use Global/No Caching. Whether or not to cache the content of this Module. A setting of "Use Global" will use the Cache Settings from the Global Configuration screen.
- Menu Tag ID. Optional ID attribute to be attached to the root UL tag of the Menu.
- Menu Class Suffix. Optional suffix applied to the CSS class of each Menu Item. This allows for Menu Item styling.
- Module Class Suffix. A suffix applied to the CSS class of the Module. This allows you to create customized CSS styles that will apply just to this module. You would then modify the "template.css" file of your template to apply styling to this new class.
- Enter this parameter with a leading space to create a new CSS class for this module. Enter the parameter without a leading space to change the CSS class name for this module.
- See the tutorial Using Class Suffixes in Joomla! 1.5/1.6 for more information.
- Maximum Menu Depth.
Other Parameters[edit]
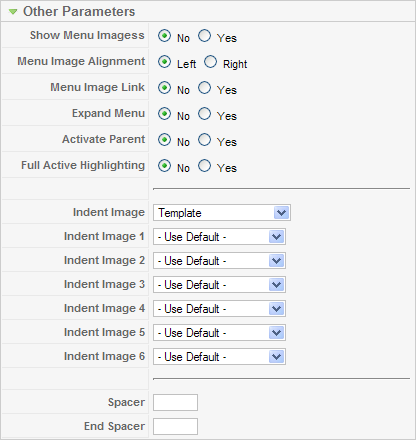
- Show Menu Images. Whether or not to show Menu Images for the Menu Items.
- Menu Image Alignment. Whether to align the images to the left or the right.
- Menu Image Link. Whether or not to have the image be a link to the Menu Item.
- Expand Menu. Whether or not to expand the menu so that all sub-menu items are always visible.
- Activate Parent. Whether or not to set the ID's of the parent Menu Items as active when a sub-menu choice is activated.
- Full Active Highlighting. Whether or not to enable activation of the Link - Article and Link - URL. Note that setting this to "Yes" can cause the loss of XHTML compliance if more than one item is active.
Most Read Content[edit]
NewsFlash[edit]
Poll[edit]
Random Image[edit]
Related Articles[edit]
Search[edit]
Sections[edit]
Statistics[edit]
Syndicate[edit]
Who's Online[edit]
Wrapper[edit]
Column Headers[edit]
Toolbar[edit]
Quick Tips[edit]
- You can insert a Joomla! Module inside an Article by typing "{loadposition xxx}", where "xxx" is the position entered for the desired Module. Note that the position name must not conflict with a position used by your Joomla! template. It can be any name (e.g., "mymoduleposition1") as long as it matches the position name typed in for the Module. The Menu Assignment for the Module must include the Menu Item where the Article is displayed, and the Plugin called "Content - Load Module" must be enabled (which it is by default). This feature allows you, for example, to insert a Custom HTML Module anywhere in an Article. See Article Manager - New/Edit for information about adding and editing Articles.


