Banner bearbeiten
From Joomla! Documentation
Beschreibung
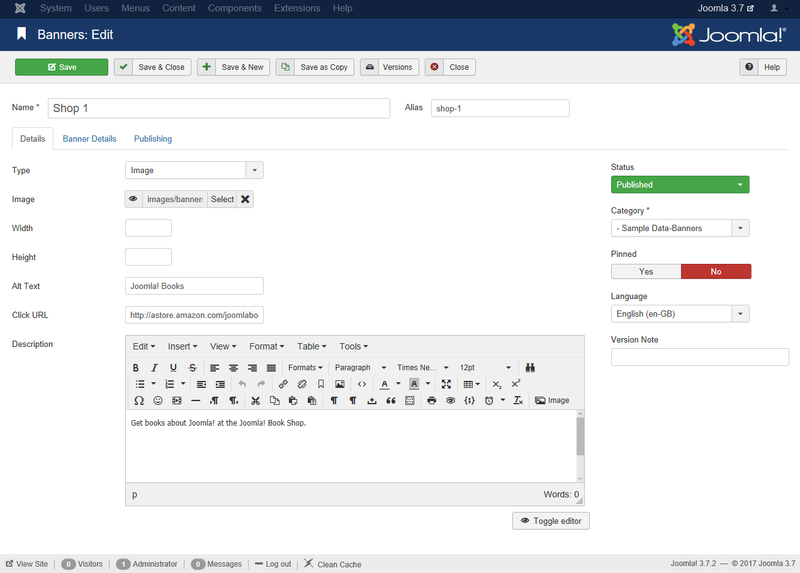
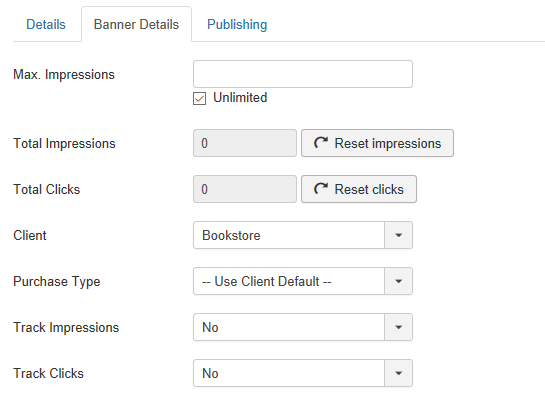
Neue Banner erstellen oder bestehende bearbeitet. Nicht vergessen: Zumindest einen Banner-Kunden und eine Banner-Kategorie vor dem ersten Banner erstellen.
Zugriff
- Wählen von Komponenten → Banner aus dem Drop-down-Menü des Joomla! Administrationsmenüs.
Den Neu-Button zum Erstellen eines neuen Banner drücken. Bearbeiten eines Banner in Banner verwalten. Dort den Titel eines Banner anklicken oder sein Kontrollkästchen markieren und den Bearbeiten-Button der Werkzeugleiste drücken.
Screenshots
Image Type
Custom Type
Details
Sidebar
- Status. (Publish/Unpublish/Trash) The published status of the item.
- Category. The Category this item belongs to. You may create new categories by entering them here.
This page is a candidate for deletion. The given reason is: No links here.
This notice should remain for a minimum of 1 week after it was placed on the page. If discussion is still ongoing, it should remain until a consensus is reached, after which the page will either be deleted or this notice removed. If you disagree with its deletion, please discuss your reasons on its associated talk page, as applicable.
Remember to check if anything links here and the page history before deleting.
Last edit by FuzzyBot (talk · contrib) · Last edited on Mon, 04 Oct 2021 23:54:09 +0000
- Pinned. (Yes/No) Whether or not the Banner is "pinned".
- Language. Item's language. If you are not using the multi-language feature of Joomla, default is 'All'.
- Version Note. Optional field to identify this version of the item in the item's Version History window.
Details
This page is a candidate for deletion. The given reason is: No links here.
This notice should remain for a minimum of 1 week after it was placed on the page. If discussion is still ongoing, it should remain until a consensus is reached, after which the page will either be deleted or this notice removed. If you disagree with its deletion, please discuss your reasons on its associated talk page, as applicable.
Remember to check if anything links here and the page history before deleting.
Last edit by FuzzyBot (talk · contrib) · Last edited on Mon, 04 Oct 2021 23:54:09 +0000
Banner Details
This page is a candidate for deletion. The given reason is: No links here.
This notice should remain for a minimum of 1 week after it was placed on the page. If discussion is still ongoing, it should remain until a consensus is reached, after which the page will either be deleted or this notice removed. If you disagree with its deletion, please discuss your reasons on its associated talk page, as applicable.
Remember to check if anything links here and the page history before deleting.
Last edit by FuzzyBot (talk · contrib) · Last edited on Mon, 04 Oct 2021 23:54:09 +0000
Publishing
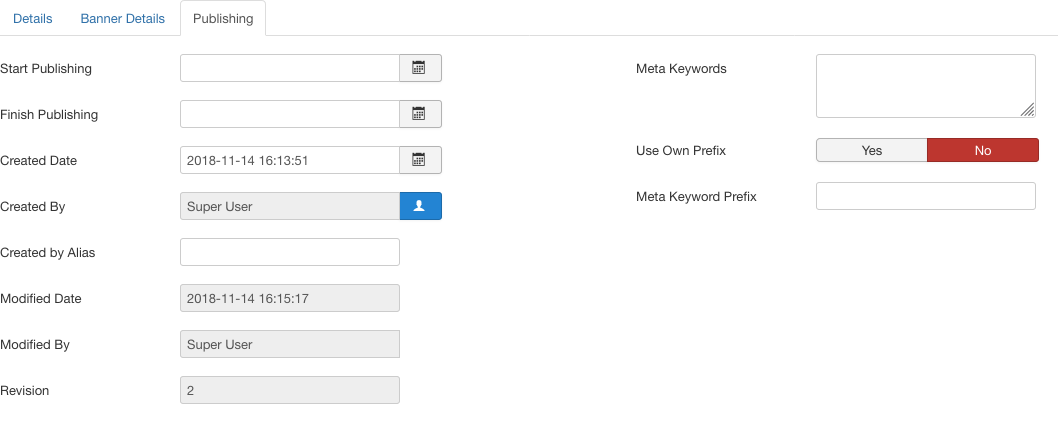
- Start Publishing. Date the Banner will publish and be available for website. Enter the date (time optional) in format year-month-date hrs:min:sec as '2021-01-07 14:10:00' or alternatively, use the modal 'pop up' window and select a date from the calendar.
- Finish Publishing. Date the Banner will stop being published and will no longer be available for website. Enter the date (time optional) in format year-month-date hrs:min:sec as '2021-01-07 14:10:00' or alternatively, use the modal 'pop up' window and select a date from the calendar.
- Created Date. Date the item was created.
- Created By. Name of the Joomla User who created the item. This will default to the currently logged-in user. If you want to change this to a different user, click the 'Select User' button
 .
.
- Created by Alias. This optional field allows you to enter in an alias for this Author for this item. This allows you to display a different Author name for this item.
- Modified Date. (Informative only) Date of last modification.
- Modified By. (Informative only) Username who performed the last modification.
- Revision. (Informative only) Number of revisions to this item.
- Meta Keywords. Optional entry for keywords. Must be entered separated by commas (for example, "cats, dogs, pets") and may be entered in upper or lower case. (For example, "CATS" will match "cats" or "Cats"). Learn more about Meta Keywords.
- Use Own Prefix. (Yes/No) Whether or not to use the banner's prefix or that of the client. Select No if you want to use the prefix of the banner client.
- Meta Keyword Prefix. When matching meta keywords, only search for meta keywords with these optional prefixes. This improves performance.
Toolbar
At the top you will see the toolbar:
The functions are:
- Save. Saves the banner and stays in the current screen.
- Save & Close. Saves the banner and closes the current screen.
- Save & New. Saves the banner and keeps the editing screen open and ready to create another banner.
- Save as Copy. Saves your changes to a copy of the current banner. Does not affect the current banner.Note: This toolbar icon is only shown if you edit an existing banner.
- Versions. Opens the banner Version History window to show any prior versions of this item. This allows you to view older versions of this item and, if desired, restore from an older version. Learn more about Version History.
- Close. Closes the current screen and returns to the previous screen without saving any modifications you may have made.
- Help. Opens this help screen.
Quick Tips
- Banners are placed on specific pages by adding Modules of type 'Banners' using the Module Manager.
- If you have a series of Banners that you would like to display on one or more pages in random order:
- Create the Banners you wish to include, making sure they have the same Client and Category.
- Create a Banner Module for this Client and Category, and in the Menu Assignment pick the Menu Selections for the module to display on.
- In the Banner Module, set the 'Randomise' value to 'Sticky, Randomise'.
- With these settings, the different Banners for that Client and Category will display on the selected pages in random order.
Related Information
More Component Banner Help:
| Related Help Screens | Description |
|---|---|
| Components Banners Banners | Used to view a list of existing Banners, edit current and create new Banners. There must be at least one Banner Client and Banner Category before a Banner can be created. |
| Components Banner Manager Options | Global options (configuration) for Banner Clients. |
| Components Banners Categories | Used to view a list of existing Banner Categories, edit current and create new Banner Categories. Note that Banner Categories are separate from other Categories, such as for Articles, Contacts, News Feeds, and Web Links. There must be at least one Banner Client and Banner Category before a Banner can be created. |
| Components Banners Categories Edit | This is where you can add a new Banner Category or edit an existing one. Note that you need to create at least one Banner Category before you can create a Banner. Also, Banner Categories are separate from other types of Categories, such as those for Articles, Contacts, and News Feeds. |
| Components Banners Clients | The Banner Client Manager is where you can edit existing Banner Clients or create new ones. Note that you must have at least one Banner Client and one Banner Category defined before you can add your first Banner. |
| Components Banners Clients Edit | This is where you add a new Banner Client or edit an existing one. Note that you need to create at least one Banner Client before you can create a Banner. |
| Components Banners Tracks | Used to view a list of existing Banner Tracking information. |
To place Banners on Pages:
| Related Help Screens | Description |
|---|---|
| Extensions Module Manager Banners | The Banner Module displays the active Banners from the Component. |


