Difference between revisions of "Content Media Manager"
From Joomla! Documentation
m (→Description: section update) |
(Marked this version for translation) |
||
| (72 intermediate revisions by 6 users not shown) | |||
| Line 1: | Line 1: | ||
| − | + | <noinclude><languages /></noinclude> | |
| − | |||
| − | |||
| − | + | {{Chunk30:Help_screen_Description_Header/<translate><!--T:80--> en</translate>}} | |
| − | The Media Manager is a tool for uploading or deleting files in the < | + | <translate> |
| + | <!--T:4--> | ||
| + | The Media Manager is a tool for uploading or deleting files in the <tt>root/images/</tt> directory on a web server.</translate> | ||
| − | + | <translate><!--T:81--> | |
| − | + | Tools included are: | |
| + | *uploading new files, | ||
| + | *deleting existing files, and | ||
| + | *creating sub-directories. | ||
| + | </translate> | ||
| − | + | {{Chunk30:Help_screen_How_To_Access_Header/<translate><!--T:82--> en</translate>}} | |
| − | + | {{Chunk30:Help_screen_How_To_Access_By_Button/<translate><!--T:83--> en</translate>|<translate><!--T:84--> Media</translate>}}. | |
| + | {{Chunk30:Help_screen_How_To_Access_By_Menu/<translate><!--T:86--> en</translate>|<translate><!--T:87--> Content,Media</translate>}}. | ||
| − | [[Image:Help30- | + | {{Chunk30:Help_screen_Screenshot_Header/<translate><!--T:88--> en</translate>}} |
| + | [[Image:Help30-Content-Media-Manager-screen-<translate><!--T:6--> | ||
| + | en</translate>.png|800px|border]] | ||
| − | + | {{Chunk30:Help_screen_Form_Header/<translate><!--T:89--> en</translate>}} | |
| − | {{Chunk30: | + | <translate> |
| − | + | ===Options=== <!--T:20--> | |
| − | + | </translate> | |
| − | + | <translate> | |
| − | + | <!--T:21--> | |
| + | View and set the [[S:MyLanguage/Help30:Components_Media_Manager_Options|Media Manager Options]] by clicking on the 'Options' button in the toolbar. Media Manager Options controls many functions of the Media Manager, such as file types allowed for upload, MIME types allowed, MIME types not allowed, .... and more.</translate> | ||
| − | + | <translate> | |
| − | ===Views=== | + | ===Views=== <!--T:22--> |
| − | To alternate views between thumbnails and details simply select the view you want by clicking "Thumbnails View" or "Details View". | + | </translate> |
| + | <translate> | ||
| + | <!--T:23--> | ||
| + | To alternate views between thumbnails and details simply select the view you want by clicking "Thumbnails View" or "Details View" by clicking on one of these icons. The folder tree can be seen in either view on the left sidebar. Click a folder, in the folder tree, to open the folder in the selected view.</translate> | ||
| − | === | + | <translate> |
| − | + | ====Thumbnail View==== <!--T:24--> | |
| + | </translate> | ||
| + | <translate> | ||
| + | <!--T:25--> | ||
| + | The 'Thumbnails View' is shown below, it contains previews of images and icons for sub-folders: </translate> | ||
| − | + | [[File:Help30-Media-Manager-Thumbnails-View-screenshot-<translate><!--T:26--> | |
| − | : | + | en</translate>.png|600px]] |
| − | : | + | <translate> |
| − | : | + | <!--T:27--> |
| + | *'''Navigation'''</translate> | ||
| + | <translate> | ||
| + | <!--T:28--> | ||
| + | :*Click the folder icons or images. Folders icons will show more content of folder, image click a preview of the image.</translate> | ||
| + | <translate> | ||
| + | <!--T:29--> | ||
| + | :*Use the carat ^ symbol </translate>[[File:Helps30-Media-Manager-carat-icon-<translate><!--T:76--> | ||
| + | en</translate>.png]] <translate><!--T:77--> | ||
| + | to 'go up' one folder level.</translate> | ||
| + | <translate> | ||
| + | <!--T:30--> | ||
| + | :*Click X to delete file or folder. Alternatively, click check boxes to mark folders and files for deletion. The 'Delete' button is located at the toolbar on top.</translate> | ||
| − | === | + | <translate> |
| − | + | ====Details View==== <!--T:31--> | |
| + | </translate> | ||
| + | <translate> | ||
| + | <!--T:32--> | ||
| + | The 'Details View' is shown below, it contains more details about the files. The benefit of the 'Details View' is the additional information on the files, dimensions: width x height in pixels(px) and file size: actual file disk size.</translate> | ||
| − | + | [[File:Help30-Media-Manager-Details-View-screenshot-<translate><!--T:33--> | |
| − | + | en</translate>.png|600px]] | |
| − | + | <translate> | |
| − | * | + | <!--T:34--> |
| − | * | + | *'''Navigation'''</translate> |
| − | * Click | + | <translate> |
| + | <!--T:35--> | ||
| + | :*Same as in the 'Thumbnails View', click on elements.</translate> | ||
| + | <translate> | ||
| + | <!--T:36--> | ||
| + | :*Files shown in preview column, folder icon for sub-folders.</translate> | ||
| + | <translate> | ||
| + | <!--T:37--> | ||
| + | :*Click X to delete file or folder. Alternatively, click check boxes to mark folders and files for deletion. The click 'Delete' toolbar button located at the left, top.</translate> | ||
| − | == | + | <translate> |
| − | + | ===Uploading Files=== <!--T:38--> | |
| + | </translate> | ||
| + | <translate> | ||
| + | <!--T:39--> | ||
| + | To upload images or other files to the <joomlaroot>/images/ directory (or any of the sub directories) simply open the directory desired to upload into by navigating to it using the current selected view, 'Thumbnail' or 'Details'.</translate> | ||
| + | <translate> | ||
| + | <!--T:41--> | ||
| + | :Click the 'Upload' button in the toolbar to reveal hidden upload element shown below:</translate> | ||
| + | :[[File:Upload-hidden-element-screen-<translate><!--T:42--> | ||
| + | en</translate>.png|400px|border]] | ||
| + | <translate> | ||
| + | <!--T:43--> | ||
| + | :#Click 'Browse...' button</translate> | ||
| + | <translate> | ||
| + | <!--T:44--> | ||
| + | :#Select file(s) from users native '''File Browser''' Explorer (Microsoft: Windows Explorer; Linux: Nautilus, Dolphin, etc.; Mac: Macintosh Explorer) window and complete selection(s).</translate> | ||
| + | <translate> | ||
| + | <!--T:45--> | ||
| + | :#'No file chosen' will change to reflect the number of files chosen to upload. Repeat step 2 if needed to select more files. Once you have all the files you want queued, then click the 'Start Upload'</translate> [[File:Upload-file-button-<translate><!--T:46--> | ||
| + | en</translate>.png]]<translate> <!--T:47--> | ||
| + | button to start the uploading of selected files to the current folder being viewed.</translate> | ||
| − | < | + | <translate> |
| + | ===Create New Folder=== <!--T:62--> | ||
| + | </translate> | ||
| + | <translate> | ||
| + | <!--T:63--> | ||
| + | To create a sub directory (folder in a folder), use the Media Manager's 'Create Folder' toolbar button. Navigate to the directory (folder) you want as the 'Parent' directory (folder). Click the "Create Folder" button in the toolbar to reveal the hidden element shown below:</translate> | ||
| + | :[[File:Create-Folder-hidden-element-screen-<translate><!--T:64--> | ||
| + | en</translate>.png]] | ||
| + | <translate> | ||
| + | <!--T:65--> | ||
| + | #First field shows the folder location, not editable, and just for information purposes. </translate> | ||
| + | <translate> | ||
| + | <!--T:66--> | ||
| + | #Type name of New Folder in the next field. </translate> | ||
| + | <translate> | ||
| + | <!--T:67--> | ||
| + | #Then click the</translate> [[File:Create-Folder-button-<translate><!--T:78--> | ||
| + | en</translate>.png]] <translate><!--T:79--> | ||
| + | button to create the new folder.</translate> | ||
| + | |||
| + | {{Chunk30:Help_screen_Toolbar_Header/<translate><!--T:90--> en</translate>}} | ||
| + | {{Chunk30:Help_screen_Toolbar_Position/<translate><!--T:93--> en</translate>}} | ||
| + | :[[File:Help30-Upload-CreateFolder-Delete-Options-Help-toolbar-<translate><!--T:9--> | ||
| + | en</translate>.png|800px|none]] | ||
| + | {{Chunk30:Help_screen_Toolbar_Function/<translate><!--T:94--> en</translate>}} | ||
| + | <translate><!--T:95--> *'''Upload'''. Opens hidden element under Thumbnail or Detail view buttons for uploading images.</translate> | ||
| + | <translate><!--T:96--> *'''Create New Folder'''. Opens hidden element under Thumbnail or Detail view buttons, where the name of a new folder can be entered and created.</translate> | ||
| + | {{Chunk30:Help_screen_toolbar_icon_Delete/<translate><!--T:15--> | ||
| + | en</translate>|<translate><!--T:16--> | ||
| + | images</translate>}} | ||
| + | {{Chunk30:Help_screen_toolbar_icon_Help/<translate><!--T:17--> | ||
| + | en</translate>}} | ||
| + | {{Chunk30:Help_screen_toolbar_icon_Options/<translate><!--T:18--> | ||
| + | en</translate>}} | ||
| + | |||
| + | {{Chunk30:Help_screen_Quick_Tips_Header/<translate><!--T:91--> en</translate>}} | ||
| + | <translate> | ||
| + | <!--T:69--> | ||
| + | * The Media Manager's maximum upload size can be changed to an amount other than 10M in the [[S:MyLanguage/Help30:Components_Media_Manager_Options|Media Manager Options]].</translate> | ||
| + | <translate> | ||
| + | <!--T:70--> | ||
| + | * You can upload multiple files at the same time. Select more than one file, click on 'Start Upload' to upload all images selected.</translate> | ||
| + | |||
| + | {{Chunk30:Help_screen_Related_Information_Header/<translate><!--T:92--> en</translate>}} | ||
| + | <translate> | ||
| + | <!--T:73--> | ||
| + | * [[S:MyLanguage/Help310:Site_Control_Panel|Control Panel]]</translate> | ||
| + | <translate> | ||
| + | <!--T:74--> | ||
| + | * [[S:MyLanguage/Help310:Components_Media_Manager_Options|Media Manager Options]]</translate> | ||
| + | |||
| + | {{cathelp|3.0,3.1,3.2,3.3,3.4,3.5,3.6,3.7,3.8,3.9,3.10|Media Manager Help Screens|Content Help Screens}} | ||
Latest revision as of 10:40, 14 February 2022
Description[edit]
The Media Manager is a tool for uploading or deleting files in the root/images/ directory on a web server.
Tools included are:
- uploading new files,
- deleting existing files, and
- creating sub-directories.
How to Access[edit]
- Click the Media button in the Control Panel.
- Select Content → Media from the dropdown menu of the Administrator Panel.
Screenshot[edit]

Form Fields[edit]
Options[edit]
View and set the Media Manager Options by clicking on the 'Options' button in the toolbar. Media Manager Options controls many functions of the Media Manager, such as file types allowed for upload, MIME types allowed, MIME types not allowed, .... and more.
Views[edit]
To alternate views between thumbnails and details simply select the view you want by clicking "Thumbnails View" or "Details View" by clicking on one of these icons. The folder tree can be seen in either view on the left sidebar. Click a folder, in the folder tree, to open the folder in the selected view.
Thumbnail View[edit]
The 'Thumbnails View' is shown below, it contains previews of images and icons for sub-folders:

- Navigation
- Click the folder icons or images. Folders icons will show more content of folder, image click a preview of the image.
- Use the carat ^ symbol
 to 'go up' one folder level.
 - Click X to delete file or folder. Alternatively, click check boxes to mark folders and files for deletion. The 'Delete' button is located at the toolbar on top.
Details View[edit]
The 'Details View' is shown below, it contains more details about the files. The benefit of the 'Details View' is the additional information on the files, dimensions: width x height in pixels(px) and file size: actual file disk size.

- Navigation
- Same as in the 'Thumbnails View', click on elements.
- Files shown in preview column, folder icon for sub-folders.
- Click X to delete file or folder. Alternatively, click check boxes to mark folders and files for deletion. The click 'Delete' toolbar button located at the left, top.
Uploading Files[edit]
To upload images or other files to the <joomlaroot>/images/ directory (or any of the sub directories) simply open the directory desired to upload into by navigating to it using the current selected view, 'Thumbnail' or 'Details'.
- Click the 'Upload' button in the toolbar to reveal hidden upload element shown below:
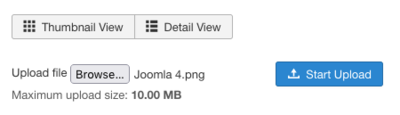
- Click 'Browse...' button
- Select file(s) from users native File Browser Explorer (Microsoft: Windows Explorer; Linux: Nautilus, Dolphin, etc.; Mac: Macintosh Explorer) window and complete selection(s).
- 'No file chosen' will change to reflect the number of files chosen to upload. Repeat step 2 if needed to select more files. Once you have all the files you want queued, then click the 'Start Upload'
 button to start the uploading of selected files to the current folder being viewed.

Create New Folder[edit]
To create a sub directory (folder in a folder), use the Media Manager's 'Create Folder' toolbar button. Navigate to the directory (folder) you want as the 'Parent' directory (folder). Click the "Create Folder" button in the toolbar to reveal the hidden element shown below:

- First field shows the folder location, not editable, and just for information purposes.
- Type name of New Folder in the next field.
- Then click the
 button to create the new folder.
Toolbar[edit]
At the top left you will see the toolbar.
The functions are:
- Upload. Opens hidden element under Thumbnail or Detail view buttons for uploading images.
- Create New Folder. Opens hidden element under Thumbnail or Detail view buttons, where the name of a new folder can be entered and created.
- Delete. Deletes the selected images. Works with one or multiple images selected.
- Help. Opens this help screen.
- Options. Opens the Options window where settings such as default parameters can be edited.
Quick Tips[edit]
- The Media Manager's maximum upload size can be changed to an amount other than 10M in the Media Manager Options.
- You can upload multiple files at the same time. Select more than one file, click on 'Start Upload' to upload all images selected.