J1.5:Het maken van een submenu
From Joomla! Documentation
Revision as of 08:26, 15 April 2016 by Marionnijhuis (talk | contribs)
The "J1.5" namespace is an archived namespace. This page contains information for a Joomla! version which is no longer supported. It exists only as a historical reference, it will not be improved and its content may be incomplete and/or contain broken links.
This page is tagged because it NEEDS UPDATING. You can help the Joomla! Documentation Wiki by contributing to it.
More pages that need help similar to this one are here. NOTE-If you feel the need is satistified, please remove this notice.
Reason: 'Needs an update using version 3.x'
In Joomla!, submenu's kunnen worden weergegeven als een menu met twee of meer niveaus of als volledig aparte menu-modules. Om te laten zien hoe je dit doet, zullen we het creëren van een menu met twee niveaus doorlopen en dan laten zien hoe je het toont als een uitgebreid menu of als afzonderlijke bovenliggende en onderliggende menu's.
Voorbeeldgegevens
In ons voorbeeld maken we een menu met de naam "Pets". Het zal twee top-level menu-items hebben genaamd "Dogs" en "Cats". Onder de Dogs, hebben we "Collies" en "Greyhounds". Onder de Cats hebben we "Tabbies" en "Siamese". Dus de structuur van het Pets menu wordt als volgt:
- Dogs
- Collies
- Greyhounds
- Cats
- Tabbies
- Siamese
Om deze structuur te maken, maken we één menu met twee menu-item niveaus. We doen dit voor het maken van één groot menu maar ook als we aparte menu-modules willen creëren (een bovenliggend menu en twee onderliggende menu's). We zullen later zien hoe je dit doet, als we de modules aanmaken.
Hier zijn de stappen voor het maken van het menu en de menu-items.
- Maak een nieuw menu in Menu's bij beheren, genaamd "Pets".
- Voeg een nieuw menu-item toe genaamd "Honden". In dit voorbeeld is het niet belangrijk wat het menu-item type is. Je kunt bijvoorbeeld een artikel aanmaken met de naam "Huisdier Menu Test" en creëer dan alle menu-items met het type ""Artikel → Artikel Lay-out"' en verwijs naar dat artikel.
- Voeg een tweede menu-item toe genaamd "Collies" (menu-itemtype als artikel indeling net als boven). In de box hoofd-item, selecteer "Dogs" zoals hieronder.

- Add a third Menu Item called "Greyhounds", again making "Dogs" the Parent Item. (Remember, these can all point to the same article.)
- Add the "Cats" Menu Item. Be sure to make the Parent Item for this "Top".
- Add the last two Menu Items, "Tabbies" and "Siamese", making "Cats" the Parent Item for both.

When you get done, the Menu Item Manager should look like the following:

Menu Modules
At this point, we've got the Menu and Menu Items done. Now we need to create the Menu Modules. In Joomla!, the Menu Module determines three main things: (1) what the menu looks like; (2) where on the page it will show; and (3) on which pages it will show. We will do two examples. In the first example, we will create one Menu Module that shows all of the items in one menu. In the second, we will create three separate menu modules to show the Pets, Dogs, and Cats menus as separate modules.
One Menu Module
To show this as one module, follow these steps:
- Navigate to Extensions → Module Manager, click the "New" icon in the toolbar, and select "Menu".
- Enter the Title as "Pets Menu" and Position as "left".
- In the Menu Assignment, enter "Select Menu Item(s) from the List" and select "Home" (under "mainmenu"), and all of the Menu Items under the "pets-menu".
- In Menu Name, select "pets-menu" from the drop-down list box.
- If you are using the default "rhuk_milkyway" template and want the menu to look like the other menus, in the Advanced Parameters enter "_menu" for Module Class Suffix.
Now, navigate to the front-end home page. You should see the Pets Menu as shown below:

Click on the Dogs Menu Item. The selected article displays and the Dogs menu expands to show the two submenu items, Collies and Greyhounds. Note that we can set a parameter in the Module Manager to always show submenu items. Here we have taken the default value of "No". Click on "Collies" and again the article changes. (Or it would if we had different articles for each Menu Item!) The screen should look like the one below:

Notice that the Breadcrumbs now shows three levels: Home, Dogs, Collies. Because we used submenus, Joomla! "knows" that Collies is under Dogs.
Separate Menu Modules
Now we will change our example to create three separate menus -- one for the top level (Dogs and Cats), one for the Dogs (Collies and Greyhounds), and one for the Cats (Tabbies and Siamese).
Note: Make sure that your Menu Items each have a unique Alias value. If you use the Copy command in the toolbar of the Menu Item Manager to create these Menu Items, the Alias will be the same as the item being copied. In this case, just edit the Alias value to make it unique (for example, the same as the Title). If you have duplicate Alias values, the menus will not work correctly if the parameter SEF URLs is set to Yes in Global Configuration.
To do this:
- Open the Pets Menu in the Module Manager and change the Title to "Pets Menu Top Level Only".
- Select the Left Position.
- Under Module Parameters, select the Menu Name "Pets Menu"
- Under Module Parameters, change the Menu Style to "List".
- Set the Start Level to "0" and the End Level to "1".
- This is optional. It allows your template to apply special a menu style to the menu (a border, for example). In Advanced Module Parameters put "_menu" in Module Class Suffix.
- For submenu Dog, in extensions menu select Module Manager, click New and select Menu, and set the title to "Dogs Submenu".
- Set the Position to "Left".
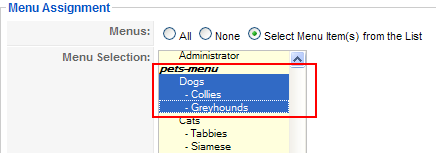
- Now this part is very important. We only want this submenu to show when we are in one of the Dogs Menu Items. So, in the Menu Assignment box, select the three items "Dogs", "Collies", and "Greyhounds", as shown below:
- Under Module Parameters, select the menu name "Pets Menu" and change the Menu Style to "List".
- Set the Start Level to "1" and End Level "2".
- This is optional. In Advanced Module Parameters, set Module Class Suffix to "_menu".
- For the "Cats Submenu", repeat steps from 7 to 12 except step 9. In the Menu Assignment box, select the items "Cat", "Tabbies" and "Siamese" (so this menu will only show under these Menu Items).

At this point, we have three menu modules all pointing to the Pets Menu. The only differences between them are (1) the Start and End Levels and (2) the Menu Item Assignment.
Now, in the front end, navigate to the Home page. The "Pets Menu Top Level Only" menu should show. Select the "Dogs" Menu Item. Now, the "Dogs Submenu" should show as a separate menu, as shown below:

Click on the Collies Menu Item and notice that again the Breadcrumbs shows the hierarchy of "Home", "Dogs", and "Collies".
Using this same technique, it is easy to create third-level submenus. You just make the Parent Menu Item a second-level submenu. Then you could use the same technique to create a separate Menu Module with Start Level of 2 and End Level of 3. This would show only the third-level Menu Items.