Difference between revisions of "Access Control List Tutorial"
From Joomla! Documentation
Dextercowley (talk | contribs) (Default ACL Setup change) |
Dextercowley (talk | contribs) (intro text) |
||
| Line 12: | Line 12: | ||
=Overview of ACL in Version 1.6= | =Overview of ACL in Version 1.6= | ||
| + | |||
| + | This section outlines the major ACL changes between versions 1.5 and 1.6. | ||
==Users, Groups, and Access Levels== | ==Users, Groups, and Access Levels== | ||
Revision as of 12:56, 16 October 2009
This page has been archived. This page contains information for an unsupported Joomla! version or is no longer relevant. It exists only as a historical reference, it will not be improved and its content may be incomplete and/or contain broken links.
This archived page is actively undergoing a major edit for a short while.
As a courtesy, please do not edit this page while this message is displayed. The user who added this notice will be listed in the page history. This message is intended to help reduce edit conflicts; please remove it between editing sessions to allow others to edit the page.
If this page has not been edited for several hours, please remove this template, or replace it with {{underconstruction}} or {{incomplete}}.
Note: This is a draft version written for the October 2009 alpha2 release of Joomla! version 1.6. Since version 1.6 is still under active development, screenshots and other information discussed in this article may change before the final release of version 1.6. However, it is expected that the basic concepts here will not change.
ACL Defined[edit]
ACL stands for Access Control List. According to Wikipepdia, “An ACL specifies which users or system processes are granted access to objects, as well as what operations are allowed to be performed on given objects.”
In the case of Joomla!, we have two separate aspects to ACL.
- Which users can gain access to what parts of the website? For example, will a given menu choice be visible for a given user?
- What operations (or actions) a user can perform on any given object? For example, can a user submit or edit an article?
Overview of ACL in Version 1.6[edit]
This section outlines the major ACL changes between versions 1.5 and 1.6.
Users, Groups, and Access Levels[edit]
With the definition in mind, let's look at how we set up the ACL for our site in version 1.6. The table below summarizes the major changes from version 1.5.
| Version 1.5 | Version 1.6 | |
| Groups | 7 fixed groups (Public, Registered, Author, Editor, Publisher, Manager, Administrator, and Super-Administrator) | Unlimited user-defined Groups |
| Users & Groups | A User can be assigned to only one group | A User can be assigned to multiple groups |
| Access Levels | 3 fixed Access Levels (Public, Registered, Special) | Unlimited user-defined Access Levels |
| Access Levels & Groups | Relationship between Groups and Access Levels was fixed. | Groups are assigned to Access Levels. Any combination of Groups can be assigned to any Access Level. |
We see that in every case the ACL has been made much more flexible, with unlimited Groups and Access Levels, and the ability to assign one User to multiple Groups and any Groups to any Access Level.
Actions, Groups, and Inheritance[edit]
The other side of ACL is granting permissions to users to take actions on objects. Here again there is a big change between Version 1.5 and 1.6. In 1.5, the actions allowed for a given group were fixed. For example, a User in the Author group could only submit an article whereas someone in the Publisher group could submit, edit, and publish articles. Also, in version 1.5 the permissions were all-or-nothing. A member of the Editor group could edit all articles on the site.
The chart below shows what has changed between versions 1.5 and 1.6.
| Version 1.5 | Version 1.6 | |
| Groups and Actions | Actions allowed by different groups are fixed. | Actions allowed for each group are defined by site administrator. |
| Permission Scope | Entire Site. User has same permissions for all objects on the site. | Permissions can be set at multiple levels in hierarchy: Site, Component, Category, Object. |
| Permission Inheritance | Not applicable | Permissions can be inherited from parent Groups and parent Categories |
Default ACL Setup[edit]
Action permissions in version 1.6 can be defined at multiple levels, as follows:
- Global Configuration: determines the default permissions for each action and group
- Component Options->Permissions: can override the default permissions for this component (for example, Articles, Menus, Users, Banners, and so on).
- Category: can override the default permissions for objects in one or more categories. Applies to all components with categories, including Articles, Banners, Contacts, Newsfeeds, and Weblinks).
- Article: Can override the permissions for a specific article.
When Joomla! is installed, these are set to their initial default settings. We will discuss these initial settings as a way to understand how the ACL works.
Global Configuration[edit]
Joomla! version 1.6 will install with the same familiar back-end permissions as that of version 1.5. However, with 1.6, you can easily change these to suit the needs of your site.
It is important to understand that the permissions for each action are inherited from the level above. Let's see how this works. The top level for this is the entire site. This is set up in the Site->Global Configuration->Permissions, as shown below.
The first thing to notice is the column headings, Admin, Login, Manage, Create, Delete, Edit, Edit State. These are the actions that a use can perform on an object in Joomla. The specific meaning of each action depends on the context. For the Global Configuration screen, they are defined as follows:
- Admin
- Grants the user "super user" status. Users with this permission can do anything on the site. Only users with this permission can change Global Configuration settings (this screen).
- Login
- Login to the back end or front end of the site
- Manage
- Open the component manger screens (User Manager, Menu Manager, Article Manager, and so on)
- Create
- Create new objects (for example, users, menu items, articles, weblinks, and so on)
- Delete
- Delete existing objects
- Edit
- Edit existing objects
- Edit State
- Change object state (Publish, Unpublish, Archive, and Trash)
On the left side, we have the Groups for the site. In this case, we have the standard 7 groups that we had in version 1.5 plus we have an additional group called "Park Rangers". Notice that our groups are set up with similar permissions as they were for version 1.5. Keep in mind that we can change any of these permissions to make the security work the way we want. Let's go through this to see how it works.
- Public has nothing set for any actions. The default in this case is for no permissions. So, as you would expect, the Public group has no special permissions.
- Registered is the same a Public except for the Allow permission for the Login action. This means that members of the Registered group can login to the site. Since default permissions are inherited, this means that, unless a child group overrides this permission, all child groups of the Registered group will be able to login as well.
- Administrator group members have permissions for Manage, Create, Delete, Edit, and Edit State. This means that members of this group, by default, can do everything except be a "super user". They can open the different component manager screens (User Manager, Article Manager, and so on) and can create, delete, edit, and change the state of these objects.
- Manager is a "child" group of the Administrator group. So, by default, the Manager group inherits all of the same permissions as the Administrator group.
- Park Rangers and Publisher both are children of the Registered group and inherit that group's default permissions.
- Editor is a child of the Publishers group and inherits its permissions.
- Author is a child of the Editor group and inherits its permissions. Since Publishers, Editor, and Author have no back-end permissions, we will discuss them below, when we discuss front-end permissions.
- Super Users group has the Allow permission for the Admin action. Because of this, members of this group have super user permissions throughout the site. They are the only users who can access and edit values on the Global Configuration screen.
There are two very important points to understand from this screen. The first is to see how the permissions can be inherited from the parent Group. The second is to see how you can control the default permissions by Group and by Action.
This provides a lot of flexibility. For example, if you wanted Park Rangers to be able to have the ability to login to the back end, you could just change their Login value to "Allow". If you wanted to not allow members of Administrator group to delete objects or change their state, you would change their permissions in these columns to Inherit (or Deny).
Component Options & Permissions[edit]
Now, let's continue to see how the default back-end permissions for version 1.6 mimic the permissions for version 1.5. The Super Users group in 1.6 is equivalent to the Super Administrator group in 1.5.
Just looking at the Global Configuration screen above, it would appear that the Administrator group and the Manager group have identical permissions. However, in version 1.5 Administrators can do everything except Global Configuration, whereas Managers are not permitted to add users or work with menu items. That is also true in the default version 1.6 configuration. Let's see how this is accomplished.
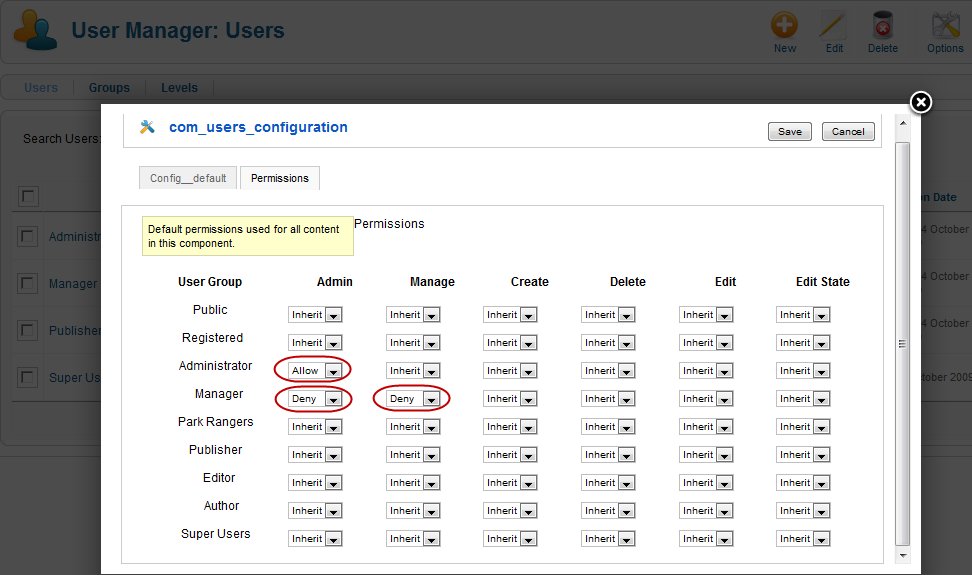
If we navigate to Users->User Manager and click the Options button in the toolbar, we see the screen below:
This screen is the same as the Global Configuration Permissions screen, except that these values only affect working with Users. Let's look at how this works.
First, notice that the Administrator group has Allow permission for the Admin action and the Manager group has Deny permission for this action. Remember that the Admin action in the Global Configuration screen gives the group "super user" permissions. In this screen, the Admin action allows you to edit the Options values. So, the Administrator group can do this but the Manager group cannot.
Next, notice that the Administrator has Inherit for the Manage action and the Manager group has Deny permission. In this screen, the Manage action gives a group access to the User Manager. Since the Administrator has Allow for the Manage action by default, then the Inherit permission here means they inherit the Allow permission for the Manage action. Since the Manager group has Deny permission for the Manage action, members of the Manager group cannot access the User Manager and therefore cannot do any of the other user-related actions.
If you look at the Options for Menus->Menu Manager, you will see the same default settings as for the User Manager. Again, the Administrator group can manage and set default permissions for Menu Manager objects whereas the Manager group cannot.
In short, we can see that the different permissions for the Administrator and Manager groups are set using the Options->Permissions forms on the User Manager and Menu Manager screens.
It is also important to understand that this same Options->Permissions form for setting default permissions is available for all Joomla! objects, including Media Manager, Banners, Contacts, Newsfeeds, Redirect, Search Statistics, Web Links, Extensions, Modules, Plugins, Templates, and Language. So you now have the option to create user groups with fine-tuned sets of back-end permissions.
Front End Permissions[edit]
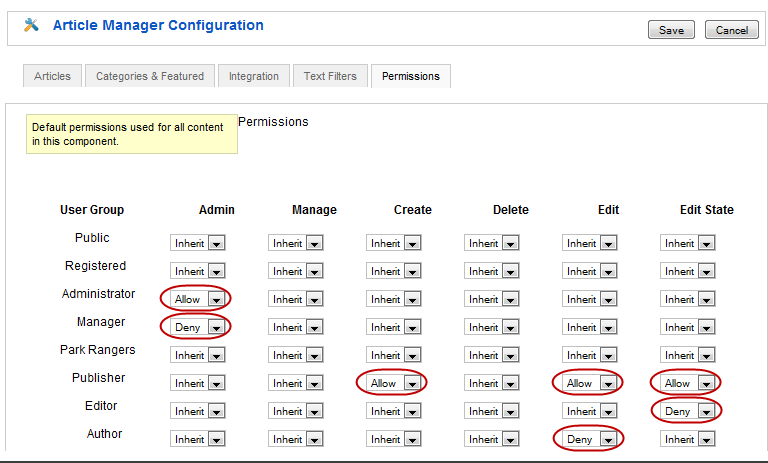
Default permissions for the front end are also set using the Options form. Let's look at Content->Article Manager->Options->Permissions.
First, if we look at the permissions for Administrator and Manager, we see that in this case Manager can do all actions for articles except the Admin action and Administrator can do everything. So both groups can create, delete, edit, and change the state of articles, but a Manager cannot see or change the default settings for articles.
Now, let's look at the groups Publisher, Editor, and Author and see how their permissions are set. All of these groups have Inherit permission for Admin and Manage. Since their default for these is blank, they do not have permission for these. So none of these groups are allowed to work with articles on the back end.
Publisher has Allow permission for Create, Edit, and Edit State. This means that Publishers, by default, can add new articles, edit existing articles, and change the state of articles. Note that, by default, Publishers can not delete articles.
Editors inherit the same permissions as Publishers except that they have Deny permission for the Edit State action. So Editors can Create and Edit but are not allowed to Edit State, which in this case means to Publish, Unpublish, Trash, or Archive articles.
Finally, Authors inherit the Editor permissions except for the Deny in Edit. So Authors can only Create new articles and cannot do any other action.
It is important to remember that these are only default settings that will apply to all articles by default. However, as we will see, they can easily be changed for specific Categories.
Article Manager & Actions Diagram[edit]
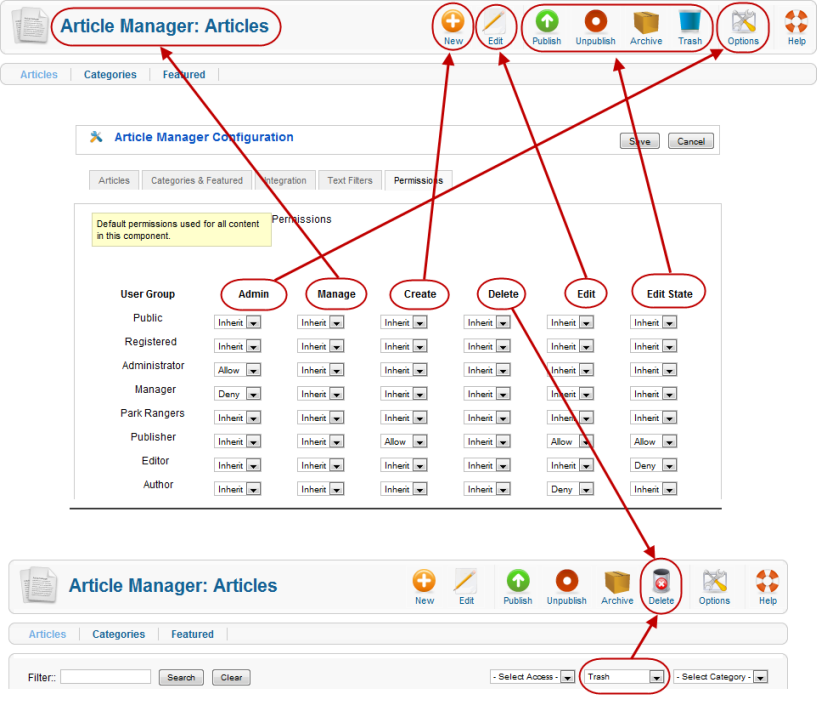
The diagram below shows how each action in the permissions form relates to the various options on the Article Manager screen.
- Admin allows you to view and change the Options for the component.
- Manage allows you to navigate to the Article Manager. Without this permission, no other actions are possible.
- Create allows you to add new articles.
- Delete allows you to delete trashed articles. Note that the Delete icon only shows in the toolbar when you have the "Select State" filter set to "Trash".
- Edit allows you to edit existing articles.
- Edit State allows to you Publish, Unpublish, Archive, or Trash articles.


