Adding a new menu
From Joomla! Documentation
Revision as of 10:18, 23 November 2015 by Conlippert (talk | contribs)
This article or section is in the process of an expansion or major restructuring. You are welcome to assist in its construction by editing it as well. If this article or section has not been edited in several days, please remove this template.
This article was last edited by Conlippert (talk| contribs) 8 years ago. (Purge)
How to Add a New Menu
Joomla! allows you to create Menus for flexible navigation. In this tutorial, you’ll find a complete walkthrough of the steps involved in creating a Menu in a Joomla! site. In this tutorial, we will set up a new menu with a menu module, position it in a template and add a menu item to it.
1. Open a new browser window and type in the URL, which will be similar to http://www.your-site-name-here.com/administrator or, if you have Joomla! installed on your local computer, http://localhost/your-folder-name-here/administrator. Here you will have to log in as an Administrator or Super Administrator.
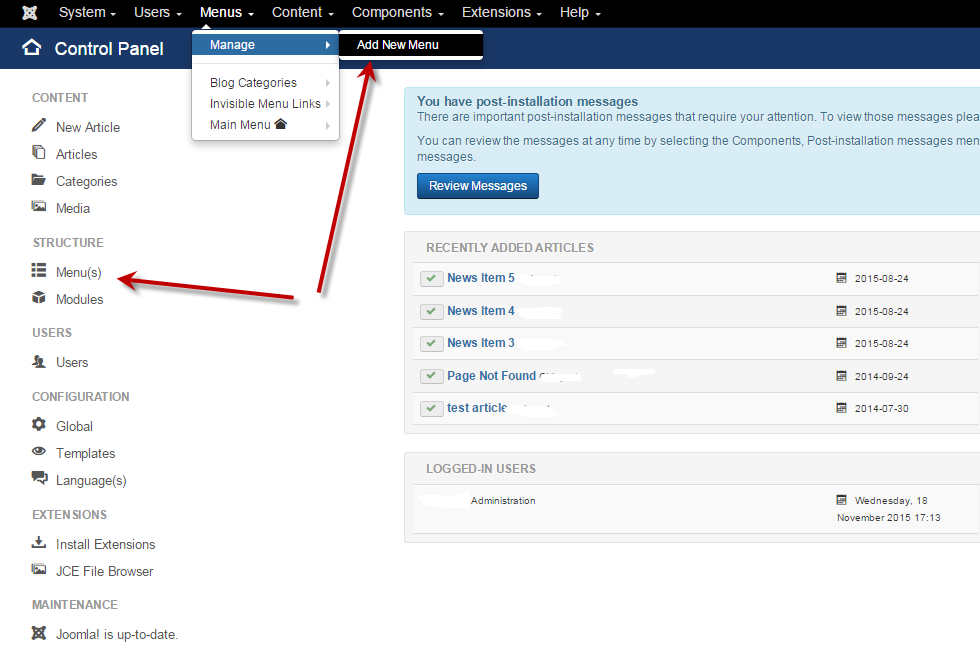
2. There are 2 ways to add a "Menu": Within the site administration panel, select Menus from the menu bar in the upper left corner. From the drop-down list, choose the "Manage" then choose "Add New Menu". You can also select Menu Manager from the left column and then select "New" from the top left corner icons.


3. Fill in the "Title", "Menu Type" and a "Description":
- Title *: A proper title for the menu. This is used to identify the menu in the Menu Manager in the backend.
- Menu type *: This should be a unique identification name used by Joomla! to identify this menu. Spaces are not allowed but you may use the '-' character such as news-menu.
- Description: A description of the menu, useful for your own reference.
4. Click the Save or the Save and Close toolbar button to create the new menu. The Save and Close button will return you to the Menu Manager. To leave without saving click the Cancel toolbar button.
5. If you saved and closed, you will see your new menu in the list of Menus.
1. In the far right column of the Menu Manager, click on Add a Module for this Menu Type. You can also add a Menu Module through the Module Manager. Click here to see this option: https://docs.joomla.org/Help34:Extensions_Module_Manager_Menu
2. You will be looking at the "Menu Module". Here are a few of the most basic points regarding the Menu Module:
- The Title field is required, so create a descriptive title. If you want this title displayed on the front of the website, click on the "Show Title" button on the right.
- Notice the Select Menu list. This should show the name of the Menu you just created.
- You need to select a Position in your template for where you want your menu to appear. Note: getting it to look the way you want it to depends on your template styling.
3. There are many options to choose from in the Menu Module such as, publishing dates, user access, and sub-menu items just to name a few. For detailed information about the Menu Module and all it's parameters see: https://docs.joomla.org/Help34:Extensions_Module_Manager_Menu [1]
4. Click the Save or the Save and Close toolbar button to create the new Menu Module. The Save and Close button will return you to the Module Manager. To leave without saving click the Cancel toolbar button.
Now it's time to add Menu Items to your new menu. There are many kinds of Menu Item Types in Joomla. Some are included in the core installation and many third-party components may add more types also. To continue with this exercise you can do one of 2 things:
- Complete the detailed tutorial here on Joomla Documentation which describes "Adding a menu item which points to an Article". https://docs.joomla.org/Adding_a_menu_item_which_points_to_an_Article.
- For detailed information on all the parameters available for Menu Items see https://help.joomla.org/proxy/index.php?option=com_help&keyref=Help34:Menus_Menu_Item_Manager_Edit.
When you've added a menu item or two to your new menu, make sure you check out how it looks on the front end of your site.


