Difference between revisions of "Creating a submenu"
From Joomla! Documentation
m (→Menu and Menu Items: grrrr, found it really hard to follow the instructions. this extra step might help people!) |
m (→Separate Menu Modules: end level needs to be 1 even though start level is also 1) |
||
| (12 intermediate revisions by 2 users not shown) | |||
| Line 15: | Line 15: | ||
Here are the steps to create the Menu and Menu Items. | Here are the steps to create the Menu and Menu Items. | ||
# '''Menus → Menu Manager''' | # '''Menus → Menu Manager''' | ||
| − | # Create [ | + | # Create [[J3.2:Adding_a_new_menu|a "new" Menu]] in the Menu Manager called "Pets". |
| − | # For the purposes of this exercise it might be easier to create a single article to point all the "Menu Items" at. So, [ | + | # For the purposes of this exercise it might be easier to create a single article to point all the "Menu Items" at.{{-}} So, [[Adding_a_new_article|create one article]] called "Pet Menu Test". |
| − | # Add a new [ | + | # Add a new [[Adding_a_new_menu_item|Menu Item]] called "Dogs". For this example, we don't really care what the "Menu Item Type"(s) are! <br />Just for the purposes of this exercise it might be easiest to set their "Menu Item Type" as '''Articles → Single Article''' {{-}}Then the "Select Article" field appears. Click the "Select" button and navigate to "Pet Menu Test". |
# Use the "Menu Location" drop-down to put the "Menu Item" in "Pets" | # Use the "Menu Location" drop-down to put the "Menu Item" in "Pets" | ||
| − | # Click on the button "Save and close" up in the top green buttons. | + | # Click on the button "Save and close" up in the top green buttons. |
| − | # Add a second Menu Item called "Collies" (again, Menu Type of Article Layout as above). In the Parent Item box, select "Dogs", nearly as shown below: [[Image:submenu_example1.png|frame|center]] | + | # Add a second Menu Item called "Collies" (again, Menu Type of Article Layout as above). In the Parent Item box, select "Dogs", nearly as shown below:{{-}}[[Image:submenu_example1.png|frame|center]]{{-}}The screenshot is from a previous version of Joomla but 3.2 is very similar. The "Parent Item" option is the 2nd item over in the right-hand column in 3.2. |
# Add a third Menu Item called "Greyhounds", again making "Dogs" the Parent Item. (Remember, these can all point to the same article.) | # Add a third Menu Item called "Greyhounds", again making "Dogs" the Parent Item. (Remember, these can all point to the same article.) | ||
| − | # Add the "Cats" Menu Item. Be sure to make the Parent Item for this "Top". | + | # Add the "Cats" Menu Item. Be sure to make the Parent Item for this "Top" or "Menu Item Root". |
# Add the last two Menu Items, "Tabbies" and "Siamese", making "Cats" the Parent Item for both. | # Add the last two Menu Items, "Tabbies" and "Siamese", making "Cats" the Parent Item for both. | ||
| − | When you are finished with the "Menu Items" section, the Menu Item Manager should look very similar to the following:[[Image:submenu_example2.png|frame|center]] | + | When you are finished with the "Menu Items" section, the Menu Item Manager should look very similar to the following:{{-}}[[Image:submenu_example2.png|frame|center]]{{-}} Again it's a little different in 3.2 as we don't get the numbers in the far left column in 3.2. |
==Menu Modules== | ==Menu Modules== | ||
| Line 37: | Line 37: | ||
# In "Select Menu" select "Pets" from the drop-down list. | # In "Select Menu" select "Pets" from the drop-down list. | ||
# If you are using the default "rhuk_milkyway" template and want the menu to look like the other menus, in the Advanced Parameters enter "_menu" for Module Class Suffix. | # If you are using the default "rhuk_milkyway" template and want the menu to look like the other menus, in the Advanced Parameters enter "_menu" for Module Class Suffix. | ||
| + | # By the "Show Sub-menu Items" click on the "No" button. | ||
| − | Now, navigate to the front-end home page. You should see the Pets Menu as shown below:[[Image:submenu_example3.png|frame|center]]Click on the Dogs Menu Item. The selected article displays and the Dogs menu expands to show the two submenu items, Collies and Greyhounds. Note that | + | Now, navigate to the front-end home page or refresh/reload it. You should see the Pets Menu as shown below:[[Image:submenu_example3.png|frame|center]]Click on the Dogs Menu Item. The selected article displays and the Dogs menu expands to show the two submenu items, Collies and Greyhounds. Note that the default in "Show Sub-menu Items" was to always show sub-menu items. We changed it to "show off". |
Click on "Collies" and again the article changes. (Or it would if we had different articles for each Menu Item!) The screen should look like the one below: [[Image:submenu_example4.png|frame|center]] | Click on "Collies" and again the article changes. (Or it would if we had different articles for each Menu Item!) The screen should look like the one below: [[Image:submenu_example4.png|frame|center]] | ||
| Line 50: | Line 51: | ||
To do this: | To do this: | ||
| − | # Open the Pets Menu in the Module Manager and change the Title to "Pets Menu Top Level Only". | + | # Open the Pets Menu in the Module Manager and change the Title from "Pets Menu" to "Pets Menu Top Level Only". |
| − | # Select the Left Position. | + | # Select the Left Top Position (position 7). |
| − | # Under Module | + | # Under the Module tab "Select Menu" drop-down to "Pets" or "Pets Menu" |
| − | + | # Set the Start Level to "1" and the End Level also to "1". | |
| − | # Set the Start Level to " | ||
# ''This is optional. It allows your template to apply special a menu style to the menu (a border, for example).'' In Advanced Module Parameters put "_menu" in Module Class Suffix. | # ''This is optional. It allows your template to apply special a menu style to the menu (a border, for example).'' In Advanced Module Parameters put "_menu" in Module Class Suffix. | ||
| − | # For | + | # For sub-menu "Dog", (in extensions menu select Module Manager (if you are not already there!)), click New and select Menu, and set the title to "Dogs Submenu". |
| − | # Set the Position to "Left". | + | # Set the Position to "Left top [position-7]". |
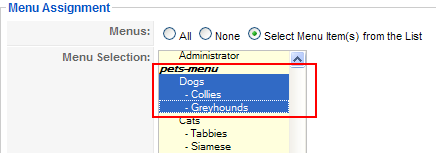
# ''Now this part is very important.'' We only want this submenu to show when we are in one of the Dogs Menu Items. So, in the Menu Assignment box, select the three items "Dogs", "Collies", and "Greyhounds", as shown below: [[Image:submenu_example5.png|frame|center]] | # ''Now this part is very important.'' We only want this submenu to show when we are in one of the Dogs Menu Items. So, in the Menu Assignment box, select the three items "Dogs", "Collies", and "Greyhounds", as shown below: [[Image:submenu_example5.png|frame|center]] | ||
| − | # Under Module | + | # Under the "Module" tab, select the menu name "Pets Menu". |
| − | # Set the Start Level to "1" and End Level "2 | + | # Set the Start Level to "1" and End Level also to "1" again. Try 2 for a spot of weirdness. |
# ''This is optional.'' In Advanced Module Parameters, set Module Class Suffix to "_menu". | # ''This is optional.'' In Advanced Module Parameters, set Module Class Suffix to "_menu". | ||
| − | # For the "Cats Submenu", repeat steps from 7 to 12 except step | + | # For the "Cats Submenu", repeat steps from 7 to 12 except step 8. In the Menu Assignment box, select the items "Cat", "Tabbies" and "Siamese" (so this menu will only show under these Menu Items). |
At this point, we have three menu modules all pointing to the Pets Menu. The only differences between them are (1) the Start and End Levels and (2) the Menu Item Assignment. | At this point, we have three menu modules all pointing to the Pets Menu. The only differences between them are (1) the Start and End Levels and (2) the Menu Item Assignment. | ||
| Line 70: | Line 70: | ||
Click on the Collies Menu Item and notice that again the Breadcrumbs shows the hierarchy of "Home", "Dogs", and "Collies". | Click on the Collies Menu Item and notice that again the Breadcrumbs shows the hierarchy of "Home", "Dogs", and "Collies". | ||
| − | Using this same technique, it is easy to create third-level | + | ==Sub-Sub-Menus== |
| + | Using this same technique, it is easy to create third-level sub-menus. You just make the Parent Menu Item a second-level sub-menu. Then you could use the same technique to create a separate Menu Module with Start Level of 2 and End Level of 3. This would show only the third-level Menu Items. | ||
[[Category:Tutorials]] | [[Category:Tutorials]] | ||
[[Category:Menu Management]] | [[Category:Menu Management]] | ||
Revision as of 13:25, 5 March 2014
In Joomla!, submenus can be shown either as one menu with two or more levels or as completely separate menu modules. To show how to do this, we will step through creating a two-level menu and then see how to show it either as one large menu or as separate parent and child menus.
Sample Data[edit]
In our example, we will create a menu called "Pets". It will have two top-level menu items called "Dogs" and "Cats". Under Dogs, we will have "Collies" and "Greyhounds". Under Cats we will have "Tabbies" and "Siamese". So the structure of the Pets menu will be as follows:
- Dogs
- Collies
- Greyhounds
- Cats
- Tabbies
- Siamese
Menu and Menu Items[edit]
To create this structure, we create one menu with two levels of Menu Items. Note that we do this whether we want to have everything shown as one large menu or whether we want to create separate menu modules (one parent menu and two child menus). We'll see how to do this later on, when we create the modules.
Here are the steps to create the Menu and Menu Items.
- Menus → Menu Manager
- Create a "new" Menu in the Menu Manager called "Pets".
- For the purposes of this exercise it might be easier to create a single article to point all the "Menu Items" at. So, create one article called "Pet Menu Test".
- Add a new Menu Item called "Dogs". For this example, we don't really care what the "Menu Item Type"(s) are!
Just for the purposes of this exercise it might be easiest to set their "Menu Item Type" as Articles → Single Article Then the "Select Article" field appears. Click the "Select" button and navigate to "Pet Menu Test". - Use the "Menu Location" drop-down to put the "Menu Item" in "Pets"
- Click on the button "Save and close" up in the top green buttons.
- Add a second Menu Item called "Collies" (again, Menu Type of Article Layout as above). In the Parent Item box, select "Dogs", nearly as shown below:The screenshot is from a previous version of Joomla but 3.2 is very similar. The "Parent Item" option is the 2nd item over in the right-hand column in 3.2.

- Add a third Menu Item called "Greyhounds", again making "Dogs" the Parent Item. (Remember, these can all point to the same article.)
- Add the "Cats" Menu Item. Be sure to make the Parent Item for this "Top" or "Menu Item Root".
- Add the last two Menu Items, "Tabbies" and "Siamese", making "Cats" the Parent Item for both.

When you are finished with the "Menu Items" section, the Menu Item Manager should look very similar to the following:

Again it's a little different in 3.2 as we don't get the numbers in the far left column in 3.2.
Menu Modules[edit]
At this point, we've got the Menu and Menu Items done. Now we need to create the Menu Modules. In Joomla!, the Menu Module determines three main things: a) what the menu looks like; b) where on the page it will show; and c) on which pages it will show.
We will do two examples. In the first example, we will create one Menu Module that shows all of the items in one menu. In the second, we will create three separate menu modules to show the Pets, Dogs, and Cats menus as separate modules.
One Menu Module[edit]
To show this as one module, follow these steps:
- Navigate to
Extensions → Module Manager,
click the "New" icon in the toolbar, and select "Menu". - Enter the Title as "Pets Menu" and Position as "left". (Left top, )
- In "Select Menu" select "Pets" from the drop-down list.
- If you are using the default "rhuk_milkyway" template and want the menu to look like the other menus, in the Advanced Parameters enter "_menu" for Module Class Suffix.
- By the "Show Sub-menu Items" click on the "No" button.
Now, navigate to the front-end home page or refresh/reload it. You should see the Pets Menu as shown below:

Click on the Dogs Menu Item. The selected article displays and the Dogs menu expands to show the two submenu items, Collies and Greyhounds. Note that the default in "Show Sub-menu Items" was to always show sub-menu items. We changed it to "show off". Click on "Collies" and again the article changes. (Or it would if we had different articles for each Menu Item!) The screen should look like the one below:

Notice that the Breadcrumbs now shows three levels: Home, Dogs, Collies. Because we used submenus, Joomla! "knows" that Collies is under Dogs.
Separate Menu Modules[edit]
Now we will change our example to create three separate menus -- one for the top level (Dogs and Cats), one for the Dogs (Collies and Greyhounds), and one for the Cats (Tabbies and Siamese).
Note: Make sure that your Menu Items each have a unique Alias value. If you use the Copy command in the toolbar of the Menu Item Manager to create these Menu Items, the Alias will be the same as the item being copied. In this case, just edit the Alias value to make it unique (for example, the same as the Title). If you have duplicate Alias values, the menus will not work correctly if the parameter SEF URLs is set to Yes in Global Configuration.
To do this:
- Open the Pets Menu in the Module Manager and change the Title from "Pets Menu" to "Pets Menu Top Level Only".
- Select the Left Top Position (position 7).
- Under the Module tab "Select Menu" drop-down to "Pets" or "Pets Menu"
- Set the Start Level to "1" and the End Level also to "1".
- This is optional. It allows your template to apply special a menu style to the menu (a border, for example). In Advanced Module Parameters put "_menu" in Module Class Suffix.
- For sub-menu "Dog", (in extensions menu select Module Manager (if you are not already there!)), click New and select Menu, and set the title to "Dogs Submenu".
- Set the Position to "Left top [position-7]".
- Now this part is very important. We only want this submenu to show when we are in one of the Dogs Menu Items. So, in the Menu Assignment box, select the three items "Dogs", "Collies", and "Greyhounds", as shown below:
- Under the "Module" tab, select the menu name "Pets Menu".
- Set the Start Level to "1" and End Level also to "1" again. Try 2 for a spot of weirdness.
- This is optional. In Advanced Module Parameters, set Module Class Suffix to "_menu".
- For the "Cats Submenu", repeat steps from 7 to 12 except step 8. In the Menu Assignment box, select the items "Cat", "Tabbies" and "Siamese" (so this menu will only show under these Menu Items).

At this point, we have three menu modules all pointing to the Pets Menu. The only differences between them are (1) the Start and End Levels and (2) the Menu Item Assignment.
Now, in the front end, navigate to the Home page. The "Pets Menu Top Level Only" menu should show. Select the "Dogs" Menu Item. Now, the "Dogs Submenu" should show as a separate menu, as shown below:

Click on the Collies Menu Item and notice that again the Breadcrumbs shows the hierarchy of "Home", "Dogs", and "Collies".
Sub-Sub-Menus[edit]
Using this same technique, it is easy to create third-level sub-menus. You just make the Parent Menu Item a second-level sub-menu. Then you could use the same technique to create a separate Menu Module with Start Level of 2 and End Level of 3. This would show only the third-level Menu Items.