J3.x:Почнімо працювати із шаблонів
From Joomla! Documentation
Revision as of 13:45, 1 October 2015 by Olesya6968ak (talk | contribs) (Created page with "= Інсталювання Шаблонів =")
Вступ
Вступний посібник надасть вам знань про те, що ж таке система шаблонів в Joomla! і як з нею працювати.
Цілі шаблонів
{{:What is the purpose of a template?/Шаблон контролює загальний вигляд сайту. Він забезпечує фреймворк, який поєднує елементи, модулі і компоненти, використовуючи каскадні стилі(cascading style sheet). Шаблони має і бек-енд(серверна частина сайту), і фронт-енд (клієнтська частина, інтерфейс) сайту.
При встановленні Joomla! користувач одразу отримує декілька шаблонів. Також ви можете знайти багато шаблонів на інших веб сайтах. Є шаблони безкоштовні під ліцензією, а є платні. До того ж, є багато розробників, які в праві створити власні шаблони. І ви теж можете.
Шаблонами керують через Менеджер Шаблонів, який розташований в меню Розширень (Extensions) у фронт-енді(в профілі адміна) вашого сайту. Чому використовують шаблони Joomla!?}}
Що ви можете зробити із шаблонами
A template is used to manipulate the way content is delivered to a web browser or screen reader. Here are some ways you can employ this on your Joomla!-powered site.
Layout
The template is the place where the design of the main layout is set for your site. This includes where you place different elements (modules). For example: You can control the placement of menus, a log in form, advertising banners, polls, etc.
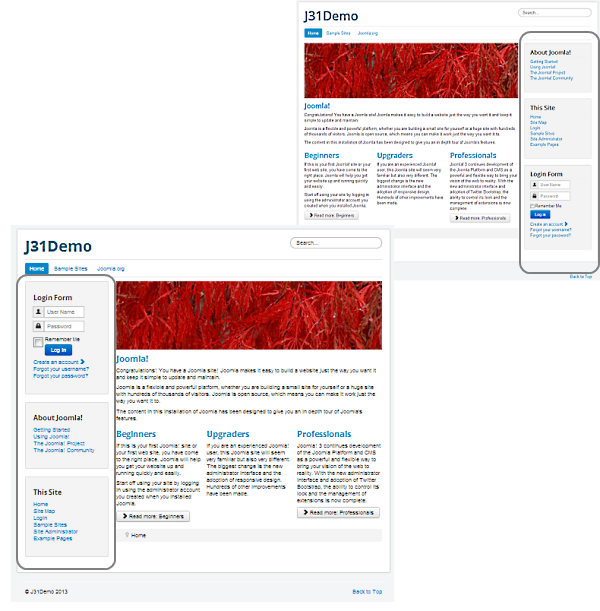
The main body(article) of the page can be altered in style(you can select from different styles of display such as typical blog layout, a news article, etc) depending on the templates layout. *See the example image. Note the differences in layout, but how the look is consistent. The sidebar of modules has been moved from left to right and its order rearranged.
If the template is designed to provide choices, you can also "dynamically" alter the content placement on your site, perhaps putting the main menu on the right or left side of the screen.
Color Scheme
Using CSS within the template design, you can change the colors of your backgrounds, text, links or just about anything that you could within your ordinary HTML code. Some templates provide a method to change the color in template management, others require you to modify the template's .css file(s).
Images and Effects
You can also control the way images are displayed on the page, and even create flash-like effects or include AJAX applications such as drop-down menus.
Fonts
The same applies to fonts. The designs for these are all set within the template's CSS file(s) to create a uniform look across your entire site, which makes it fantastically easy to change the whole look just by altering one or two files rather than every single page.
Browser Specific Solutions
A template can be designed to alter how it displays on different web browsers, allowing you to take full advantage of the latest developments without making your site inaccessible to those who are not able to run "up-to-the-minute" system upgrades (such as certain companies who limit what software their employees can use).
Шаблони, що постачаються
{{:J3.1:Templates supplied with Joomla!/Шаблони, що вказані нижче, постачаються із інсталяцією Joomla! 3.x
Шаблони сайтів: Protostar (за замовчуванням) Beez 3 Шаблони адміністраторів ISIS (за замовчуванням) Hathor}}
Перемикання Шаблонів
To change the default Template for the Site (frontend) or Administrator (backend), follow these steps:
Access the template manager
- Log in to the Administrator (backend). If you are not sure how to do this see: To log in to the Administrator (backend)
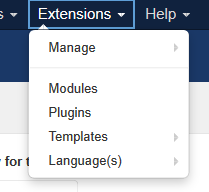
- Click on: Extensions → Templates
You will now see the Template Manager screen.
Note: If you do not see Templates listed as an option on the Extensions menu, then it is most likely because you are not logged in as a Super Administrator. Only Super Administrators will see this menu item.
Managing default template
From here you manage your templates for frontend and backend. The default view shows your installed frontend templates styles. The default style for the frontend is marked with a star; in the image below it is 'protostar - Default'.
To change the default style to 'beez3':
- click the checkbox left from the style name to select it;
- click "Default" on the toolbar;
the star changes from 'protostar' to 'beez3' and you are done. Alternatively, you can click on the shadow of a template's default star to quickly set the template as default.
You can use the filter drop-downs on the top or the filter search to limit the number of templates shown in the list of templates. Other options are:
- edit - edit the options and Menu Assignment a template is shown on (see below)
- duplicate - duplicate the style of the template
- delete - delete a template style (must not be default template style)
Assigning more than one template style for the frontend
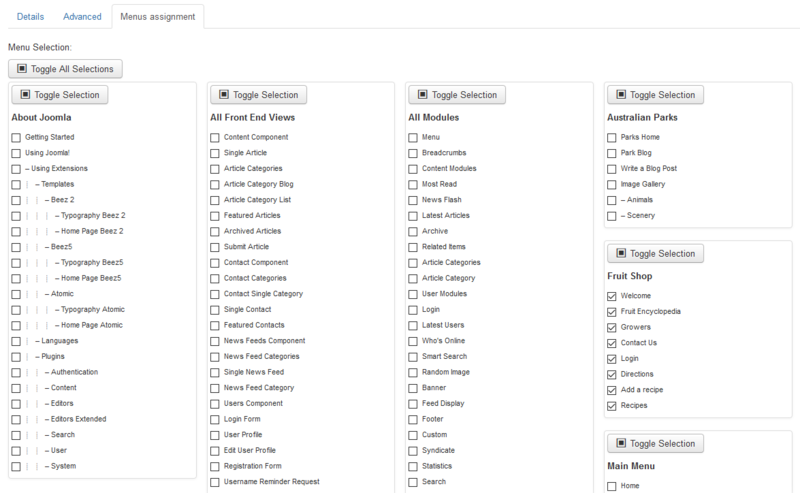
Joomla gives you the option of switching between two or more styles on the frontend. This is done with "Menu Assignment", so you can set different styles for each menu or only a menu item. This allows specific "pages" that are defined by menu links to set for a "specific" style. Styles can be of different templates.
Template manager method
Click on: Extensions → Template Manager
- You will see your installed template styles, now choose a style which is not set as your default one. Yellow star indicates the style is a default.
- Click on the style name or hit the checkbox to the left of the style name, and click "Edit" on the toolbar.
- You now see the page "Template: [Edit style]", and go to the section "Menu Assignment" block and choose the menu items on which the style should be shown.
- Click "Save" on the toolbar and you´re done. The menu item will now show the selected template.
- Go to the frontend of your website and refresh the page to view the modifications.
Menu manager method
- Access menu item Menus → [Menu Name]
- Choose a menu item by checking the box to the left of its name and then click on the Edit toolbar button. Alternatively, simply click the name of the menu item to edit it.
- On the Edit Menu Item screen, in Template Style, choose the desired template style and click on the Save button.
- Go to the frontend of your website and refresh the page to view the modifications.
See also
Інсталювання Шаблонів
Install via Admin Panel (packed template file)
Log into the back-end of your site (www.your-site.com/administrator/)
Click on: Extensions -> Extension Manager
You see the page "Extension Manager"
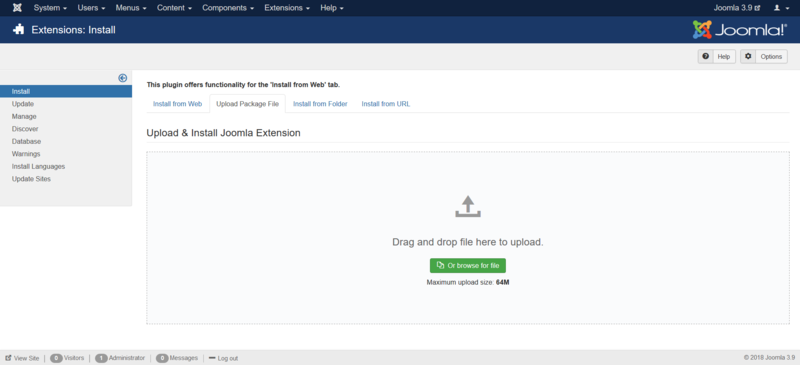
From here you can install your Templates, Plugins, Modules, Components and Languages. You have different options:
- Install from Web - to select an extension listed on the Joomla! Extension Directory
- Upload Package File - to select a package from your PC, upload and install it
- Install from Folder - to enter the path where the package is located on your webserver
- Install from URL - to enter the URL to the package
Option 4 does everything for you, your environment needs to be properly configured to allow this. Option 2 requires you to download the extension to your PC. Option 3 requires you to unzip and move the folders/files to your webserver. All options require the webserver to have write access to the webspace.
Here, we choose the second method: Upload Package File
Drag and drop file to the upload area to upload. Alternatively you can also click the button "Or browse the file" to select the package from your PC.
If the package contains no errors you are done and get a success message like the one below.
Verify installation
Go from tab 'Install' to tab 'Manage', set the 'Type' filter to 'Template'. The installed template should appear in the list. If it does, the template is properly installed. Now you can assign one of styles to a menu item or set the style as default. For administrator templates make sure you have two windows of the template manager. Activate the new template in one of them and reset it in the other one if something went wrong.
Install via FTP (unpacked template file)
Templates can also be installed via FTP without packaging them. Simply select the template folder on your PC and upload it to your server, using your favourite FTP software. Be sure you upload the template folder to the directory: /path_to_joomla/templates/ - where /path_to_joomla/ is the location of your Joomla! installation on the server. This method is mostly used when you have created a template yourself, and do not want to have to package it to install the template, or if you want to upload more than one template at once. You must then go into extension manager and click on Discover in the sub menu. Click on "Discover" in the toolbar if your template doesn't immediately appear. A list of uninstalled items in the FTP should then appear. Click the checkbox to the left of your template and click on the button 'Install'.
Note: Do not try to use FTP to install Components, Modules and Plugins if you are a beginner/novice. These items need database entries which have to be inserted manually if you bypass the package installer.


