Difference between revisions of "Managing Media"
From Joomla! Documentation
(Marked this version for translation) |
m (blank lines added) |
||
| Line 1: | Line 1: | ||
<noinclude><languages /></noinclude> | <noinclude><languages /></noinclude> | ||
| + | |||
<translate> | <translate> | ||
| + | |||
== Introduction == <!--T:1--></translate> | == Introduction == <!--T:1--></translate> | ||
Revision as of 12:55, 4 May 2022
Introduction[edit]
In Joomla, media are images and files that appear as illustrations or links in articles, modules, templates and so on. An important feature of media is that they are delivered directly by the web server without being processed by Joomla code. This is fast and efficient. Also, be aware that media are usually stored in the images folder of your Joomla web site. Do not confuse this with the media folder, which contains javascript and style sheet files.
Image and file media are managed with the Media component of Joomla. It allows you to organise media content in a folder tree, upload individual items, perform some elementary image editing functions, and place images and links directly into articles.
How to Access[edit]
From the Joomla Administrator interface there are several routes to open the Media component:
- Select Content → Media from the Administrator menu.
- Select Site panel → Media from the Home Dashboard.
- Select CMS Content → Media from an article edit screen.
In the first two cases the Media component appears in a normal component screen. In the last it appears in a modal dialog.
Screenshot[edit]
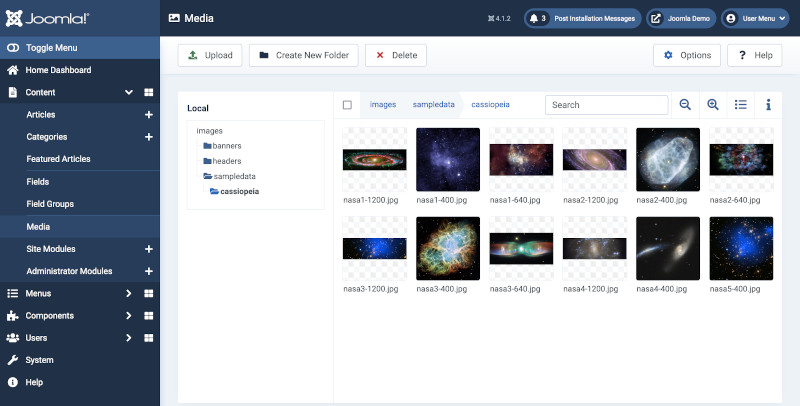
The following image shows the Media page just after Joomla installation but with the cassiopeia/sampledata folder selected:
Managing Folders[edit]
The sub-folder names in your images folder tree become part of the image url so it is important for linking and search engine optimisation purposes that the names conform to a convention:
- all lower case
- no spaces or punctuation
- if necessary, use a minus sign to create human readable words, for example deciduous-trees rather than deciduous_trees.
Before creating much content for your site it may pay to think ahead to how you might categorise your content and perhaps create an images folder tree that is similar to your category tree. Otherwise you may end up with a very large number of images and files in the root of your images tree and that will become difficult to manage. If you decide to move images into a better structure later you will have to find the links to those images in your articles and change them. That could be a time-consuming, daunting task!
[edit]
Use the folder tree in the Local column to select a folder. In the case illustrated above the cassiopeia folder was first selected. That revealed the sampledata folder which was then select to show its content.
The current location is also indicated in the breadcrumbs above the images. In this case images → cassiopeia → sampledata.
If you select a different folder the previous folder at the same level closes.
Creating a folder[edit]
- Select the parent folder under which the new folder should be created.
- Select the Create New Folder button.
- In the Create New Folder popup window, enter a name for the folder in the Folder Name field.
- Click the Create button.
- The new folder will appear in in the selected parent folder along with a green Success system message.
Deleting a folder[edit]
Warning: deleting a folder will also delete all contents of the folder!
- Select the parent of the folder to be deleted using the directory tree shown under Local. That will show all of the folders and files in the parent.
- Move the cursor over the folder to be deleted in the media area. It will turn grey and a white button will appear near the top left.
- Select the white button. A green tick will appear to indicate it is selected.
- Select the Delete button from the Toolbar.
- In the Confirm Delete popup dialog select the Delete button. The folder will be deleted along with all of it files, subfolders and their files.
The folder selected for deletion is illustrated below:
Media Area Toolbar[edit]
This is the bar above the list of images, files and folders that has buttons for a variety of tasks.
Select box[edit]
A check box that allows you to select all of the items in the folder displayed in the media area. You might want to use it to delete all of the current items without deleting the folder.
Breadcrumbs[edit]
Use the folder names above the media area to go backwards in the folder hierarchy.
Double click a folder name in the media area to open that folder.
Search[edit]
If you have a long list of images and files you can search for items containing any group of characters. The search is progressive: as you add characters to the search term the list is reduced to just those containing that character string.
Magnify[edit]
Use the magnify buttons to enlarge or reduce the thumbnail size. Depending on the size of your screen you may see 2, 4, 6 or 8 thumbnail images side by side.
List or Thumbnail Views[edit]
In thumbnail view, select the list symbol to switch to list view. In list view, select the thumbnail symbol to switch to thumbnail view. In list view you will see information on image size and dimensions, amongst other data.
Information[edit]
Select the Information icon to open a side panel showing information about whatever is selected.
Further Information[edit]
In this series of tutorials:

