Difference between revisions of "Running Automated Tests from Eclipse"
From Joomla! Documentation
Dextercowley (talk | contribs) (Create separate article for Eclipse -- copy from combined article) |
|||
| Line 165: | Line 165: | ||
| − | [[Category:Bug Squad]] [[Category:Development]] [[Category:Testing]] [[Category:Automated Testing]] [[Category: | + | [[Category:Bug Squad]] [[Category:Development]] [[Category:Testing]] [[Category:Automated Testing]] |
| + | [[Category:IDE (Integrated development environment)]] | ||
Revision as of 20:16, 5 August 2013
Eclipse Users[edit]
In Eclipse, you can set up Debug and External Tools launch configurations that make it easy to debug or run unit and system tests.
Run a Unit Test[edit]
You can create an External Tools launch configuration that lets you run any unit test simply by pointing to the test file and pressing the Run button. Here are the steps for Windows:
- Open the Run→External Tools→External Tools Configuration menu and press the button labeled "New Launch Configuration".
- Enter a descriptive name, such as "Run Selected Unit Test".
- Enter the location that points to your phpunit.bat file (for example,
c:\xampp\php\phpunit.bat). - Set the Working Directory to
${project_loc}\tests\unit - Set the arguments to
c:\xampp\php\phpunit --verbose ${resource_loc}. You can leave out the "--verbose" if you prefer the more compact display.
This is shown in the screenshot below.
Here are the steps for Mac OSX using XAMPP:
- Enter a descriptive name, such as "Run Selected Unit Test".
- Enter the location that points to your phpunit executable file. For XAMPP, this will be
/Applications/XAMPP/xamppfiles/bin/phpunit). - Set the Working Directory to
${project_loc}/tests/unit - Set the arguments to
--verbose "${resource_loc}". You can leave out the "--verbose" if you prefer the more compact display.
This is shown in the screenshot below.
To run a unit test:
- Select a unit test, either by selecting it in the PHP Explorer view or in the edit area of Eclipse.
- Run the External Launch configuration by selecting it from the drop-down list next to the External Launch Configuration button in the toolbar (shown below).
Note that a test might normally take a 30-60 seconds to run. The output of the test will show in the Eclipse console.
Run All Tests in a Folder[edit]
You can run all of the unit tests in a folder using this same launch configuration. Just select a folder instead of a test file and all of the unit tests in that folder will run.
Setting Up For Debugging[edit]
Make Sure XDebug is Installed[edit]
As you would expect, XDebug must be installed and configured for use with Eclipse. See Setting_up_your_workstation_for_Joomla!_development#Edit_PHP.INI_File for detailed instructions.
Add PEAR Library to Workspace[edit]
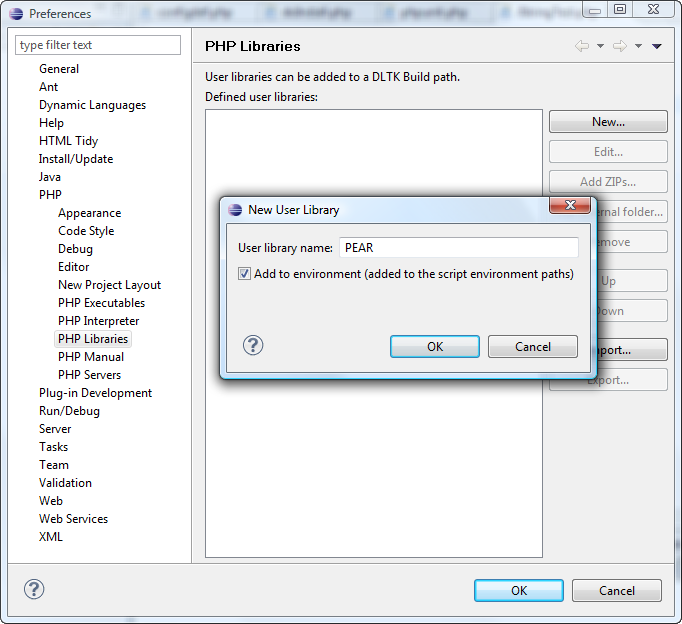
Before you can debug a unit or system test, you have to add the PEAR library to your project or workspace. In this example, we will add PEAR to our workspace. That way, all projects will automatically have access to PHPUnit.
Here are the steps:
- Select Window→Preferences→PHP→PHP Libraries.
- Press the New button and add PEAR as shown below. Be sure to press the checkbox labeled "Add to environment".
- Press OK, then press the Add External folder button and browse to your PEAR folder, as shown below. In this example, the folder is in
c:\xampp\php\PEAR.
- Press OK and the screen should show the external folder, as shown below, with the correct file path for your workstation.
After this is completed go to project preferences - > Properties -> PHP Include path -> Libraries tab -> Add library. Select User library in popup, click Next and mark Pear[enviroment] as checked.
Also make sure your project folder is added in Source tab of your project's PHP Include path.
Configure the PHP Executable[edit]
Normally, you will want to debug unit and system tests as PHP scripts (as opposed to web pages). Before you can do this, you need to configure a PHP Executable in Eclipse. This is done as follows:
- Select Window→Preferences→PHP→PHP Executables. The screen below will show.
- Press Add and complete the screen as shown below, substituting the correct file paths for your workstation.
At this point, your workstation is set up for PHPUnit debugging. Now you just have to create the debug configurations as shown in the next section.
Debug a Single Unit Test[edit]
Once you have PEAR added to your libraries, it is easy to set up a debug configuration that allows you to debug any unit test. Here are the steps:
- Press the drop-down arrow next to the Debug button and select Debug Configurations from the menu, as shown below.
- In the Debug Configurations window, make sure that PHP Script is selected and press the New Launch configuration button as shown below.
- Fill out the PHP Script tab of the Debug Configurations as shown below.
- Name: a descriptive name like "Debug Selected Unit Test"
- PHP Debugger: XDebug
- PHP Executable: The one you set up earlier (there will only be one)
- PHP File: Use the Browse button to browse to the phpunit.php file in your
tests/systemfolder.
- Select the PHP Script Arguments tab and enter --verbose ${selected_resource_loc} as shown below.
- The "--verbose" option allows you to see more details when the tests are run.
- The "${selected_resource_loc}" passes the currently selected file at runtime, so you can use this configuration just by selecting the desired file and then running it.
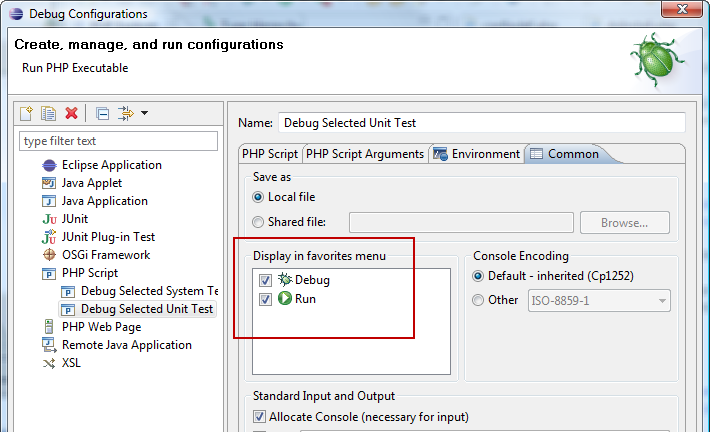
- Finally, select the Common tab and check the Debug checkbox under "Display in favorites menu", as shown below.
At this point, you are ready to debug any unit test. All you need to do is:
- Select the desired test file either in the PHP Explorer view or in the editor.
- Select Debug Configurations from the Debug drop-down button and select the "Debug Selected Unit Test" option. Once you have run this once, it will show on your Debug favorites menu.
Run a Single System Test[edit]
You can create a configuration to make it easy to run any single test in your project. To do this:
- Open the Run→External Tools→External Tools Configuration menu and press the button labeled "New Launch Configuration"
- Enter the location that points to your phpunit.bat file (for example,
c:\xampp\php\phpunit.bat). On Linux systems, this might be called "phpunit". - Set the Working Directory to
${project_loc}/tests/system - Set the arguments to
--bootstrap servers/configdef.php ${selected_resource_loc}.
This is shown in the screenshot below.
To use this configuration,
- Make sure the Selenium RC process is running (for example, by running the "selenium.bat" file you created when you installed Selenium RC earlier)
- Select the desired test file by clicking on it in the PHP Explorer view or in the edit area
- Start this launch configuration
The selected test file will be run and you will see the browser session open and run the test script. The test results will be reported in the Eclipse console.
Debug a Single System Test[edit]
The steps for creating a Debug Configuration for a Selenium system test are similar to those for the unit test.
- Open Debug Configurations from the drop-down menu next to the Debug Button on the toolbar, as shown below.
- In the Debug Configurations window, make sure that PHP Script is selected and press the New Launch configuration button as shown below.
- Fill out the Debug Configurations dialog box as shown below:
- Name: A descriptive name for the configuration, like "Debug Selected System Test".
- PHP Debugger: XDebug
- PHP Executable: The one you defined earlier (there probably is only one).
- PHP File: Browse to the phpunit.php file in your
tests/systemfolder.
- Select the PHP Script arguments and fill this out as shown below.
- --bootstrap servers/configdef.php points to the configuration file that passes the login information to Selenium.
- "${selected_resource_loc}" passes the location of the currently selected file in Eclipse to the command line.
- Finally, select the Common tab and check the Debug option in the Display in favorites menu. This will add this configuration to your favorites.
At this point, you can debug any system test. To do so:
- Make sure the Selenium RC program is running in the background.
- Select the desired test by selecting it in the PHP Explorer or in the editor.
- Run this Debug Configuration by selecting the drop-down arrow next to the Debug button, then Debug Configurations, then the "Debug Selected System Test" configuration created above.
Run the System Test Suite[edit]
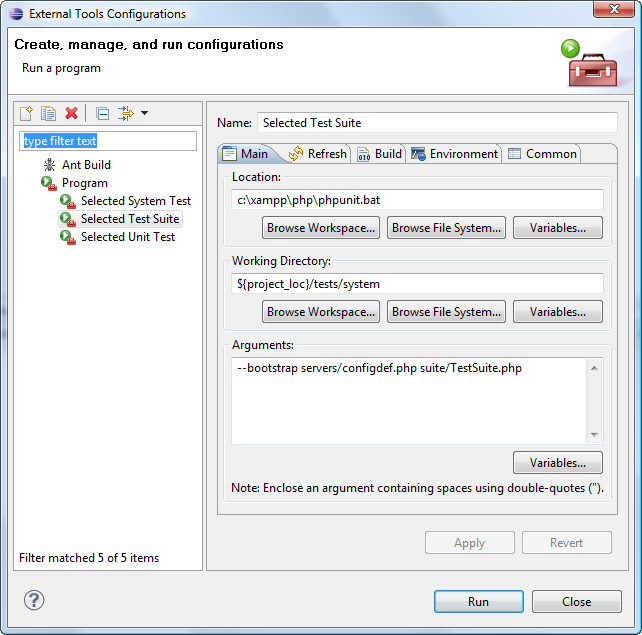
To create a launch configuration to run the Test Suite of the currently-selected Eclipse project:
- Enter the location that points to your phpunit.bat file. If you are running Linux, this file might be called phpunit.
- Set the Working Directory to
${project_loc}/tests\system - Set the arguments to
--bootstrap servers/configdef.php suite/TestSuite.php.
This is shown in the screenshot below.
The console output will show in the Eclipse console. Note that you still need to have the Selenium RC program running in the background first, before running the suite. Note that you need to select a file in the current project before running this command so the {project_loc} variable is set correctly.


