Working with Git and Eclipse
From Joomla! Documentation
Revision as of 16:50, 9 May 2012 by Dextercowley (talk | contribs) (→Installing Eclipse with PHP and Git)
This article is actively undergoing a major edit for a short while.
As a courtesy, please do not edit this page while this message is displayed. The user who added this notice will be listed in the page history. This message is intended to help reduce edit conflicts; please remove it between editing sessions to allow others to edit the page.
If this page has not been edited for several hours, please remove this template, or replace it with {{underconstruction}} or {{incomplete}}.
Introduction[edit]
This article discusses how to set up and use eGit (the Eclipse version of Git) with Eclipse version 3.7.2 (available as of March 2012). It is important to have the latest version of Eclipse in order to use the latest (and most stable) version of eGit.
If you have an older version of Eclipse, it is quite easy to try the latest version without removing your old version. Simply install the new version in a different directory than the existing Eclipse version and use the same Eclipse workspace. All of your projects and preferences are saved in the workpace and will be available to the new Eclipse version. If for some reason you need to go back to your old Eclipse version, just close the new version and start the old one.
Installing Eclipse with PHP and Git[edit]
To Install Eclipse with PHP and Git, follow these steps:
- Install Eclipse for Javascript Web Developers from Eclipse Downloads. This will give you a version of Eclipse with XML and HTML file editing (but without eGit or PHP).
- To add eGit and PHP, navigate to Eclipse→Help→Install New Software, as shown below.

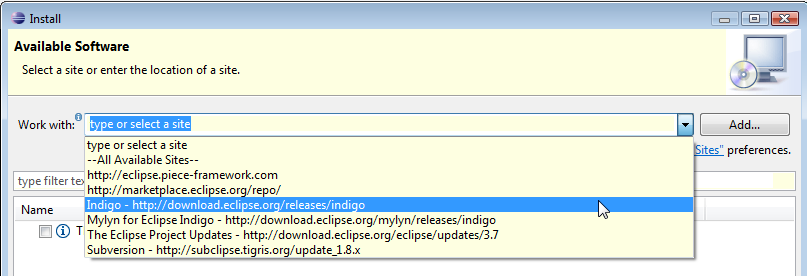
- Select Indigo update site as shown below.
- This will present a list of all of the available Eclipse plugins. Select the three git options under Collaboration, as shown below.

- Then select the PHP Development Tools (PDT) option under Programming Languages as shown below:

- Then click through the rest of the wizard and accept the terms of the license agreement. At this point, the requested plugins will be downloaded. After this, you will be prompted to restart Eclipse (which you should do).


At this point, you should have PHP and eGit installed with Eclipse. Confirm this by selecting Window→Open Perspective→Other and make sure that the PHP and Git Repositories perspectives show on the list.
Creating a Project from a Remote Repository[edit]


