Difference between revisions of "Creating a submenu"
From Joomla! Documentation
m (→Menu and Menu Items: grammar wrong but not sure about how to handle plurals) |
(Corrected 'dashes' to 'hyphens' and other markup changes.) |
||
| (116 intermediate revisions by 7 users not shown) | |||
| Line 1: | Line 1: | ||
| − | In Joomla | + | <noinclude><languages /></noinclude> |
| + | {{Top portal heading|color=white-bkgd|icon=magic|icon-color=#5091cd|size=3x|text-color=#333|title=Tutorial<br /> | ||
| + | <translate><!--T:1--> | ||
| + | How to Create a Submenu in a Joomla! Site</translate>}} | ||
| + | <noinclude>{{Joomla version|version=3.x}}</noinclude> | ||
| + | <translate><!--T:2--> | ||
| + | In Joomla, submenus can be shown either as one menu with two or more levels or as completely separate menu modules. This is useful for constructing menus showing parent and child level navigation or for showing sublevel menu items in entirely separate positions on your template. To show how to do this, we will step through creating parent and child level menu items and then see how to show those items within one large menu and as a separate menu with only the child level items showing in a separate position on a template.</translate> {{-}} | ||
| + | __TOC__ | ||
| + | <translate><!--T:3--> | ||
| + | To begin, menus function with three basic constructs:</translate> | ||
| + | <translate><!--T:4--> | ||
| + | *Articles - you need content to link to. This can also be component pieces, other menu items or external links.</translate> | ||
| + | <translate><!--T:5--> | ||
| + | *Menu - describes the menu items, the type of navigation, their parent/child relationship to other menu items and the order they are displayed in.</translate> | ||
| + | <translate><!--T:6--> | ||
| + | *Menu Module - controls the position and displaying of the menu.</translate> | ||
| − | + | <translate><!--T:7--> | |
| − | + | For this tutorial, begin by logging into the Joomla Administrator. If you are unfamiliar with how to login see this article: [[S:MyLanguage/J3.x:Logging_in_or_out_of_the_Administrator_back-end|Logging in or out of the Administrator backend]].</translate> {{-}} | |
| − | |||
| − | |||
| − | |||
| − | |||
| − | |||
| − | |||
| − | + | <translate><!--T:8--> | |
| − | + | '''Note''' For this tutorial you need Super Administrator permissions or permissions open enough to create and modify Articles, Menu Items, and Modules. For more information on User Access Control see [[S:MyLanguage/J3.x:Access Control List Tutorial|ACL Tutorial]].</translate> | |
| − | + | <translate> | |
| − | + | ==Step 1 - Create Your Articles== <!--T:9--> | |
| − | + | </translate> | |
| − | + | <translate><!--T:10--> | |
| − | + | In our example, we will create top level menu items for ''Dogs'' and ''Cats''. Under Dogs, we will have ''Collies'' and ''Pomeranians''. Under Cats we will have ''Burmese'' and ''Russian Blues''. So the structure of our sample menu items will be as follows:</translate> | |
| − | |||
| − | |||
| − | + | <translate><!--T:11--> | |
| + | *Dogs</translate> | ||
| + | <translate><!--T:12--> | ||
| + | **Collies</translate> | ||
| + | <translate><!--T:13--> | ||
| + | **Pomeranians</translate> | ||
| + | <translate><!--T:14--> | ||
| + | *Cats</translate> | ||
| + | <translate><!--T:15--> | ||
| + | **Burmese</translate> | ||
| + | <translate><!--T:16--> | ||
| + | **Russian Blues</translate> | ||
| − | + | <translate><!--T:17--> | |
| − | + | First, create 4 articles so our menu items will have something to link to: ''Collies'', ''Pomeranians'', ''Burmese'' and ''Russian Blue''. See this tutorial if you need help creating an Article: [[S:MyLanguage/Help34:Content Article Manager Edit|Adding a new Article]].</translate> | |
| − | == | + | <translate> |
| − | + | ==Step 2 - Create the Parent Level Menu Items== <!--T:18--> | |
| − | + | </translate> | |
| − | + | <translate><!--T:19--> | |
| − | + | To create the structure, we need to navigate to the menu where we want our new menu items. If this is a new menu, you will need to create it. See this tutorial on how to create a menu: [[S:MyLanguage/J3.x:Adding a new menu|Adding a new menu]].</translate> | |
| − | |||
| − | |||
| − | + | <translate><!--T:20--> | |
| + | Once you have your menu located in the Menu Manager, you will add the parent menu items using the {{rarr|System Links,External URL}} for each navigation link: ''Dogs'' and ''Cats''.</translate> | ||
| − | + | <translate><!--T:21--> | |
| + | Please note, there are other menu item types that can be used for the parent level navigation structure.</translate> | ||
| − | + | <translate><!--T:22--> | |
| + | Here are the steps to create sample Menu Items using our example data. For more information on creating Menu Items see [[S:MyLanguage/J3.x:Adding a new menu|Adding a new menu item]].</translate> {{-}} | ||
| + | <translate><!--T:23--> | ||
| + | # Navigate to the Menu Manager by clicking on {{rarr|Menus,Menu Manager}}</translate>{{-}}[[Image:J3x-Edit-Main-Menu-<translate><!--T:24--> | ||
| + | en</translate>.jpg|775px|border]] | ||
| + | <translate><!--T:25--> | ||
| + | # In the toolbar, click on ''New''</translate>{{-}}[[Image:J3x-Edit-Main-Menu-Toolbar-new-<translate><!--T:26--> | ||
| + | en</translate>.png|775px|border]] | ||
| + | <translate><!--T:27--> | ||
| + | # For the purposes of this exercise we are creating "placeholder" links using the {{rarr|System,External URL}} menu type for the ''Dogs'' and ''Cats'' parent level menu items. So, in the new Menu Item, click on the Menu Type select button:</translate> {{-}}[[Image:J3x-Add-Main-Menu-Select-Type-<translate><!--T:28--> | ||
| + | en</translate>.png|775px|border]] | ||
| + | <translate><!--T:29--> | ||
| + | # Click on ''System Links'' then scroll down and select ''External URL''.</translate>{{-}}[[Image:J3x-Create-Sublevel-Menu-System-External-Url-<translate><!--T:30--> | ||
| + | en</translate>.png|775px|border]] | ||
| + | <translate><!--T:31--> | ||
| + | # Add the ''Menu Item Title'' ("Dogs") and type in a hashtag "#" in the ''Link'' box.</translate>{{-}}[[Image:J3x-Create-Sublevel-Menu-Menu-Item-External-Url-<translate><!--T:32--> | ||
| + | en</translate>.png|775px|border]] | ||
| + | <translate><!--T:33--> | ||
| + | # Save your menu item.</translate> {{-}}[[Image:Joomla-3-Menu-Add-Menu-Save-<translate><!--T:34--> | ||
| + | en</translate>.png|775px|border]] | ||
| + | <translate><!--T:35--> | ||
| + | # Repeat steps 2 - 6 for the ''Cats'' Parent Level menu item.</translate> | ||
| − | == | + | <translate> |
| − | Now | + | ==Step 3 - Create the Sublevel Menu Items== <!--T:36--> |
| + | </translate> | ||
| + | <translate><!--T:37--> | ||
| + | Now you will add the sublevel menu items using the {{rarr|Articles,Single Article}} to create menu links to the individual pages ''Collies'', ''Pomeranians'', ''Burmese'', and ''Russian Blues''. For each Menu Item created, we will set the ''Parentage'' to ''Dogs'' or ''Cats''.</translate> | ||
| − | < | + | <translate><!--T:38--> |
| + | For more detailed information on how to create a Single Article Menu Type, see [[S:MyLanguage/Adding a menu item which points to an Article|Adding a menu item which points to an Article]].</translate> | ||
| − | + | <translate><!--T:39--> | |
| − | + | '''Note''' There are other menu item types that can be used for the sublevel navigation structure.</translate> | |
| − | |||
| − | |||
| − | |||
| − | |||
| − | |||
| − | |||
| − | |||
| − | |||
| − | |||
| − | |||
| − | |||
| − | |||
| − | + | <translate><!--T:40--> | |
| + | # In the toolbar, click on "New".</translate>{{-}}[[Image:J3x-Edit-Main-Menu-Toolbar-new-<translate><!--T:41--> | ||
| + | en</translate>.png|775px|border]] | ||
| + | <translate><!--T:42--> | ||
| + | # In the new Menu Item click on the Menu Type select button:</translate>{{-}}[[Image:J3x-Add-Main-Menu-Select-Type-<translate><!--T:43--> | ||
| + | en</translate>.png|775px|border]] | ||
| + | <translate><!--T:44--> | ||
| + | # Select {{rarr|Articles,Single Article}} from the list displayed.</translate>{{-}}[[Image:J3x-Add-Main-Menu-Article-Type-<translate><!--T:45--> | ||
| + | en</translate>.png|border]] | ||
| + | <translate><!--T:46--> | ||
| + | # Returning to the Menu Item Detail page, click on the ''Select Article'' List.</translate>{{-}}[[Image:J3x-Add-Main-Menu-Article-Select-Article-<translate><!--T:47--> | ||
| + | en</translate>.png|border]] | ||
| + | <translate><!--T:48--> | ||
| + | # Select the ''Collies'' article for this example.</translate>{{-}}[[Image:J3x-Create-Sublevel-Menu-Menu-Item-Single-Article-<translate><!--T:49--> | ||
| + | en</translate>.png|border]] | ||
| + | <translate><!--T:50--> | ||
| + | # On returning to the Article Detail page, fill in the ''Menu Item Title''.</translate> <translate><!--T:51--> | ||
| + | Then click on the ''Parent Item'' select list located in the far right column. Find and select the ''Dogs'' parent item by scrolling through the Parent Item List. Note that menu levels are displayed with hyphens: "-" (single hyphen) is the highest level, "--" (two hyphens) is the second level, "---" third level and so on.</translate> {{-}}[[Image:J3x-Create-Sublevel-Menu-Select-Parent-Item-<translate><!--T:52--> | ||
| + | en</translate>.png|775px|border]] | ||
| + | <translate><!--T:53--> | ||
| + | # Click on the button ''Save & Close'' up in the top button.</translate>{{-}}[[Image:Joomla-3-Menu-Add-Menu-Save-<translate><!--T:54--> | ||
| + | en</translate>.png|775px|border]] | ||
| + | <translate><!--T:55--> | ||
| + | # Repeat steps 1-7 for the remaining articles ''Pomeranians'' with the ''Dog'' parent and articles ''Burmese'' and ''Russian Blues'' for the ''Cat'' parent.</translate> | ||
| + | <translate><!--T:56--> | ||
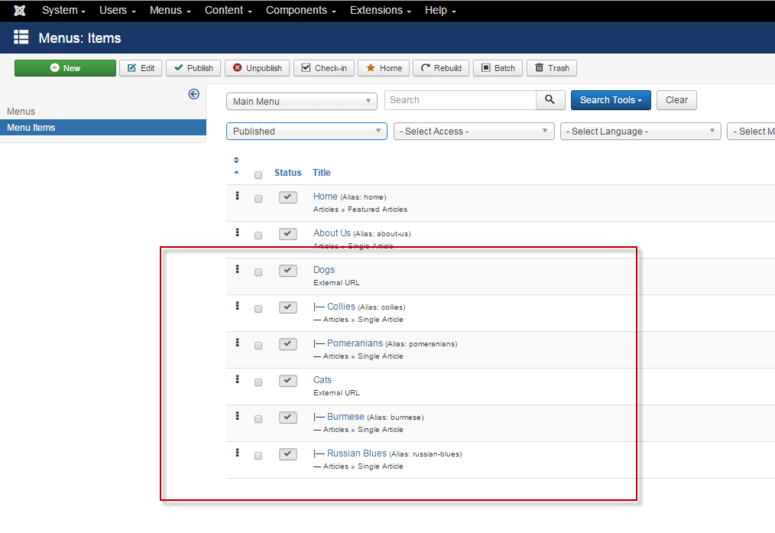
| + | # When you are finished with the "Menu Items" section, the Menu Item Manager should look very similar to the following:</translate>{{-}}[[Image:J3x-Create-Sublevel-Menu-Items-<translate><!--T:57--> | ||
| + | en</translate>.png|775px|border]] | ||
| − | + | <translate> | |
| + | ==Step 4 - Setup the Menu Module== <!--T:58--> | ||
| + | </translate> | ||
| + | <translate><!--T:59--> | ||
| + | At this point, we have our Articles and Menu Items done. Now we need to update the ''Menu Module''. In Joomla!, the Menu Module determines three things:</translate> | ||
| + | <translate><!--T:60--> | ||
| + | # What the menu looks like.</translate> | ||
| + | <translate><!--T:61--> | ||
| + | # Where on the page it will show.</translate> | ||
| + | <translate><!--T:62--> | ||
| + | # Which pages it will show on.</translate> | ||
| − | + | <translate><!--T:63--> | |
| + | We will do two examples:</translate> | ||
| + | <translate><!--T:64--> | ||
| + | * In the first example, we will set the parameters that show the parent level menu items with the lower level items beneath.</translate> | ||
| + | <translate><!--T:65--> | ||
| + | * In the second example, we will add an additional menu module that appears in the left column and shows only the second level menu items.</translate> | ||
| + | <translate><!--T:66--> | ||
| + | '''Note''' We will do both examples using the Protostar Template included in the core Joomla! installation.</translate> | ||
| − | + | <translate> | |
| + | ===Example 1 - One Menu Module With Second Level Menu Items=== <!--T:67--> | ||
| + | </translate> | ||
| + | <translate><!--T:68--> | ||
| + | To show this as one module, follow these steps:</translate> | ||
| + | <translate><!--T:69--> | ||
| + | # Navigate to {{rarr|Extensions,Module Manager}} and locate the Menu Module associated with your menu. For instructions on creating a new menu module, see</translate> [[S:MyLanguage/Help34:Extensions Module Manager Menu|Module Menu]] {{-}}[[Image:J3x-Create-Sublevel-Menu-Module-Control-Panel-<translate><!--T:70--> | ||
| + | en</translate>.png|775px|border]] | ||
| + | <translate><!--T:71--> | ||
| + | # Click on the module name associated with your menu. In this tutorial, we are selecting ''Main Menu''. ''Note:'' this image has been filtered by selecting ''Menu'' in the Module type dropdown.</translate>{{-}}[[Image:J3x-Create-Sublevel-Menu-Module-List-Menus-<translate><!--T:72--> | ||
| + | en</translate>.png|775px|border]] | ||
| + | <translate><!--T:73--> | ||
| + | # In the Module details, set the ''Start level'' to ''1'', the ''End Level'' to ''All'' and set ''Show Submenu Items'' to ''Yes''.</translate>{{-}}[[Image:J3x-Create-Sublevel-Menu-Module-Details-<translate><!--T:74--> | ||
| + | en</translate>.png|775px|border]] | ||
| + | <translate><!--T:75--> | ||
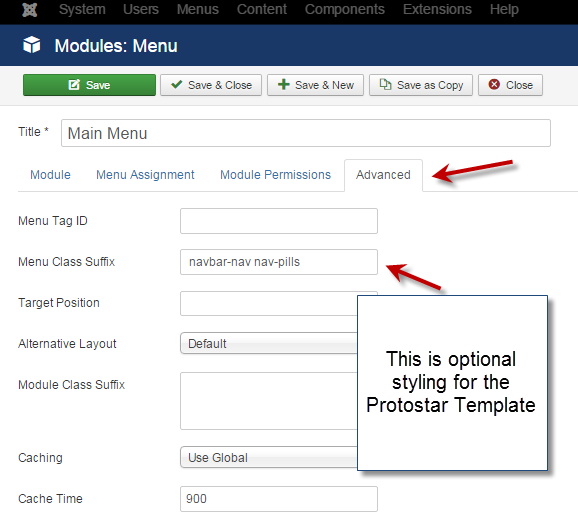
| + | # For this tutorial, we have added some styling in the ''Advanced'' tab. In the ''Menu Class Suffix'' we have entered ''navbar-nav nav-pills''. You can also add ''navbar-nav nav-tabs'' for a slightly different look. Note: there is a space before ''navbar-nav''.</translate>{{-}}[[Image:J3x-Create-Sublevel-Menu-Module-Advanced-Menu-Class-Suffix-<translate><!--T:76--> | ||
| + | en</translate>.png|border]] | ||
| + | <translate><!--T:77--> | ||
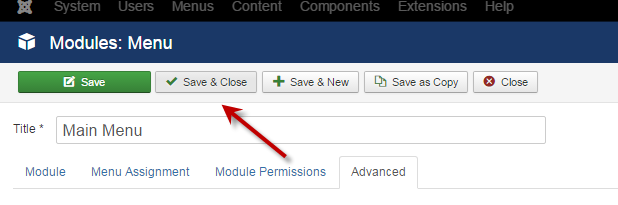
| + | # Click on ''Save & Close''.</translate>{{-}}[[Image:J3x-Create-Sublevel-Menu-Module-Save-<translate><!--T:78--> | ||
| + | en</translate>.png|border]] | ||
| + | <translate><!--T:79--> | ||
| + | # Go to the frontend of your site and your menu should look similar to this. In the Protostar Template, the sublevel menu items are displayed as dropdown menu items.</translate>{{-}}[[Image:J3x-Create-Sublevel-Menu-Frontend-Sample-Dropdown-<translate><!--T:80--> | ||
| + | en</translate>.png|775px|border]] | ||
| + | <translate><!--T:81--> | ||
| + | # The source code generated will look similar to this:</translate> | ||
| + | <syntaxhighlight lang="html"> | ||
| + | <ul class="nav menu navbar-nav nav-pills"> | ||
| + | <li class="item-101 current active"><a href="/" >Home</a></li> | ||
| + | <li class="item-102"><a class="dropdown-toggle" href="/about-us" >About Us</a></li> | ||
| + | <li class="item-210 deeper parent"><a href="#" >Dogs</a> | ||
| + | <ul class="nav-child unstyled small"> | ||
| + | <li class="item-212"><a href="/2015-11-24-14-19-31/collies" >Collies</a></li> | ||
| + | <li class="item-213"><a href="/2015-11-24-14-19-31/pomeranians" >Pomeranians</a></li> | ||
| + | </ul> | ||
| + | </li> | ||
| + | <li class="item-211 deeper parent"><a href="#" >Cats</a> | ||
| + | <ul class="nav-child unstyled small"> | ||
| + | <li class="item-214"><a href="/2015-11-24-14-20-12/burmese" >Burmese </a></li> | ||
| + | <li class="item-215"><a href="/2015-11-24-14-20-12/russian-blues" >Russian Blues</a></li> | ||
| + | </ul> | ||
| + | </li> | ||
| + | </ul> | ||
| + | </syntaxhighlight> | ||
| + | <translate> | ||
| + | ===Example 2 - A Second Menu Module With Child Level Menu Items=== <!--T:82--> | ||
| + | </translate> | ||
| + | |||
| + | <translate><!--T:83--> | ||
| + | To show in a separate module in a different position, follow these steps:</translate> | ||
| + | <translate><!--T:84--> | ||
| + | # Navigate to {{rarr|Extensions,Module Manager}} and locate or create a second Menu Module associated with your menu. For instructions on creating a new menu module, see</translate> <translate><!--T:85--> | ||
| + | [[S:MyLanguage/Help34:Extensions Module Manager Menu|Module Menu]]</translate>{{-}}[[Image:J3x-Create-Sublevel-Menu-Module-Control-Panel-<translate><!--T:86--> | ||
| + | en</translate>.png|775px|border]] | ||
| + | <translate><!--T:87--> | ||
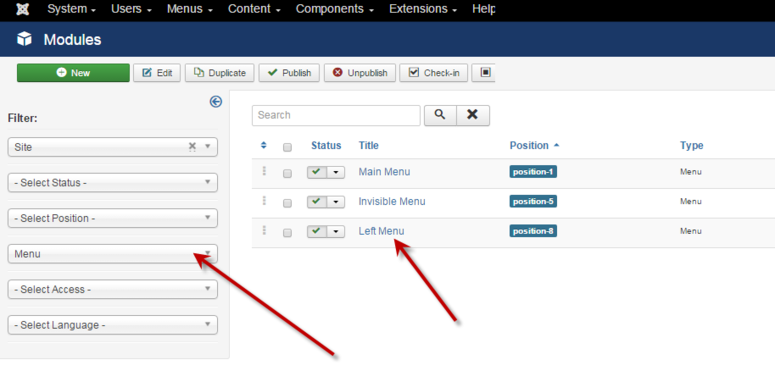
| + | # Click on the module name associated with your menu. In this tutorial, we are selecting ''Left Menu''. Note: this image has been filtered by selecting ''Menu'' in the Module type dropdown.</translate>{{-}}[[Image:J3x-Create-Sublevel-Menu-Module-List-Menus-2-<translate><!--T:88--> | ||
| + | en</translate>.png|775px|border]] | ||
| + | <translate><!--T:89--> | ||
| + | # In the Module details, set the ''Start level'' to ''2'', the ''End Level'' to ''All'' and set ''Show Submenu Items'' to ''Yes''. Note the position has changed and the menu we are pointing to is the ''Main Menu''.</translate>{{-}}[[Image:J3x-Create-Sublevel-Menu-Module-Details-2-<translate><!--T:90--> | ||
| + | en</translate>.png|775px|border]] | ||
| + | <translate><!--T:91--> | ||
| + | # For this tutorial, we have used the ''Menu Assignment'' tab and assigned this Menu Module to appear on all pages except the home page.</translate>{{-}}[[Image:J3x-Create-Sublevel-Menu-Module-Module-Assignment-Tab-<translate><!--T:92--> | ||
| + | en</translate>.png]] | ||
| + | <translate><!--T:93--> | ||
| + | # Click on ''Save & Close''.</translate>{{-}}[[Image:J3x-Create-Sublevel-Menu-Module-Save-<translate><!--T:94--> | ||
| + | en</translate>.png]] | ||
| + | <translate><!--T:95--> | ||
| + | # Go to the frontend of your site and navigate to the ''Collies'' article. Your menu should look similar to this. Notice the child level subitems are the only items showing.</translate>{{-}}[[Image:J3x-Create-Sublevel-Menu-Frontend-Sample-Child-Menu-<translate><!--T:96--> | ||
| + | en</translate>.png|775px|border]] | ||
| + | <translate><!--T:97--> | ||
| + | # The source code generated will look similar to this:</translate> | ||
| + | <syntaxhighlight lang="html"> | ||
| + | <ul class="nav menu"> | ||
| + | <li class="item-212 current active"><a href="/2015-11-24-14-19-31/collies" >Collies</a></li> | ||
| + | <li class="item-213"><a href="/2015-11-24-14-19-31/pomeranians" >Pomeranians</a></li> | ||
| + | </ul> | ||
| + | </syntaxhighlight> | ||
| + | |||
| + | <translate> | ||
| + | ==Sub-Sub-Menus== <!--T:98--> | ||
| + | </translate> | ||
| + | <translate><!--T:99--> | ||
| + | Using this same technique, it is easy to create third-level sub-menus. You just make the Parent Menu Item a second-level sub-menu. Then you could use the same technique to create a separate Menu Module with Start Level of 2 and End Level of 3. This would show only the third-level Menu Items.</translate> | ||
| + | |||
| + | <noinclude> | ||
| + | <translate> | ||
| + | <!--T:100--> | ||
| + | [[Category:Beginners]] | ||
[[Category:Tutorials]] | [[Category:Tutorials]] | ||
| + | [[Category:Joomla! 3.x]] | ||
[[Category:Menu Management]] | [[Category:Menu Management]] | ||
| + | </translate> | ||
| + | </noinclude> | ||
Latest revision as of 13:39, 23 November 2022
How to Create a Submenu in a Joomla! Site
In Joomla, submenus can be shown either as one menu with two or more levels or as completely separate menu modules. This is useful for constructing menus showing parent and child level navigation or for showing sublevel menu items in entirely separate positions on your template. To show how to do this, we will step through creating parent and child level menu items and then see how to show those items within one large menu and as a separate menu with only the child level items showing in a separate position on a template.
To begin, menus function with three basic constructs:
- Articles - you need content to link to. This can also be component pieces, other menu items or external links.
- Menu - describes the menu items, the type of navigation, their parent/child relationship to other menu items and the order they are displayed in.
- Menu Module - controls the position and displaying of the menu.
For this tutorial, begin by logging into the Joomla Administrator. If you are unfamiliar with how to login see this article: Logging in or out of the Administrator backend.
Note For this tutorial you need Super Administrator permissions or permissions open enough to create and modify Articles, Menu Items, and Modules. For more information on User Access Control see ACL Tutorial.
Step 1 - Create Your Articles[edit]
In our example, we will create top level menu items for Dogs and Cats. Under Dogs, we will have Collies and Pomeranians. Under Cats we will have Burmese and Russian Blues. So the structure of our sample menu items will be as follows:
- Dogs
- Collies
- Pomeranians
- Cats
- Burmese
- Russian Blues
First, create 4 articles so our menu items will have something to link to: Collies, Pomeranians, Burmese and Russian Blue. See this tutorial if you need help creating an Article: Adding a new Article.
Step 2 - Create the Parent Level Menu Items[edit]
To create the structure, we need to navigate to the menu where we want our new menu items. If this is a new menu, you will need to create it. See this tutorial on how to create a menu: Adding a new menu.
Once you have your menu located in the Menu Manager, you will add the parent menu items using the System Links → External URL for each navigation link: Dogs and Cats.
Please note, there are other menu item types that can be used for the parent level navigation structure.
Here are the steps to create sample Menu Items using our example data. For more information on creating Menu Items see Adding a new menu item.
- Navigate to the Menu Manager by clicking on Menus → Menu Manager

- In the toolbar, click on New

- For the purposes of this exercise we are creating "placeholder" links using the System → External URL menu type for the Dogs and Cats parent level menu items. So, in the new Menu Item, click on the Menu Type select button:

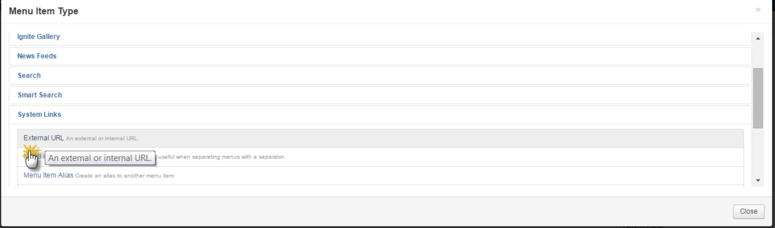
- Click on System Links then scroll down and select External URL.
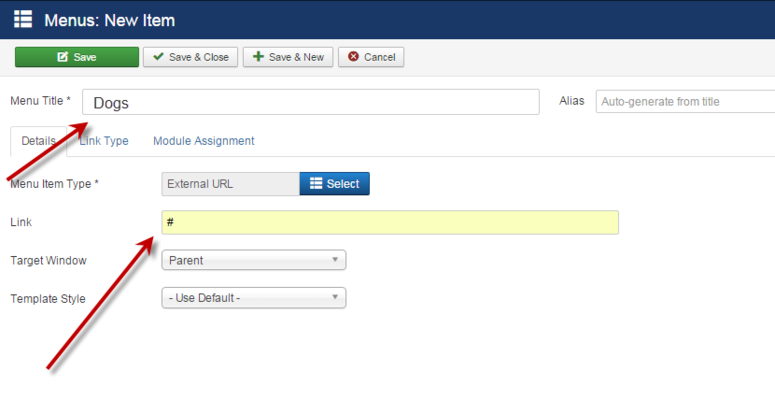
- Add the Menu Item Title ("Dogs") and type in a hashtag "#" in the Link box.
- Save your menu item.

- Repeat steps 2 - 6 for the Cats Parent Level menu item.


Step 3 - Create the Sublevel Menu Items[edit]
Now you will add the sublevel menu items using the Articles → Single Article to create menu links to the individual pages Collies, Pomeranians, Burmese, and Russian Blues. For each Menu Item created, we will set the Parentage to Dogs or Cats.
For more detailed information on how to create a Single Article Menu Type, see Adding a menu item which points to an Article.
Note There are other menu item types that can be used for the sublevel navigation structure.
- In the toolbar, click on "New".
- In the new Menu Item click on the Menu Type select button:
- Select Articles → Single Article from the list displayed.

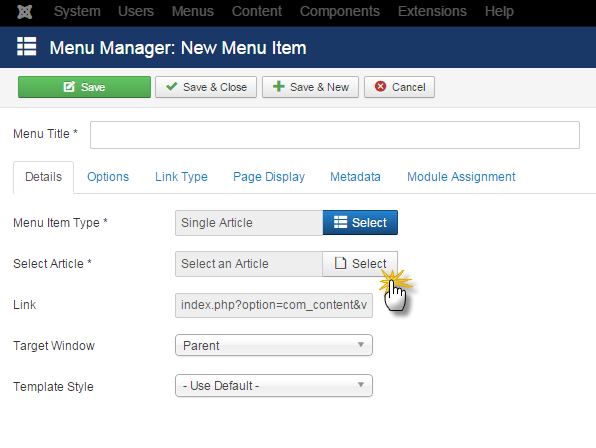
- Returning to the Menu Item Detail page, click on the Select Article List.
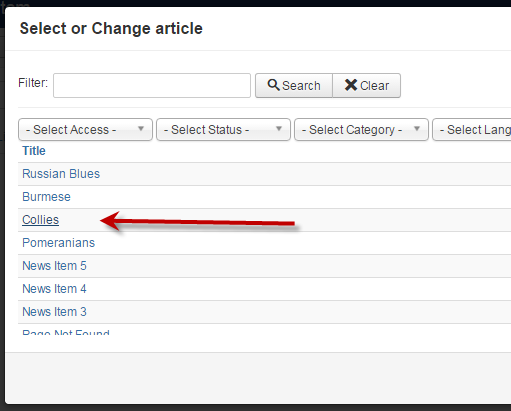
- Select the Collies article for this example.
- On returning to the Article Detail page, fill in the Menu Item Title. Then click on the Parent Item select list located in the far right column. Find and select the Dogs parent item by scrolling through the Parent Item List. Note that menu levels are displayed with hyphens: "-" (single hyphen) is the highest level, "--" (two hyphens) is the second level, "---" third level and so on.

- Click on the button Save & Close up in the top button.
- Repeat steps 1-7 for the remaining articles Pomeranians with the Dog parent and articles Burmese and Russian Blues for the Cat parent.
- When you are finished with the "Menu Items" section, the Menu Item Manager should look very similar to the following:


Step 4 - Setup the Menu Module[edit]
At this point, we have our Articles and Menu Items done. Now we need to update the Menu Module. In Joomla!, the Menu Module determines three things:
- What the menu looks like.
- Where on the page it will show.
- Which pages it will show on.
We will do two examples:
- In the first example, we will set the parameters that show the parent level menu items with the lower level items beneath.
- In the second example, we will add an additional menu module that appears in the left column and shows only the second level menu items.
Note We will do both examples using the Protostar Template included in the core Joomla! installation.
Example 1 - One Menu Module With Second Level Menu Items[edit]
To show this as one module, follow these steps:
- Navigate to Extensions → Module Manager and locate the Menu Module associated with your menu. For instructions on creating a new menu module, see Module Menu

- Click on the module name associated with your menu. In this tutorial, we are selecting Main Menu. Note: this image has been filtered by selecting Menu in the Module type dropdown.

- In the Module details, set the Start level to 1, the End Level to All and set Show Submenu Items to Yes.

- For this tutorial, we have added some styling in the Advanced tab. In the Menu Class Suffix we have entered navbar-nav nav-pills. You can also add navbar-nav nav-tabs for a slightly different look. Note: there is a space before navbar-nav.
- Click on Save & Close.
- Go to the frontend of your site and your menu should look similar to this. In the Protostar Template, the sublevel menu items are displayed as dropdown menu items.

- The source code generated will look similar to this:


<ul class="nav menu navbar-nav nav-pills">
  <li class="item-101 current active"><a href="/" >Home</a></li>
  <li class="item-102"><a class="dropdown-toggle" href="/about-us" >About Us</a></li>
  <li class="item-210 deeper parent"><a href="#" >Dogs</a>
    <ul class="nav-child unstyled small">
      <li class="item-212"><a href="/2015-11-24-14-19-31/collies" >Collies</a></li>
      <li class="item-213"><a href="/2015-11-24-14-19-31/pomeranians" >Pomeranians</a></li>
    </ul>
  </li>
  <li class="item-211 deeper parent"><a href="#" >Cats</a>
    <ul class="nav-child unstyled small">
      <li class="item-214"><a href="/2015-11-24-14-20-12/burmese" >Burmese </a></li>
      <li class="item-215"><a href="/2015-11-24-14-20-12/russian-blues" >Russian Blues</a></li>
    </ul>
  </li>
</ul>
Example 2 - A Second Menu Module With Child Level Menu Items[edit]
To show in a separate module in a different position, follow these steps:
- Navigate to Extensions → Module Manager and locate or create a second Menu Module associated with your menu. For instructions on creating a new menu module, see Module Menu
- Click on the module name associated with your menu. In this tutorial, we are selecting Left Menu. Note: this image has been filtered by selecting Menu in the Module type dropdown.
- In the Module details, set the Start level to 2, the End Level to All and set Show Submenu Items to Yes. Note the position has changed and the menu we are pointing to is the Main Menu.

- For this tutorial, we have used the Menu Assignment tab and assigned this Menu Module to appear on all pages except the home page.

- Click on Save & Close.
- Go to the frontend of your site and navigate to the Collies article. Your menu should look similar to this. Notice the child level subitems are the only items showing.

- The source code generated will look similar to this:


<ul class="nav menu">
  <li class="item-212 current active"><a href="/2015-11-24-14-19-31/collies" >Collies</a></li>
  <li class="item-213"><a href="/2015-11-24-14-19-31/pomeranians" >Pomeranians</a></li>
</ul>Sub-Sub-Menus[edit]
Using this same technique, it is easy to create third-level sub-menus. You just make the Parent Menu Item a second-level sub-menu. Then you could use the same technique to create a separate Menu Module with Start Level of 2 and End Level of 3. This would show only the third-level Menu Items.