Components Newsfeeds Categories
From Joomla! Documentation
Description[edit]
Provides an overview of the News Feeds Categories available on a Joomla site. The screen is used to find, add, edit and delete News Feeds Categories. All News Feeds are organised in Categories. There must be at least one News Feeds Category before a News Feed can be created.
How to Access[edit]
- Select Components → News Feeds → Categories from the dropdown menu of the Administrator Panel.
Screenshot[edit]
Column Headers[edit]
In the table containing categories these are the different columns as shown below. Click on the column heading to sort the list by that column's value.
- Ordering. Up-Down Arrows
 . User specified ordering, default is order of categories creation. When active, drag and drop ordering by 'click and hold' on the bars icon
 then 'release' in desired position.
- Checkbox. Check this box to select one or more categories. To select all categories, check the box in the column heading.Note: Many toolbar actions can work with multiple categories.
- Status. Published
 or Unpublished
  categories are shown. Click on the green check mark or the red circle in the Status column to toggle between Published and Unpublished.
- Title. The name of the category. You can open the category for editing by clicking on the Title.
- Published. Whether and how many categories has been published. You see the Published categories by clicking on the Number in this column.
- Unpublished. Whether and how many categories has been unpublished. You see the Unpublished categories by clicking on the Number in this column.
- Archived. Whether and how many categories has been archived. You see the Archived categories by clicking on the Number in this column.
- Trashed. Whether and how many categories has been trashed. You see the Trashed categories by clicking on the Number in this column.
- Access. The viewing Access Level for this category.
- Language. Category's language. If you are not using the multi-language feature of Joomla, default is 'All'.
- ID. This is a unique identification number for this category assigned automatically by Joomla. It is used to identify the category internally, and you cannot change this number.
Column Filters[edit]
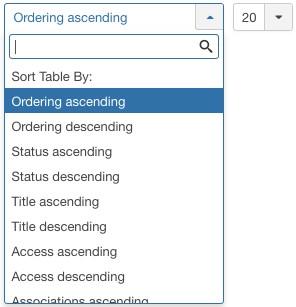
Above the column headers on the right, there are 2 dropdown input fields, Sort Table By: (preset to 'Ordering ascending') and a number (preset to '20') to display.
These column sorting input fields shows the current method of sorting applied to the table. Use the dropdown field choices and click the column heading name. Alternatively, click on the column heading to sort the list by that column's value.
This will also change the value in the drop field to correspond with the column header name. The list will then be sorted in order by that column and a sort icon (up or down arrow) will show next to the column name. Click a second time to reverse the sort, which will change the corresponding drop field.
- Ordering ascending (default). Shows ordering of selected column, ascending or descending.
- Number of categories to display. Shows the number of categories to display on one page, default is 20 categories. If there are more categories than this number, you can use the page navigation buttons to navigate between pages.
List Filters[edit]
The List Filters are a series of controls that let you limit what categories show in the screen. More than one filter may be entered. In this case, only categories that meet all of the filter conditions will show on the list.
Filter by Partial Title or ID
In the upper left is a search field and 2 buttons.
- To filter by partial title, enter part of the title and click 'Search'

- To filter by ID number, enter "id:xx", where "xx" is the ID number (for example, "id:29").
- Click 'Clear' to clear the Filter field and restore the list to its unfiltered state.
Search Tools[edit]
Above the column headings, there are 5 dropdown list boxes.
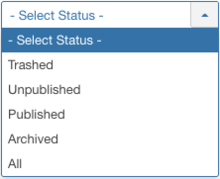
Filter by Status
Lets you show only categories with the selected published status.
- - Select Status -: Show only categories that are Published and Unpublished.
- Trashed: Show only categories that are Trashed. Quick Tip: Permanently delete categories
- Unpublished: Show only categories that are Unpublished.
- Published: Show only categories that are Published.
- Archived: Show only categories that are Archived.
- All: Show all categories regardless of published status.
Filter by Access
Lets you show only categories that have a specified viewing access level. The list box will show the access levels defined for your site.
- - Select Access -: Show categories with any viewing access level.
- Public: Show only categories with this viewing access level.
- Guest: Show only categories with this viewing access level.
- Registered: Show only categories with this viewing access level.
- Special: Show only categories with this viewing access level.
- Super Users: Show only categories with this viewing access level.
Filter by Language
Lets you show only categories that have a specific language assigned. The list box will show the languages defined for your site.
- - Select Language -: Show categories for any language.
- All: Show categories set for 'All' languages.
- English (en-GB): Show categories only for this language.
Filter by Tag
Lets you show only categories that have a specified tag. The list box will show the tags created for your site.
- - Select Tag -: Show categories with any (or no) tag(s).
- Joomla: Show only categories with this tag.
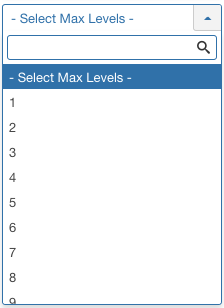
Filter by Max Levels (Category Level)
Lets you show only categories at or above the specified level in the hierarchy.
- - Select Max Levels -: Show all categories.
- 1: Show only categories at the top level in the hierarchy (in other words, whose parent is '- No Parent -').
- 2: Show only categories in the top and 2nd levels in the hierarchy.
- 3: Show only categories in the top, 2nd and 3rd levels in the hierarchy.
- 4 … 8
- 9: Show only categories in the top, 2, 3, 4, 5, 6, 7, 8 and 9 levels in the hierarchy.
- 10: Show only categories in 10 levels in the hierarchy.
Automatic Pagination[edit]
Page Controls. When the number of categories is more than one page, you will see a page control bar as shown below. The current page number being viewed is shaded.
- Start: Click to go to the first page.
- Prev: Click to go to the previous page.
- Page numbers: Click to go to the desired page.
- Next: Click to go to the next page.
- End: Click to go to the last page.
Toolbar[edit]
At the top left you will see the toolbar.
The functions are:
- New. Opens the editing screen to create a new category.
- Edit. Opens the editing screen for the selected category. If more than one category is selected (where applicable), only the first category will be opened. The editing screen can also be opened by clicking on the Name of the category.
- Publish. Makes the selected category available to visitors to your website.
- Unpublish. Makes the selected category unavailable to visitors to your website.
- Archive. Changes the status of the selected category to indicate that they are archived. Archived category can be moved back to the published or unpublished state by selecting "Archived" in the Select Status filter and changing the status of the category to Published or Unpublished as preferred.
- Check-in. Checks-in the selected category. Works with one or multiple category selected.
- Batch. Batch processes the selected category. Works with one or multiple items selected.
- Rebuild. Reconstructs and refreshes the relevant table. Normally, you do not need to rebuild this table. This function is provided in case the data in the table becomes corrupted.
- Trash. Changes the status of the selected category to indicate that they are trashed. Trashed category can still be recovered by selecting 'Trashed' in the 'Select Status' filter and changing the status of the category to Published or Unpublished as preferred. To permanently delete trashed category, select 'Trashed' in the 'Select Status' filter, select the category to be permanently deleted, then click the 'Empty Trash' toolbar icon.
- Help. Opens this help screen.
- Options. Opens the Options window where settings such as default parameters can be edited.
Batch Process[edit]
The Batch Process allows a change in settings for a group of selected categories marked with a check-mark in the corresponding check-mark boxes. To use: select one or more categories form the table of categories being viewed and click on the 'Batch' Toolbar button. This will open a pop up window as shown below.
You can change one value or all values at one time.
How to Batch Process a group of categories:
- Select one or more categories on the list by selecting the desired checkbox(es).
- Click the 'Batch' Toolbar button.
- Set one or more of the following values:
- To change the Language, select the desired language from the Set Language list box.
- To change the Access Levels, select the desired new access level from the Set Access Level list box.
- To change the Category, select a category.
- To copy the categories to a different category, select the desired category from the category list box and check the Copy option.In this case, the original categories are unchanged and the copies are assigned to the new category and, if selected, the new language, access level and tag.Note: Changes you have selected from language, access level and tag will be applied to the copies, not the original.
- To move the categories to a different category, select the desired category from the category list box and check the Move option.In this case, the original categories will be moved to a new category and, if selected, be assigned the new language, access level and tag.
- To change the Category, select a category.
- To add a Tag, select the desired tag from the Add Tag list box.
When all of the settings are entered, click on Process to perform the changes. A message "Batch process completed successfully." will show. Note: Nothing will happen if you don't have any categories selected.
If you wish to clear your entered selections, click on the 'Cancel' button. Note: This does not uncheck the check boxes for the categories.
Quick Tips[edit]
- To permanently delete categories:
- Change the status of the categories to Trashed.
- Change the Status filter to Trashed. At this point the trashed categories will show and the Empty trash button
 will show in the toolbar.
 - Select the desired trashed categories and click on Empty trash in the toolbar. The categories will be permanently deleted.
Related Information[edit]
Help Screens[edit]
| Component | Description |
|---|---|
| News Feeds |
Provides an overview of the News Feeds from other sites available on a Joomla site. The screen is used to find, add, edit and delete News Feeds from other sites. |
| News Feeds Edit |
This is where you can
|
| Categories (this screen) |
Provides an overview of the News Feeds Categories available on a Joomla site. The screen is used to find, add, edit and delete News Feeds Categories. |
| Categories Edit |
This is where you can
|
| Options |
News Feed Options configuration allows setting of parameters used globally for all news feeds. |
| Menu Items | Description |
|---|---|
| Categories |
Used to show a list of all News Feed Categories. Categories are shown in a hierarchical list. |
| Category |
Used to show all News Feeds belonging to a specific Category in a list layout. |
| Single News Feed |
Used to show one News Feed in the Frontend of the site. |


