Modules
From Joomla! Documentation
Description[edit]
The Modules list is used to find, add, and edit modules.
Modules are used to display content and/or media around the main content.
How to Access[edit]
Home Dashboard → Site → Modules
To add a Module:
- click the New toolbar button
To edit a Module:
- select a Title from the list
Screenshot[edit]
Column Headers[edit]
- Checkbox. Check this box to select modules. To select all modules, check the box in the column heading. After boxes are checked the toolbar button 'Actions' get active.
- Ordering. You can change the order of an module within a list as follows:
- Status. Status of module. Hover icon for informations.
- Title. The title of the module. Edit the module by clicking on the Title.
- Position. The position on the page where this module is displayed. Learn more.
- Type. The system name of the Module.
- Pages. The Menu Items where this Module will be displayed.
- On all pages
- No pages
- Only on the pages selected
- On all pages except those selected
- Access. The viewing Access Level for this module.
- Language. Modules language, default is 'All'.
- ID. A unique identification number for this module, you cannot change this number.
List Filters[edit]
Site and Administrator filter. Selects either Site or Administrator modules.
Search bar. Near the top of the page you will see the search bar shown in the Screenshot above.
- Search by Text. Enter part of the search term and click the Search icon. Hover to see a Tooltip indicating which fields will be searched.To 'Search by ID' enter "id:x", where "x" is the ID number (for example, "id:19").
- Filter Options. Click to display the additional filters.
- Clear. Click to clear the Filter field and restore the list to its unfiltered state.
- Ordering. Shows the current list ordering field. 2 ways to change the order:
- Select from the dropdown list. Ordering may be in ascending or descending order.
- Click a column heading. The column heading toggles between ascending and descending order.
- Number to Display. Shows the number of modules in a list. Select from the dropdown list to change the number displayed.The default for a site is '20' but this may be changed in the Global Configuration.
Filter Options[edit]
Near the top of the page you will see the filter bar shown in the Screenshot above.
- Select Status. Select from Trashed / Unpublished / Published / All.
- Select Position. Select from the list of available module positions.
- Select Type. Select from the list of available module types.
- Select Menu Item. Select from the list of available menu items.
- Select Access. Select from the list of available viewing access levels.
- Select Language. Select from the list of available languages.
Pagination[edit]
Page Controls. When the number of modules is more than one page, you will see a page control bar near the bottom of the page shown in the Screenshot above. The current page number being viewed has a dark colour background.
- Start. Click to go to the first page.
- Prev. Click to go to the previous page.
- Page numbers. Click to go to the desired page.
- Next. Click to go to the next page.
- End. Click to go to the last page.
Toolbar[edit]
At the top of the page you will see the toolbar shown in the Screenshot above.
- New. Opens the editing screen to create a new module.
- Actions. Reveals a list of actions for selected modules. Check one or more modules checkboxes to activate the list.
- Publish. Makes the selected modules available to visitors to your website.
- Unpublish. Makes the selected modules unavailable to visitors to your website.
- Check-in. Checks-in the selected modules.
- Trash. Changes the status of the selected modules to indicate that they are trashed. Learn more.
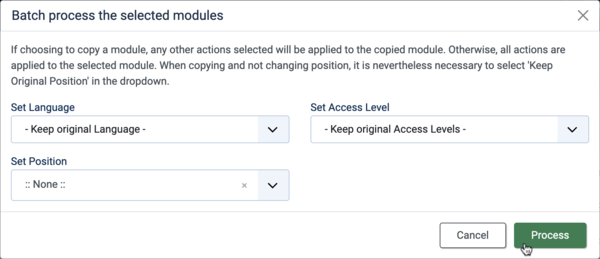
- Batch. Batch processes the selected modules.
- Duplicate. Makes a copy of the selected modules. The copy is created immediately and is given the same name as the original but suffixed with a number (for example "(2)") so that it can be distinguished from the original and any other copies.
- Options. Opens Module: Options.
- Help. Opens this help screen.
Batch Process[edit]
The Batch Process allows a change in settings for a group of selected modules.
How to Batch Process a group of modules:
- Select one or more modules on the list by checking the desired checkboxes.
- Click the Batch Toolbar button.
- Set one or more of the following values:
- To change the Language, select the desired new language from the Set Language list box.
- To change the Access Levels, select the desired new access level from the Set Access Level list box.
- To change the Position, select the desired new Position from the Set Position list box.
- When all of the settings are entered, click on Process to perform the changes. A message "Batch process completed successfully." will show.
Quick Tips[edit]
- Joomla websites require at least 1 Menu Module.
- Other Module Types (for example Banners) are optional.
- Some Modules are linked to components. For example, each Menu Module is related to one Menu.
- Other Modules (for example Breadcrumbs) do not depend on any other content.
- Multiple occurrences of similar Module Types are allowed and common.
Related Information[edit]
- The Joomla installation has over 40 module types. Additional 3rd party modules can be obtained from the Joomla Extensions Directory.

