Menus Menu Item Article Categories
From Joomla! Documentation
How To Access[edit]
To create a new List All Categories Menu Item:
- Select Menus → [name of the menu] from the drop-down menu on the back-end of your Joomla! installation (for example, Menus → Main Menu).
- Click New to create a new menu item.
- Click the Menu Item Type Select button and then click the List All Categories link under Articles.
To edit an existing List All Categories Menu Item, click its Title in Menu Manager: Menu Items.
Description[edit]
Used to show a list of Categories. Categories are shown in a hierarchical list, as shown below.
Depending on the selected options for this layout, you can click on a category Title to show the articles in that category.
Screenshot[edit]
Column Headers[edit]
Common Options[edit]
See Menu Item Manager: New Menu Item for help on fields common to all Menu Item types, including Details, Link Type Options, Page Display Options, Metadata Options, and Module Assignments for this Menu Item.
Required Settings[edit]
This layout requires that you select a starting top-level category. This is done in the list box shown below.
To include all article categories, select Root. Otherwise, select the desired top-level category. All child categories of the selected category will show in the layout.
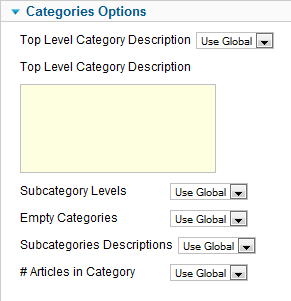
Categories Options[edit]
Category Options[edit]
Blog Layout Options[edit]
List Layout Options[edit]
Article Options[edit]
The List All Categories Layout has the following Article Options, as shown below.
The List All Categories Layout has the following Article Options, as shown below. In addition to Yes/No or Hide/Show, these options allow the "Use Global" setting. This uses the default value from Article Manager Options.
The Article Options are as follows.
- Show Title. (Use Global/Use Article Settings/Hide/Show). Whether or not to show the Article's Title.
- Linked Titles. (Use Global/Use Article Settings/No/Yes). If the Article's Title is shown, whether to show it as a link to the article.
- Show Intro Text. (Use Global/Use Article Settings/Hide/Show). If set to Show, the Intro Text of the article will show when you drill down to the article. If set to Hide, only the part of the article after the "Read More" break will show.
- Show Category. (Use Global/Use Article Settings/Hide/Show). Whether or not to show the Article's Category.
- Link Category. (Use Global/Use Article Settings/No/Yes). If the Article's Category is shown, whether to show it as a link to a Category layout (list or blog) for that Category.
- Show Parent. (Use Global/Use Article Settings/Hide/Show). Whether or not to show the Article's Parent Category.
- Link Parent. (Use Global/Use Article Settings/No/Yes). If the Article's Parent Category is shown, whether to show it as a link to a Category layout (list or blog) for that Category.
- Show Author. (Use Global/Use Article Settings/Hide/Show) Whether to show the author of the Article.
- Link Author. (Use Global/Use Article Settings/No/Yes). If the Article's author is shown, whether to show it as a link to a Contact layout for that author. Note that the author must be set up as a Contact in Contact Manager: Edit.
- Show Create Date. (Use Global/Use Article Settings/Hide/Show). Whether or not to show the Article's create date.
- Show Modify Date. (Use Global/Use Article Settings/Hide/Show). Whether or not to show the Article's modify date.
- Show Publish Date. (Use Global/Use Article Settings/Hide/Show). Whether or not to show the Article's start publishing date.
- Show Navigation. (Use Global/Use Article Settings/Hide/Show). Whether or not to show a navigation link (for example, Next or Previous article) when you drill down to the article.
- Show Voting. (Use Global/Use Article Settings/Hide/Show). Whether or not to show the a voting icon for the article.
- Show Read More. (Use Global/Hide/Show). Whether or not to show a "Read More" link to allow a drill down to the entire article.
- Show Title with Read More. (Use Global/Hide/Show). If set to Show, the Article's title will show in the "Read More" button.
- Show Icons. (Use Global/Use Article Settings/Hide/Show). If set to Show, Print and Email will use icons instead of text.
- Show Print Icon. (Use Global/Use Article Settings/Hide/Show). Show or Hide the Print Article button.
- Show Email Icon. (Use Global/Use Article Settings/Hide/Show). Show or Hide the Email Article button.
- Show Hits. (Use Global/Use Article Settings/Hide/Show). Show or Hide the number of times the article has been hit (displayed by a user).
- Show Unauthorised Links. (Use Global/No/Yes). If Yes, the Intro Text for restricted articles will show. Clicking on the "Read More" link will require users to log in to view the full article content.
Integration Options[edit]
The List All Categories layout has the following Integration Options.
These determine whether a news feed will be available for the page and what information it will show.
Toolbar[edit]
At the top right you will see the toolbar:
The functions are:
- Save. Saves the menu item and stays in the current screen.
- Save & Close. Saves the menu item and closes the current screen.
- Save & New. Saves the menu item and keeps the editing screen open and ready to create another menu item.
- Save as Copy. Saves your changes to a copy of the current menu item. Does not affect the current menu item. This toolbar icon is not shown if you are creating a new menu item.
- Cancel/Close. Closes the current screen and returns to the previous screen without saving any modifications you may have made.
- Help. Opens this help screen.
Quick Tips[edit]
- To see an example of the featured layout, install Joomla with the sample data and select the Home page.
Related Information[edit]
- Featured articles are selected using Content → Featured Articles.
- To create a new menu see Menus Menu Manager.


