Working with Git and Eclipse
From Joomla! Documentation
This article is actively undergoing a major edit for a short while.
As a courtesy, please do not edit this page while this message is displayed. The user who added this notice will be listed in the page history. This message is intended to help reduce edit conflicts; please remove it between editing sessions to allow others to edit the page.
If this page has not been edited for several hours, please remove this template, or replace it with {{underconstruction}} or {{incomplete}}.
Introduction[edit]
This article discusses how to set up and use eGit (the Eclipse version of Git) with Eclipse version 3.7.2 (available as of March 2012). It is important to have the latest version of Eclipse in order to use the latest (and most stable) version of eGit.
If you have an older version of Eclipse, it is quite easy to try the latest version without removing your old version. Simply install the new version in a different directory than the existing Eclipse version and use the same Eclipse workspace. All of your projects and preferences are saved in the workpace and will be available to the new Eclipse version. If for some reason you need to go back to your old Eclipse version, just close the new version and start the old one.
Installing Eclipse with PHP and Git[edit]
To Install Eclipse with PHP and Git, follow these steps:
- Install Eclipse for Javascript Web Developers from Eclipse Downloads. This will give you a version of Eclipse with XML and HTML file editing (but without eGit or PHP).
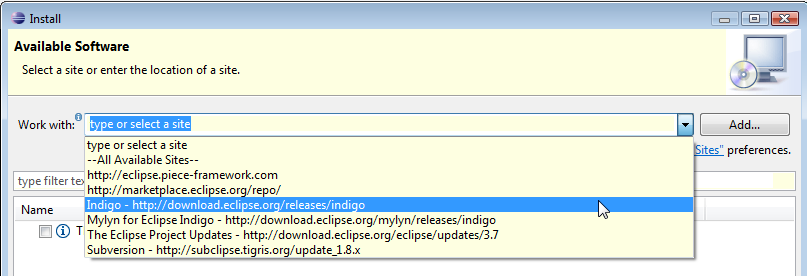
- To add eGit and PHP, navigate to Eclipse→Help→Install New Software, as shown below.

- Select Indigo update site as shown below.
- This will present a list of all of the available Eclipse plugins. Select the three git options under Collaboration, as shown below.

- Then select the PHP Development Tools (PDT) option under Programming Languages as shown below:

- Then click through the rest of the wizard and accept the terms of the license agreement. At this point, the requested plugins will be downloaded. After this, you will be prompted to restart Eclipse (which you should do).


At this point, you should have PHP and eGit installed with Eclipse. Confirm this by selecting Window→Open Perspective→Other and make sure that the PHP and Git Repositories perspectives show on the list.
Creating a Project from a Remote Repository[edit]
Normally the first task we need to do is to create an Eclipse project from a remote Git repository (usually on Github). The repository might be a fork we have created for our own use or it might be a Joomla project (CMS or Platform) or someone else's project. In any case, we follow the same three steps:
- Clone the remote repository into a local Git repository.
- Create a new PHP project in our Eclipse workspace.
- Share the project. This associates the Eclipse project with the local Git repository.
Note that there are different ways to accomplish this. Here are detailed instructions for one way to do this.
Clone the Remote Repository[edit]
One easy to way to clone a remote repository is using the Git Repositories view in Eclipse. Here are the steps:
- Open the Git Repositories view (Windows→Show View→Git Repositories) and click on the Clone button as shown below.

- Select URI and click Next.

- At this point, we need the URL from Github. We can use either SSH or HTTPS. SSH requires that you have created SSH keys in Github and stored them in Eclipse. Find the desired repository in Github. To use SSH, select the SSH tab and Copy to Clipboard button.

- Paste this value into the URI value in the Eclipse form and select SSH as the protocol and check the box "Store in Secure Store", as shown here.Then click Next.

- If you want to use HTTPS instead of SSH, in Github select the HTTP tab as shown here.

- For HTTPS, select HTTPS as the protocol and fill in your Github user name and password, again checking the box "Store in Secure Store". This is shown below.Then click Next.

- Here we select the branch to track. Normally this is the master branch, as shown here.Select the desired branch and click Next.

- Next we select the local destination for the repository. This will normally be the same as the project location for the PHP project. The remote repository name defaults to "origin", as shown in the example below.Then click finish to create the repository.

- Note that the eGit Help documentation advises against storing the local Git repository in the project folder. However, in practice this appears to the best way to do it.
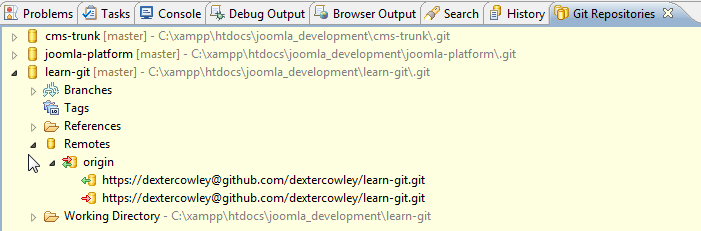
- At this point, the repository should show in the Git Repositories view as shown here (for SSH).Note that the remote repository shows under the name "origin". If you used HTTP instead of SSH, the origin repository will show as follows.


Create the PHP Project[edit]


[edit]


