Creating a Database for Joomla!
From Joomla! Documentation
Every installation of the Joomla! CMS requires a database. The database will store data such as articles, menus, categories, and users. This information is needed to make and manage your Joomla! website. Regardless of the requirements of the version, in order to install Joomla! you must have a working database, database user, database password and proper privileges for the database user. You will need to complete these tasks before you begin the installation. This article will address the most common type of database used when Installing Joomla!, a MySQL database. First, we show using cPanel on a hosting account, other types of hosting interfaces should have similar steps. Then we show the same using phpMyAdmin on a localhost XAMPP setup
MySQL DB Wizard[edit]
For beginners, it is recommended that the MySQL Database Wizard is used. The wizard will guide you step by step through the process. You may use these steps to guide you through your own hosting account panel if it differs, they are:
- Create a Database → Create a User → Set User password → Set User Privileges.
First, activate the wizard by clicking the icon in your hosting account's cPanel.
Creating a Database[edit]
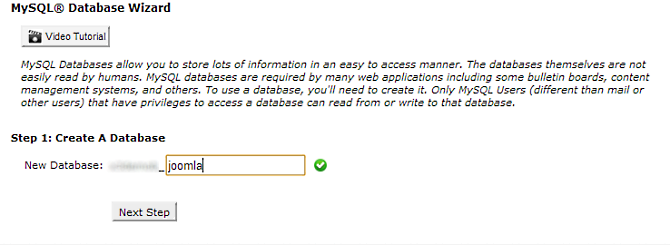
Next, you must choose a name for your database. In a shared hosting environment, your database name is usually proceeded by your hosting account's username, then an ID you specify. For example, if your hosting account's username is B1234, your database name could look similar to this: B1234_joomla.
Creating a Database User and User password[edit]
Once you have created a database, you now need a database user to access it. This step will create a user and the user's password at the same time. The Username for a database will be similar to the database name. You can actually use the name of the database for the user, but for security, use a unique Username with a strong password.
Set the User Privileges[edit]
The last database creation task is to give your database user privileges (permissions) to interact with your database. These privileges give your user the ability to create database tables, drop (delete) them, alter, index and other interactive tasks.
- If you are not using the database creation wizard. Privileges are usually included in the assignment of a database user to a database. This work flow is Create db → Create db User → Assign a db User to a db (including privileges).
Finishing Up[edit]
After you complete all the steps of the database wizard, you will see the summary of the final results.
- Write down the following information for use in your Joomla! installation.
- Database name, example: D1234_joomla
- Database user, example: D1234_juser
- Database user's password
- Note the location of the database. Usually, Localhost for a cPanel installation. Occasionally, a hosting account may have a database server completely separate from a user account's server for physical files. Instead of Localhost the database server may actually be a URL type of address, dbserver10.hosting.com.
MariaDB using phpMyAdmin XAMPP on Localhost[edit]
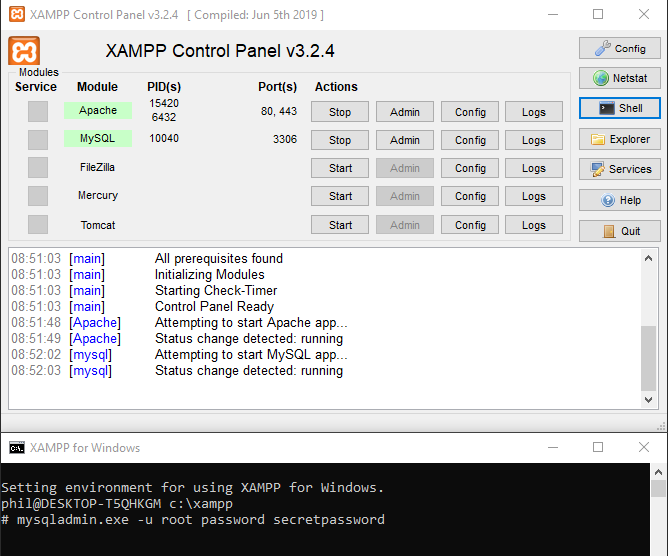
Start by opening your XAMPP Control Panel and seeing that it works by going to http://localhost/. You should see the XAMPP welcome page with PHPInfo and phpMyAdmin in the top menu. Next, we want to make our root user secure with a password. This can be done in your XAMPP console by opening the Shell and entering: mysqladmin.exe -u root password secretpassword
This will set the root to use a password. Choose your own and not secretpassword. Make a note of it.
Now your phpMyAdmin will break so we need to fix that.
Navigate to your config.inc.php file which is most likely at:
C:\xampp\phpMyAdmin\config.inc.php
On line 21:
$cfg['Servers'][$i]['password'] = ' ';
You need to add your password. In our example it will look like:
$cfg['Servers'][$i]['password'] = 'secretpassword';
Now our phpMyAdmin should work. We can use it to create a new user
Create a New Database User with phpMyAdmin XAMPP on Localhost[edit]
Open phpMyAdmin from the link in the top menu of the XAMPP welcome page and select User accounts in the top menu. Here you will see a page listing the users. Select the Add user account link which is just under the New label.
You will be asked for a Username and password and to retype the password. For development on your localhost, in Global privileges, check the All box. Select Go in the bottom right corner.
Create a New Database using phpMyAdmin XAMPP on Localhost[edit]
Now that you have your user, create a new database to add your tables to or allow Joomla to create it for you in the installation process. If you want to name your own then click the Databases tab. Fill in the name you would like to use spacing words with underscores. If you want "my database" enter my_database. Select utf8_unicode_ci and hit Create.
You now have a database, a user and a password and are all set to install Joomla!


