Difference between revisions of "How to build your free Joomla Website/nl"
From Joomla! Documentation
(Created page with "*[http://tutorials.joomla.com/extensions/13-google-maps Hoe Google Maps integreren]: Het toevoegen van een kaart met uw adres aan uw joomla.com website is makkelijk door de sp...") |
(Updating to match new version of source page) |
||
| (11 intermediate revisions by 2 users not shown) | |||
| Line 1: | Line 1: | ||
<noinclude><languages /></noinclude> | <noinclude><languages /></noinclude> | ||
| + | |||
| + | <div class="mw-translate-fuzzy"> | ||
==Wat is joomla.com?== | ==Wat is joomla.com?== | ||
| − | [https://www.joomla.com joomla.com] is de nieuwste Joomla service waarmee een compleet gratis website gebouwd en onderhouden kan worden op een joomla.com subdomein (example.joomla.com) voor een onbeperkte periode. De website software bevat alle core functionaliteiten van het Joomla CMS die het bouwen van websites eenvoudig en flexibel maken. | + | [https://www.joomla.com joomla.com] is de nieuwste Joomla service waarmee een compleet gratis website gebouwd en onderhouden kan worden op een joomla.com subdomein (example.joomla.com) voor een onbeperkte periode. De website software bevat alle core functionaliteiten van het Joomla CMS die het bouwen van websites eenvoudig en flexibel maken. |
| + | </div> | ||
| + | <div lang="en" dir="ltr" class="mw-content-ltr"> | ||
| + | joomla.com is a domain name used to allow individuals to create personal instances of the Joomla CMS in subdomains of the form alice.joomla.com, bob.joomla.com and so on. The subdomains are managed by the CloudAccess.net hosting service. With your own subdomain you can build and maintain a completely free Joomla website for an unlimited time. The free site features all of the Joomla CMS core functionalities that make building a website easy and flexible. | ||
| + | </div> | ||
| + | <div lang="en" dir="ltr" class="mw-content-ltr"> | ||
| + | ==Launching your first Joomla.com site== | ||
| + | </div> | ||
| + | <div lang="en" dir="ltr" class="mw-content-ltr"> | ||
| + | If you are new to Joomla and would like to see it in action without downloading and setting it up yourself the process to launch your new Joomla website has never been easier! To get started, navigate to the main [https://launch.joomla.org/ launch.joomla.org] page and enter the information requested in the sequence of forms, mostly appearing in pop-up dialog boxes. | ||
| + | </div> | ||
| + | |||
| + | <div lang="en" dir="ltr" class="mw-content-ltr"> | ||
| + | === Step 1: Enter a suitable subdomain name === | ||
| + | </div> | ||
| + | |||
| + | <div lang="en" dir="ltr" class="mw-content-ltr"> | ||
| + | [[Image:Launch-Joomla-homepage-information.png|800px|center|none]] | ||
| + | </div> | ||
| + | |||
| + | <div lang="en" dir="ltr" class="mw-content-ltr"> | ||
| + | Alice and Bob are probably taken but you can choose any name that is easy to type and to remember. | ||
| + | </div> | ||
| + | |||
| + | <div lang="en" dir="ltr" class="mw-content-ltr"> | ||
| + | === Step 2: Select Your Joomla Version === | ||
| + | </div> | ||
| + | |||
| + | <div lang="en" dir="ltr" class="mw-content-ltr"> | ||
| + | As this is a new installation it is best to select the latest stable version. | ||
| + | </div> | ||
| + | |||
| + | <div lang="en" dir="ltr" class="mw-content-ltr"> | ||
| + | [[Image:Launch-Joomla-select-version.png|center|none]] | ||
| + | </div> | ||
| + | |||
| + | <div lang="en" dir="ltr" class="mw-content-ltr"> | ||
| + | === Step 3: Create an account === | ||
| + | </div> | ||
| + | |||
| + | <div lang="en" dir="ltr" class="mw-content-ltr"> | ||
| + | Fill in your personal details and select the Register button. | ||
| + | </div> | ||
| + | |||
| + | <div lang="en" dir="ltr" class="mw-content-ltr"> | ||
| + | [[Image:Launch-Joomla-personal-details.png|center|none]] | ||
| + | </div> | ||
| − | + | <div lang="en" dir="ltr" class="mw-content-ltr"> | |
| + | '''Notes''' | ||
| + | </div> | ||
| + | *<span lang="en" dir="ltr" class="mw-content-ltr">'''Email Address:''' Your email address is used to login to your Cloud Control Panel (CCP) and to send you messages to complete the set up of your account. It must be a valid account. It is also used for a Super User account in your free joomla.com site.</span> | ||
| + | *<span lang="en" dir="ltr" class="mw-content-ltr">'''Country:''' This data is used to track where the signups come from.</span> | ||
| + | *<span lang="en" dir="ltr" class="mw-content-ltr">'''Terms of Service''' You are required to agree to the Terms of Service available from the link adjacent to the check box. If you agree to sign up for the Joomla marketing campaign you will be sent occasional Joomla marketing emails. This is not a requirement.</span> | ||
| − | == | + | <div lang="en" dir="ltr" class="mw-content-ltr"> |
| − | + | === Step 4: Unlock Premium Features === | |
| − | + | If you do not wish to Unlock Premium Features for $5 per month you can select '''NOT NOW''' to proceed with your free site. | |
| + | </div> | ||
| − | + | <div lang="en" dir="ltr" class="mw-content-ltr"> | |
| − | + | You will shortly receive a 6 digit token on the phone number that you entered. | |
| − | + | </div> | |
| − | |||
| − | |||
| − | |||
| − | |||
| − | |||
| − | |||
| − | |||
| − | == | + | <div lang="en" dir="ltr" class="mw-content-ltr"> |
| − | + | === Step 5: Verify Account === | |
| + | </div> | ||
| − | == | + | <div lang="en" dir="ltr" class="mw-content-ltr"> |
| − | + | [[Image:Launch-Joomla-verify-account.png|center|none]] | |
| + | </div> | ||
| + | |||
| + | <div lang="en" dir="ltr" class="mw-content-ltr"> | ||
| + | Use the token to complete the process - you will be logged in to the CloudAccess.net control panel (CCP). | ||
| + | </div> | ||
| + | |||
| + | <div lang="en" dir="ltr" class="mw-content-ltr"> | ||
| + | === Step 6: CloudAccess.net Control Panel === | ||
| + | </div> | ||
| + | |||
| + | <div lang="en" dir="ltr" class="mw-content-ltr"> | ||
| + | [[Image:Launch-Joomla-cloud-access-control-panel.png|center|none]] | ||
| + | </div> | ||
| + | |||
| + | <div lang="en" dir="ltr" class="mw-content-ltr"> | ||
| + | You will also receive an email with your free site login credentials. It may take a few minutes for your free Joomla site to become available. If you have any problems, open a New Ticket in the CPP and the support team will fix whatever needs fixing. | ||
| + | </div> | ||
| + | |||
| + | '''Important:''' Remember to login at least once a month and select the '''Renew''' button in time to keep your free site alive! | ||
| + | |||
| + | <div lang="en" dir="ltr" class="mw-content-ltr"> | ||
| + | === Step 7: Access your site === | ||
| + | </div> | ||
| + | |||
| + | <div lang="en" dir="ltr" class="mw-content-ltr"> | ||
| + | To access your site you can select the '''Login''' button in your CPP Your Products panel. It will take you directly to the Administrator Dashboard of your site. Or you can go directly to the subdomain you created (for example myalias.joomla.org/administrator/) and login with the credentials sent to the email address you registered with. | ||
| + | </div> | ||
| + | |||
| + | <span lang="en" dir="ltr" class="mw-content-ltr">It is a simple as that and once your site is up and running, you can start creating content (articles, menu items, modules) right away. You do not need any extensions to build a stunning fully functional website!</span> | ||
| + | |||
| + | <div lang="en" dir="ltr" class="mw-content-ltr"> | ||
| + | == CPP Tools == | ||
| + | Joomla is managed almost entirely from its Administrator pages. However, from time to time it is useful to have access to system tools for problem solving purposes. Select the Manage button in the CPP Your Products page for access to these tools. | ||
| + | </div> | ||
| + | |||
| + | <div lang="en" dir="ltr" class="mw-content-ltr"> | ||
| + | [[Image:Launch-Joomla-cpp-manage.png|center|none]] | ||
| + | </div> | ||
| + | |||
| + | <div lang="en" dir="ltr" class="mw-content-ltr"> | ||
| + | === phpMyAdmin === | ||
| + | </div> | ||
| + | |||
| + | <div lang="en" dir="ltr" class="mw-content-ltr"> | ||
| + | phpMyAdmin is a utility used to work directly with databases. It really requires experience but experience can be built up as and when problems occur. For access, navigate via Application / Database and then Login to phpMyAdmin. | ||
| + | </div> | ||
| + | |||
| + | <div lang="en" dir="ltr" class="mw-content-ltr"> | ||
| + | === Backup === | ||
| + | It is important to keep regular site backups of the files and database. Many users install a free Akeeba backup extension to do site backups from within Joomla. You can also create backups via Applications / Manage Backups and select the Create Backup button. | ||
| + | </div> | ||
| + | |||
| + | <div lang="en" dir="ltr" class="mw-content-ltr"> | ||
| + | === File Explorer === | ||
| + | </div> | ||
| + | |||
| + | <div lang="en" dir="ltr" class="mw-content-ltr"> | ||
| + | Access to files is sometimes useful, for example to examine Joomla log files that are not directly available from within the Joomla Administrator pages. Access is available via Server / File Explorer and the httpsdocs drop-down list. | ||
| + | </div> | ||
==Hulp krijgen bij het gebruik van joomla.com== | ==Hulp krijgen bij het gebruik van joomla.com== | ||
| − | Joomla. | + | De meeste functionaliteiten overlappen die van het Joomla! CMS. Gebruikers wordt daarom ook aangeraden om hulp te zoeken op het [http://forum.joomla.org Joomla! Forum] en in deze Wiki Documentatie. |
| − | + | <div lang="en" dir="ltr" class="mw-content-ltr"> | |
| + | ==Test upcoming releases with joomla.com== | ||
| + | </div> | ||
| − | === | + | <div lang="en" dir="ltr" class="mw-content-ltr"> |
| − | + | Tests are important in an open source project like Joomla as they provide quality assurance for upcoming releases. You can help with testing of new features and bug fixes by installing the [https://github.com/joomla-extensions/patchtester/releases Joomla Patchtester] extension in your free Joomla site. No special skills are required to become a tester! If you have never tested pull requests, the Joomla Documentation provides all the [[S:MyLanguage/Testing_Joomla!_patches|tutorials]] you need. So be part of it, start testing Joomla today. | |
| − | + | </div> | |
| − | |||
| − | |||
| − | |||
| − | |||
| − | |||
| − | === | + | <div lang="en" dir="ltr" class="mw-content-ltr"> |
| − | + | [[Image:Launch-Joomla-patch-tester.png|800px|center|none]] | |
| − | + | </div> | |
| − | |||
| − | |||
| − | |||
| − | + | <div lang="en" dir="ltr" class="mw-content-ltr"> | |
| + | Caveats: You will need a GitHub account and a GitHub token. You will not be able to test pull requests involving CSS and JavaScript changes requiring NPM Resource Changes. | ||
| + | </div> | ||
<noinclude> | <noinclude> | ||
| − | [[Category:Beginners|Beginners]] | + | [[Category:Beginners|Beginners{{#translation:}}]] |
| − | [[Category:Tutorials|Tutorials]] | + | [[Category:Tutorials|Tutorials{{#translation:}}]] |
</noinclude> | </noinclude> | ||
Latest revision as of 08:45, 15 January 2024
Wat is joomla.com?
joomla.com is de nieuwste Joomla service waarmee een compleet gratis website gebouwd en onderhouden kan worden op een joomla.com subdomein (example.joomla.com) voor een onbeperkte periode. De website software bevat alle core functionaliteiten van het Joomla CMS die het bouwen van websites eenvoudig en flexibel maken.
joomla.com is a domain name used to allow individuals to create personal instances of the Joomla CMS in subdomains of the form alice.joomla.com, bob.joomla.com and so on. The subdomains are managed by the CloudAccess.net hosting service. With your own subdomain you can build and maintain a completely free Joomla website for an unlimited time. The free site features all of the Joomla CMS core functionalities that make building a website easy and flexible.
Launching your first Joomla.com site
If you are new to Joomla and would like to see it in action without downloading and setting it up yourself the process to launch your new Joomla website has never been easier! To get started, navigate to the main launch.joomla.org page and enter the information requested in the sequence of forms, mostly appearing in pop-up dialog boxes.
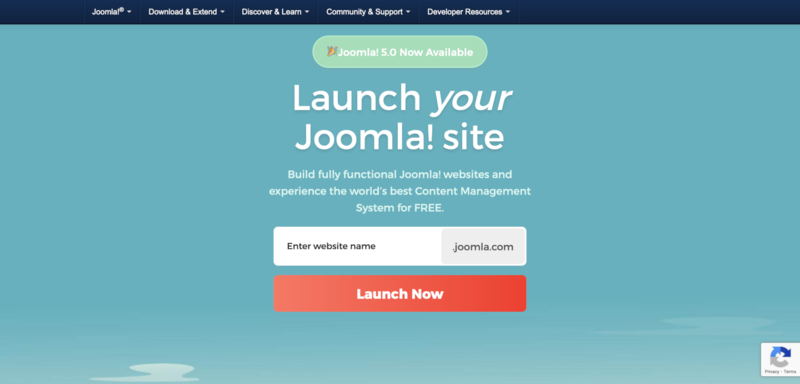
Step 1: Enter a suitable subdomain name
Alice and Bob are probably taken but you can choose any name that is easy to type and to remember.
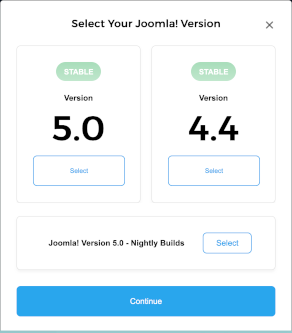
Step 2: Select Your Joomla Version
As this is a new installation it is best to select the latest stable version.
Step 3: Create an account
Fill in your personal details and select the Register button.
Notes
- Email Address: Your email address is used to login to your Cloud Control Panel (CCP) and to send you messages to complete the set up of your account. It must be a valid account. It is also used for a Super User account in your free joomla.com site.
- Country: This data is used to track where the signups come from.
- Terms of Service You are required to agree to the Terms of Service available from the link adjacent to the check box. If you agree to sign up for the Joomla marketing campaign you will be sent occasional Joomla marketing emails. This is not a requirement.
Step 4: Unlock Premium Features
If you do not wish to Unlock Premium Features for $5 per month you can select NOT NOW to proceed with your free site.
You will shortly receive a 6 digit token on the phone number that you entered.
Step 5: Verify Account
Use the token to complete the process - you will be logged in to the CloudAccess.net control panel (CCP).
Step 6: CloudAccess.net Control Panel
You will also receive an email with your free site login credentials. It may take a few minutes for your free Joomla site to become available. If you have any problems, open a New Ticket in the CPP and the support team will fix whatever needs fixing.
Important: Remember to login at least once a month and select the Renew button in time to keep your free site alive!
Step 7: Access your site
To access your site you can select the Login button in your CPP Your Products panel. It will take you directly to the Administrator Dashboard of your site. Or you can go directly to the subdomain you created (for example myalias.joomla.org/administrator/) and login with the credentials sent to the email address you registered with.
It is a simple as that and once your site is up and running, you can start creating content (articles, menu items, modules) right away. You do not need any extensions to build a stunning fully functional website!
CPP Tools
Joomla is managed almost entirely from its Administrator pages. However, from time to time it is useful to have access to system tools for problem solving purposes. Select the Manage button in the CPP Your Products page for access to these tools.
phpMyAdmin
phpMyAdmin is a utility used to work directly with databases. It really requires experience but experience can be built up as and when problems occur. For access, navigate via Application / Database and then Login to phpMyAdmin.
Backup
It is important to keep regular site backups of the files and database. Many users install a free Akeeba backup extension to do site backups from within Joomla. You can also create backups via Applications / Manage Backups and select the Create Backup button.
File Explorer
Access to files is sometimes useful, for example to examine Joomla log files that are not directly available from within the Joomla Administrator pages. Access is available via Server / File Explorer and the httpsdocs drop-down list.
Hulp krijgen bij het gebruik van joomla.com
De meeste functionaliteiten overlappen die van het Joomla! CMS. Gebruikers wordt daarom ook aangeraden om hulp te zoeken op het Joomla! Forum en in deze Wiki Documentatie.
Test upcoming releases with joomla.com
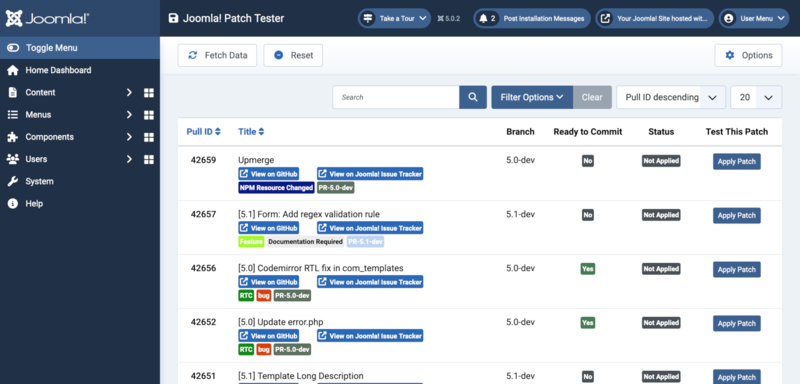
Tests are important in an open source project like Joomla as they provide quality assurance for upcoming releases. You can help with testing of new features and bug fixes by installing the Joomla Patchtester extension in your free Joomla site. No special skills are required to become a tester! If you have never tested pull requests, the Joomla Documentation provides all the tutorials you need. So be part of it, start testing Joomla today.
Caveats: You will need a GitHub account and a GitHub token. You will not be able to test pull requests involving CSS and JavaScript changes requiring NPM Resource Changes.


