Difference between revisions of "Getting Started with Templates/de"
From Joomla! Documentation
Prof.Logout (talk | contribs) (Created page with "= Was macht ein Template =") |
Prof.Logout (talk | contribs) (Created page with "de") |
||
| (4 intermediate revisions by the same user not shown) | |||
| Line 5: | Line 5: | ||
Dieses Tutorial gibt dir einen Einblick in das Template System von Joomla! und die Möglichkeiten seiner Verwendung. | Dieses Tutorial gibt dir einen Einblick in das Template System von Joomla! und die Möglichkeiten seiner Verwendung. | ||
==Sinn und Zweck von Templates== | ==Sinn und Zweck von Templates== | ||
| − | {{:What is the purpose of a template?/ | + | {{:What is the purpose of a template?/de}} |
= Was macht ein Template = | = Was macht ein Template = | ||
| − | {{:What can you do with a template?/ | + | {{:What can you do with a template?/de}} |
| − | = Templates | + | = Standart Templates = |
{{:J3.1:Templates supplied with Joomla!/en}} | {{:J3.1:Templates supplied with Joomla!/en}} | ||
| − | = | + | = Templates wechseln = |
{{:J3.1:Switching templates/en}} | {{:J3.1:Switching templates/en}} | ||
| − | = | + | = Templates installieren = |
{{:J3.1:Installing a template/en}} | {{:J3.1:Installing a template/en}} | ||
Revision as of 14:22, 23 September 2015
Einleitung
Dieses Tutorial gibt dir einen Einblick in das Template System von Joomla! und die Möglichkeiten seiner Verwendung.
Sinn und Zweck von Templates
Ein Template bestimmt das Design und Layout einer Seite. Es stellt den Rahmen bereit, in den Elemente, Module und Komponenten eingefügt werden. Sowohl Front- als Backend-Seiten haben ein Template.
Bei der Installation von Joomla! werden einige Templates mit installiert. Auf anderen Websites können noch viele andere Templates gefunden werden. Viele sind kostenlos unter verschiedenen Lizenzen verfügbar, andere müssen gekauft werden. Zusätzlich gibt es viele Entwickler, welche kundenspezifische Templates entwickeln. Natürlich kannst du auch dein eigenes Template erstellen.
Templates werden mit dem Template-Manager verwaltet. Dieser befindet sich unter dem Menüpunkt Erweiterungen im Backend der Website
=== Warum nutzt Joomla! Templates? [absolut einsteigerfreundlich!] ===
Durch die grundlegende Struktur von Joomla! werden wichtige Aufgaben getrennt, um eine effiziente Wartung der Software zu erreichen. Eine dieser Aufgaben ist es, das Erscheinungsbild der Website zu beeinflussen. Dies beinhaltet Entscheidungen, wie z. B. die Positionierung von Elementen (Komponenten, Module, Plugins) auf der Website.
Beim Erstellen einer Website bleibt die Position vieler Elemente immer gleich (Menüs, Banner, Sidebars, etc.). Zusätzlich soll jede Seite weitgehend gleich aussehen (Schriftart, Überschriften, Farben, etc.). Eventuell sollen einzelne Teile der Seite anders aussehen, um sie hervorzuheben (Blogs, Foren, etc.). Ein gewisses Maß an Planung wird benötigt, wenn du dich jedoch auf ein allgemeines Layout für deine Seiten festgelegt hast, musst du nur noch den Inhalt der einzelnen Seiten erstellen.
An dieser Stelle greift das Template. Du kannst entweder den Code für jede Seite einzeln schreiben oder für jeden Bereich deiner Website ein Template erstellen und auf einzelnen Seiten nur "die Lücken füllen". Okay, ganz so einfach ist es leider nicht, aber dieses Tutorial wird dich Schritt für Schritt an die effiziente Templatenutzung heranführen. Beginnend bei der Nutzung und endend bei der Erstellung von Templates.
- Nutze eines der vorinstallierten Joomla! Templates
- Lade dir ein kostenloses Template aus dem Internet.
- Bezahle einen Entwickler um dir ein Template anzupassen oder zu erstellen, falls deine Bedürfnisse sonst nicht erfüllt werden.
Zusammenfassung – Ein Template bestimmt das Design deiner Website und erlaubt es dir als Administrator mehr Zeit für den Inhalt aufzubringen.
Was macht ein Template
Ein Template verändert die Darstellung von Inhalten in einem Internetbrowser. Nachfolgend einige Beispiele, wie du dies in einer Joomla!-Website nutzen kannst.
Layout
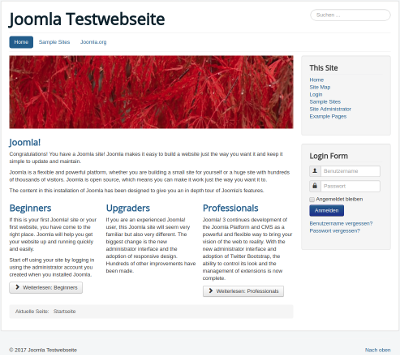
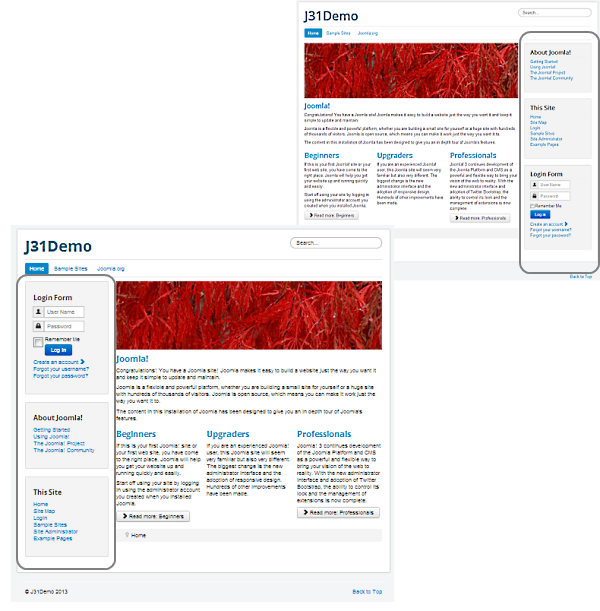
Im Template wird das Design für das Hauptlayout deiner Seite gesetzt. Das beinhaltet die Position verschiedener Elemente (Module). Zum Beispiel kann die Position von Menüs, Loginformularen, Werbebannern oder Umfragen definiert werden.
Der Hauptinhalt (z. B. ein Beitrag) der Seite kann, abhängig vom Layout des Templates, zwischen verschiedenen Styles variiert werden (z. B. Standart Blog, News, etc.).*Siehe Beispielbild. Das Layout wurde verändert, aber das Aussehen der Website ist gleich geblieben. Die Seitenleiste wurde lediglich von links nach rechts verschoben, wobei auch die Reihenfolge der Module verändert wurde.
Wenn das Template mit Auswahlmöglichkeiten programmiert wurde, ist es auch möglich das Layout "dynamisch" zu verändern, z. B. durch die Platzierung des Hauptmenüs in der linken oder rechten Seitenleiste.
Farbschema
Mithilfe von CSS im Design des Templates kannst du die Farben aller Elemente ändern. Viele Templates bieten die Möglichkeit, Farben direkt im Template Manager zu verändern. Bei anderen muss dazu der Code in einer .css Datei angepasst werden.
Bilder und Effekte
Du kannst auch die Darstellung von Bildern auf der Website festlegen. Auch das Erstellen von Flash-Artigen Effekten oder von Drop-Down-Menüs mit AJAX ist möglich.
Schriftarten
Das Selbe gilt auch für Schriftarten. Diese werden ebenfalls in den .css-Dateien des Templates festgelegt, um ein einheitliches Bild zu erschaffen. Dadurch ist es besonders einfach, das Aussehen der gesamten Website zu verändern - denn die Änderungen müssen nur in ein oder zwei Dateien und nicht für jede Unterseite einzeln vorgenommen werden.
Browser-Spezifische Lösungen
Ein Template kann auch für einzelne Webbrowser angepasst werden, um den aktuellsten Stand der Entwicklung zu nutzen. Die Website bleibt auch für diejenigen zugänglich, die die neuesten System-Upgrades nicht nutzen können (z. B. bestimmte Unternehmen, die die Software, die ihre Mitarbeiter benutzen können, einschränken).
Standart Templates
The following templates are supplied with a default installation of Joomla! 3.x
Site Templates
- Protostar (Default template)
- Beez 3
Administrator Templates
- ISIS (Default template)
- Hathor
Templates wechseln
To change the default Template for the Site (frontend) or Administrator (backend), follow these steps:
Access the template manager
- Log in to the Administrator (backend). If you are not sure how to do this see: To log in to the Administrator (backend)
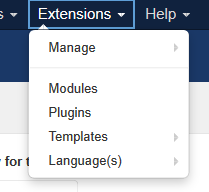
- Click on: Extensions → Templates
You will now see the Template Manager screen.
Note: If you do not see Templates listed as an option on the Extensions menu, then it is most likely because you are not logged in as a Super Administrator. Only Super Administrators will see this menu item.
Managing default template
From here you manage your templates for frontend and backend. The default view shows your installed frontend templates styles. The default style for the frontend is marked with a star; in the image below it is 'protostar - Default'.
To change the default style to 'beez3':
- click the checkbox left from the style name to select it;
- click "Default" on the toolbar;
the star changes from 'protostar' to 'beez3' and you are done. Alternatively, you can click on the shadow of a template's default star to quickly set the template as default.
You can use the filter drop-downs on the top or the filter search to limit the number of templates shown in the list of templates. Other options are:
- edit - edit the options and Menu Assignment a template is shown on (see below)
- duplicate - duplicate the style of the template
- delete - delete a template style (must not be default template style)
Assigning more than one template style for the frontend
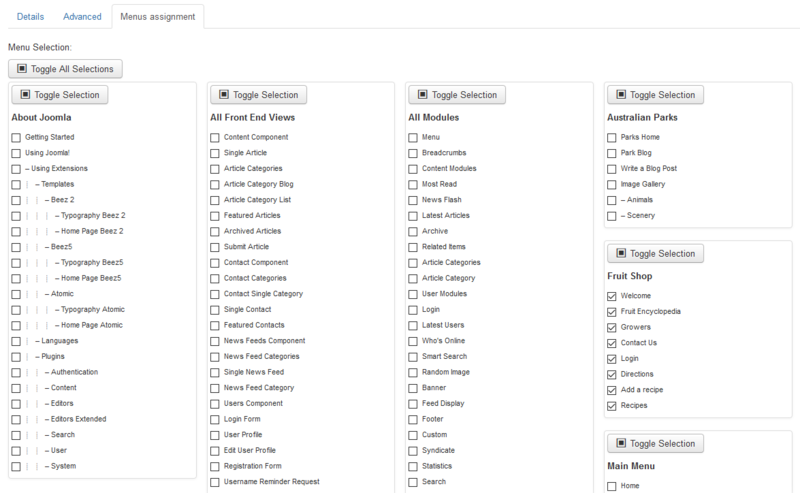
Joomla gives you the option of switching between two or more styles on the frontend. This is done with "Menu Assignment", so you can set different styles for each menu or only a menu item. This allows specific "pages" that are defined by menu links to set for a "specific" style. Styles can be of different templates.
Template manager method
Click on: Extensions → Template Manager
- You will see your installed template styles, now choose a style which is not set as your default one. Yellow star indicates the style is a default.
- Click on the style name or hit the checkbox to the left of the style name, and click "Edit" on the toolbar.
- You now see the page "Template: [Edit style]", and go to the section "Menu Assignment" block and choose the menu items on which the style should be shown.
- Click "Save" on the toolbar and you´re done. The menu item will now show the selected template.
- Go to the frontend of your website and refresh the page to view the modifications.
Menu manager method
- Access menu item Menus → [Menu Name]
- Choose a menu item by checking the box to the left of its name and then click on the Edit toolbar button. Alternatively, simply click the name of the menu item to edit it.
- On the Edit Menu Item screen, in Template Style, choose the desired template style and click on the Save button.
- Go to the frontend of your website and refresh the page to view the modifications.
See also
Templates installieren
Install via Admin Panel (packed template file)
Log into the back-end of your site (www.your-site.com/administrator/)
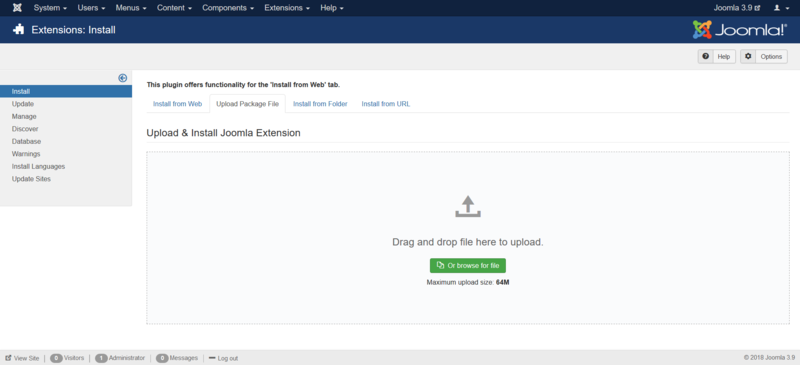
Click on: Extensions -> Extension Manager
You see the page "Extension Manager"
From here you can install your Templates, Plugins, Modules, Components and Languages. You have different options:
- Install from Web - to select an extension listed on the Joomla! Extension Directory
- Upload Package File - to select a package from your PC, upload and install it
- Install from Folder - to enter the path where the package is located on your webserver
- Install from URL - to enter the URL to the package
Option 4 does everything for you, your environment needs to be properly configured to allow this. Option 2 requires you to download the extension to your PC. Option 3 requires you to unzip and move the folders/files to your webserver. All options require the webserver to have write access to the webspace.
Here, we choose the second method: Upload Package File
Drag and drop file to the upload area to upload. Alternatively you can also click the button "Or browse the file" to select the package from your PC.
If the package contains no errors you are done and get a success message like the one below.
Verify installation
Go from tab 'Install' to tab 'Manage', set the 'Type' filter to 'Template'. The installed template should appear in the list. If it does, the template is properly installed. Now you can assign one of styles to a menu item or set the style as default. For administrator templates make sure you have two windows of the template manager. Activate the new template in one of them and reset it in the other one if something went wrong.
Install via FTP (unpacked template file)
Templates can also be installed via FTP without packaging them. Simply select the template folder on your PC and upload it to your server, using your favourite FTP software. Be sure you upload the template folder to the directory: /path_to_joomla/templates/ - where /path_to_joomla/ is the location of your Joomla! installation on the server. This method is mostly used when you have created a template yourself, and do not want to have to package it to install the template, or if you want to upload more than one template at once. You must then go into extension manager and click on Discover in the sub menu. Click on "Discover" in the toolbar if your template doesn't immediately appear. A list of uninstalled items in the FTP should then appear. Click the checkbox to the left of your template and click on the button 'Install'.
Note: Do not try to use FTP to install Components, Modules and Plugins if you are a beginner/novice. These items need database entries which have to be inserted manually if you bypass the package installer.
