Joomla 2.5'den 3.x'e Adım, Adım Geçiş
From Joomla! Documentation
2.5.x sitenizi Joomla! 3.x'e taşımak için adım adım talimatlar şunlardır: Yüzlerce farklı senaryo var, bu size takip edilmesi gereken temel prosedürü verecektir. Çok karmaşık geçişler, muhtemelen yüklü üçüncü taraf uzantılarının bir sonucu olacaktır. Uzantılarını taşımak için önerilen yol için Joomla! sitenize yüklenen üçüncü taraf uzantı geliştiricileri ile iletişime geçmeniz önerilir.
Giriş
Joomla 2.5'den 3.x'e geçiş mini bir geçiş olarak kabul edilir. Joomla'nın çekirdek uzantıları, Joomla'nın arka plan yöneticisi tarafındaki Joomla! Güncelleme bileşeniyle "tek tıklamayla" yükseltme ile yükseltilecek olmasıdır. Birçok üçüncü taraf uzantısı da tek tıklamayla yükseltme işlemidir. Bazıları değil. Her birine bakmanız ve 2.5'dan 3.x'e ulaşmak için uzantının takip etmesi gereken yolu belirlemeniz gerekir. Henüz yapmadıysanız adımlarını takip etmeden önce, Kendini Değerlendirme ve 2.5 ila 3.x Göç Planlama göz atın.
Joomla! Temel Eklentileri:
- Kategoriler
- Makaleler
- Menüler
- Modüller (temel modüller - üçüncü taraf değil)
- Reklamlar
- İletişimler
- Mesajlaşma
- Haber Beslemeleri
- Yönlendirme
- Arama
- Akıllı Arama
- Web Bağlantıları
Çok büyük veya karmaşık 2.5 ila 3.x taşıma işlemleri için
Tek tıkla güncelleme iyi olacak ve çoğu için iyi çalışıyor. Bazı daha büyük, daha karmaşık siteler için tek tıklamalı güncelleme en iyi yol olmayabilir. Büyük veya çok karmaşık siteler için, düzenli bir geçiş için talimatları izlemek ve tek tıklamayla güncelleme işlevini atlamak isteyebilirsiniz. Bunu yapmak için, 1.5 ile 3.x planlama ve Joomla 1.5'den 3.x'e geçiş, Okurken sadece 2.5 yerine 1.5 değerini koyun.
Adım Adım
Bir Geliştirme Yeri Oluşturma
- Canlı 2.5 sitenizin yedeğini alın. Önerilen bir aracı kullanabilirsiniz (sayfanın alt kısmına bakın) veya el ile bunu yapabilirsiniz.
- Devam etmeden önce Joomla 3 teknik gereksinimlerini karşıladığınız dan emin olun.
- 2.5 sitenizi geri yüklemek için yeni bir veritabanı ve yeni kullanıcı oluşturun.
- Çalışacak ve aşağıdakilerden birinde 2.5 sitenizin yedek kopyasını geri yüklemek için bir test sitesi oluşturun veya alan oluşturun:
- Bir alt alan adı.
- Bir alt dizin.
- Yerel bir cihaz ile WAMP, MAMP, LAMP, XAMPP.
- Kökte geçici bir etki alanındaki yeni bir barındırma hesabı. (Taşıma işleminde ana hostu değiştirmek isterseniz).
- Restoring a site on a local device. See Installing Joomla locally and Setting up your workstation for Joomla development.
- Restoring a site with a tool listed at bottom of page. (Read the developer documentation)
- In your test location, update your Joomla! 2.5 instance to the latest maintenance release. (Currently 2.5.28).
- Make sure you have the latest database schema updated to the latest version 2.5.28 by going to: Extension Manager → Database tab. If your schema is not up to date as in the following image, click the Fix button:

- Empty trash: Do you have any articles in the trash? If so, delete them (and any applicable media that may be associated with them if not in use elsewhere on the site). Articles (categories and menu items too) left in the trash can cause issues in having a migration to complete without errors.
- Test.
- Backup again.
Assess Each Extension
- You are going to be looking at every single extension installed on your site. You will be determining if they need to be updated to the latest version or uninstalled. In Joomla! 2.5.28 you can go to Extension Manager → Update tab and click Find Updates which will add a tooltip in the Version column, under the Manage tab, giving some compatibility information from the backend. This functionality only supports extensions that update via the Extension Manager Update tab. If you have extensions installed that do not use the Joomla extension update then they need to be assessed manually as detailed below. The same goes for those extensions that have a tooltip. You will still need to check the type of package and migration path with the extension developer to verify how to upgrade/migrate.
- Go to Extension Manager → Manage tab.
- Click the drop-down for Type.
- Select Package from the drop-down.
 Selecting Package first is recommended because if there is something you need to uninstall in a package, it will automatically uninstall the associated Modules, Plugins, or anything else in the package at one time.
 - Uninstall any Packages that are no longer needed or will not be migrating to Joomla 3.
- Repeat this process of going through the Manage tab for all Types in the drop-down: Component, File, Language, Library, Module, Plugin and Template. If the Author states Joomla! Project, then leave those extensions alone. Smart Search is a Joomla core supported extension even though the Author fields are blank. For all others, make sure that you uninstall those not in use or not compatible with Joomla! 3.x.NOTE! You will not be able to uninstall any Template that is set as default. You will need to select a Core supported template like Beez or Atomic and then uninstall the template if you need to do so.
- Make a note of any versions of Packages and Components currently running that you will be keeping on your site. You can use the Third-Party Extension Inventory Worksheet or just copy/paste them into a document for reference.
- Update all extensions to the latest versions.
- Before and as you update, note if the extensions have both 2.5 & 3.x versions in the same package. If so, they will be fine to "one-click update." If not, and 2.5 and 3.x have different packages, you need to look at them case by case. They will normally fall into one of the following scenarios:
- The extension has separate packages but upon upgrading to 3.x, they automatically detect this and still work. Make sure the developer confirms this.
- The extension has separate packages that need to be uninstalled in 2.5 and then installed with the Joomla 3.x version once the site is migrated. An example of this might be a content plugin. It is very simple to uninstall it in 2.5 and then install it again in 3.x.
- See Template Considerations for more specific information on templates and Converting a previous Joomla! Version template

Going to Joomla! 3.x
Joomla! 2.5.28 can only be migrated to the latest Joomla 3.x in two or more steps. First migrate to version 3.5.1. Then you will be offered version 3.6.5. Finally the current version will be available in the Joomla Updates page of the Components menu.
Once you have either updated or uninstalled your third-party extensions so that only those compatible with Joomla! 3 remain in your installation, continue with the following steps:
- Go to Site → Global Configuration → Server tab and turn Error Reporting from System Default to Maximum. Make sure to Save & Close.

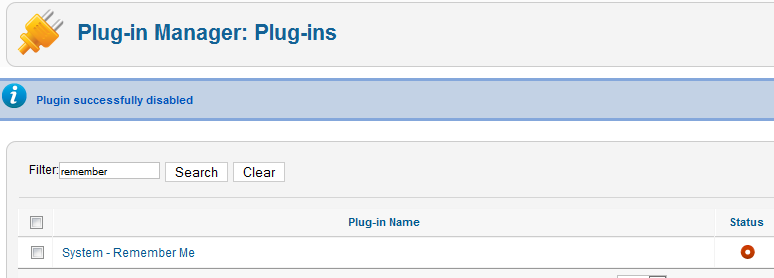
- Go to Extensions → Plugin Manager and enter Remember Me into the Filter and press enter.
- Disable the Remember Me plugin by clicking the green check mark and making it a red circle.
- Take another backup.
- Recommended but not required: Fix assets. (Fixing the assets table). See below for a tool to do this in just a few clicks.
- Go to Components → Joomla Update. (It should say no updates found. If it doesn’t, update Joomla to the latest version and test. Then do another backup.) Click on the Options button at the top right corner.
- Select Short Term Support (This is the current text - it may be different in the future) from the drop-down for Update server.

- Click Save & Close.
- You will then see your Installed Joomla Version, the Latest Joomla! version and the URL for the update package.

- If the update is not showing up, go to Extension manager → Update and press Purge Cache from the toolbar. Now the update to Joomla! 3 should show up.
- Cross your fingers, make sure you turned off Remember Me and that you have a backup from just before this point.
- Click the Install the Update button.
- Watch the spinning circle go round and round. The amount of time the wheel spins is dependent on your site, Internet connection and server speed. The process takes about two minutes. When the update is finished, you will probably be logged out of the Administrator. Sign in again.
- If all goes well, you will get to a totally new look to the backend administrator panel.

- Click the Clear Cache button. You will now see a A Joomla update was found notice for a later version of Joomla. Postpone this update temporarily.
- Go to Extensions → Manage → Database and click Fix.
- In the Extension Manager, go to Discover and see if there are any extensions to install.
- Recommended but not required: Fix assets. (Fixing the assets table). See below for a tool to do this in just a few clicks.
- Enable Remember Me from the Plugin Manager.
- Go to the frontend of your site and see if it shows up even if it’s not the right template. If so, continue. If not, see common errors during migration.
- Take a backup.
- At this point, it would be prudent to clear your browser's cache. Some browsers, notably Firefox, will retain old version 2.5 files. That caching might prevent the operation of the Save and Save & Close buttons in the Administrator.
- Go to Content → Article Manager → Options button → Editing Layout tab and set the Enable Versions to Yes.
- Install your new template or other extensions if you have them to install. Back up often.
- Configure them. Back up often.
- Test everything. Back up often.
- If everything works as expected, turn Error Reporting back to System Default (System → Global Configuration → Server tab). Make sure to Save & Close.
- Now you should return to Joomla Updates in the Components menu. Install any updates offered. After the successful installation of version 3.5.1, you will likely be offered version 3.6.5 next. Finally, the Update facility will bring your site up to the current version in the 3.x series.


Going Live with your Joomla! 3.x Site
- When you’re ready to go live, back up your 2.5 site for the last time. Restore it in a subdirectory or subdomain if you would like to.
- Back up your Joomla! 3.x site and move or restore your Joomla! 3.x site to the root (or change nameservers if you were building on a temporary domain at a new hosting account root).
- Test again.
- Remove the Joomla! 2.5 site from the server within a couple of days unless you have edited your robots.txt file to block the search engine spiders.
- Remove all development sites you may have been working with or keep them up-to-date if they are running a current version in order to ward off hack attempts on your server.
If you had data change on the 2.5 site while you were migrating to 3.x, you will want to get that data moved over to the 3.x site before going live. You can do this manually (make sure you keep the same user IDs - go in order) or by using a Data Import and Export extension.
Suggested Tools
- Akeeba Backup for backup and restore.
- ACL Manager to fix asset issues in a few clicks.