Difference between revisions of "Taking the website temporarily offline/fr"
From Joomla! Documentation
(Updating to match new version of source page) |
|||
| (41 intermediate revisions by 3 users not shown) | |||
| Line 1: | Line 1: | ||
<noinclude><languages /></noinclude> | <noinclude><languages /></noinclude> | ||
| − | |||
| − | Vous pouvez avoir besoin en de certaines occasions de rendre votre ''site Joomla! complètement inaccessible aux visiteurs | + | <div class="mw-translate-fuzzy"> |
| + | Vous pouvez avoir besoin en de certaines occasions de rendre votre ''site Joomla! complètement inaccessible aux visiteurs'' pour un court moment. Il existe un simple bouton en backend vous permettant de mettre votre site hors-ligne très rapidement. Il peut être remis en service ultérieurement tout aussi facilement. | ||
| + | </div> | ||
| − | ==Mettre temporairement hors ligne votre site Joomla!== | + | <span class="mw-translate-fuzzy">==Mettre temporairement hors-ligne votre site Joomla!==</span> |
| + | <div class="mw-translate-fuzzy"> | ||
Pour rendre votre site Joomla! inaccessible aux visiteurs, en le remplaçant par un simple message, procédez ainsi : | Pour rendre votre site Joomla! inaccessible aux visiteurs, en le remplaçant par un simple message, procédez ainsi : | ||
| − | # Connectez-vous à l'administration en backend. Pour apprendre comment faire, veuillez consulter : [[S:MyLanguage/ | + | </div> |
| + | <div class="mw-translate-fuzzy"> | ||
| + | # Connectez-vous à l'administration en backend. Pour apprendre comment faire, veuillez consulter : [[S:MyLanguage/Logging_in_or_out_of_the_Administrator_back-end|Se connecter et se déconnecter de l'administration en backend]]. | ||
| + | </div> | ||
# Cliquez sur ''Configuration'' dans le Panneau d'administration ou cliquez sur l'élément de menu {{rarr|Site,Configuration}} dans {{JVer|2.5}} ou {{rarr|Système,Configuration}} dans {{JVer|3.x}}. | # Cliquez sur ''Configuration'' dans le Panneau d'administration ou cliquez sur l'élément de menu {{rarr|Site,Configuration}} dans {{JVer|2.5}} ou {{rarr|Système,Configuration}} dans {{JVer|3.x}}. | ||
| − | # | + | <div class="mw-translate-fuzzy"> |
| − | # | + | # Il existe de nombreuses options de configuration divisées en groupes ou onglets séparés. L'onglet ''Site'' est normalement celui affiché par défaut. Si ce n'est pas le cas, cliquez sur cet onglet. |
| − | # '' | + | </div> |
| − | # | + | <div class="mw-translate-fuzzy"> |
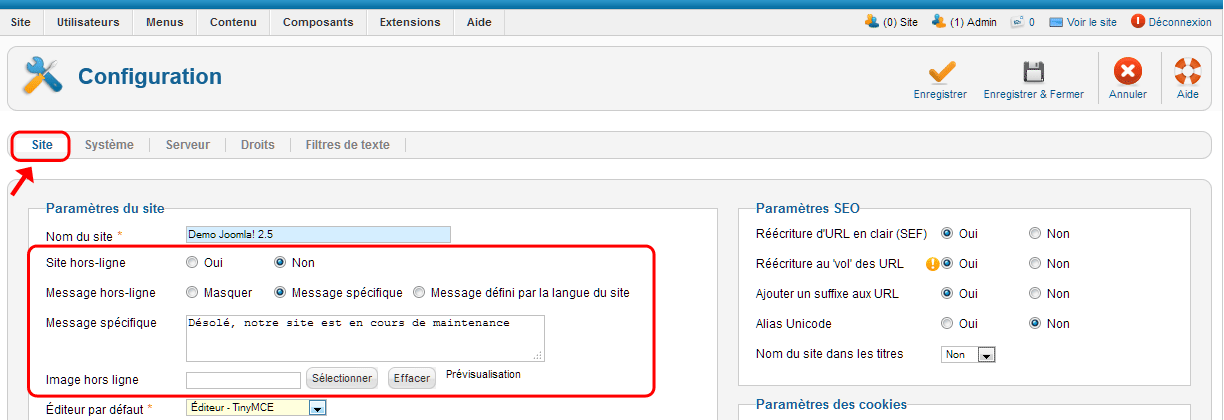
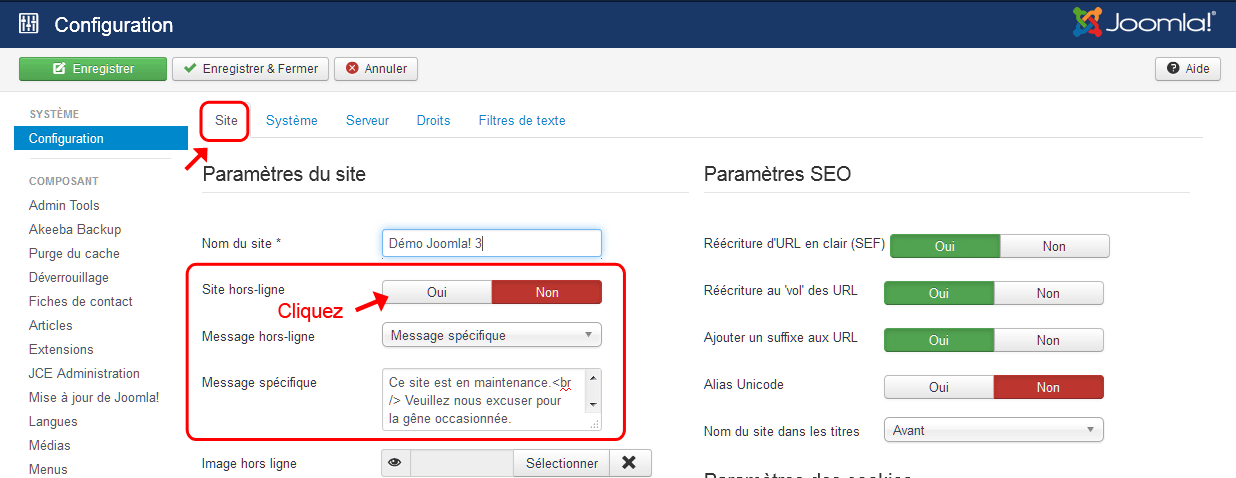
| − | #* | + | # Localisez '''Site hors-ligne''' et basculer le bouton radio de '''Non''' à '''Oui''' dans {{JVer|2.5}} (voir capture d'écran ci-dessous) ou cliquez sur le bouton '''Oui''' dans {{JVer|3.x}}. |
| − | #* | + | </div> |
| − | # | + | <div class="mw-translate-fuzzy"> |
| − | #* | + | # ''Option :'' Changer le '''message hors-ligne''' pour donner à vos visiteurs une explication sur la raison de l'indisponibilité de votre site. |
| + | </div> | ||
| + | <div class="mw-translate-fuzzy"> | ||
| + | # Cliquez sur le bouton '''Enregistrer''' pour mettre en œuvre les nouveaux paramètres : | ||
| + | </div> | ||
| + | <div class="mw-translate-fuzzy"> | ||
| + | #* Le bouton '''Enregistrer''' de la barre d'outils va enregistrer vos modifications tout en restant sur la page de configuration. | ||
| + | </div> | ||
| + | #* Le bouton '''Enregistrer & Fermer''' va enregistrer vos modifications et retourner au panneau d'administration. | ||
| + | # Vous devriez voir un message confirmant les paramètres que vous avez modifiés. | ||
| + | <div class="mw-translate-fuzzy"> | ||
| + | #* Si vous voyez un message d'erreur, reportez-vous à [[S:MyLanguage/Cannot save Global Configuration changes|Impossible d'enregistrer les modifications de la configuration]]. | ||
| + | </div> | ||
===Joomla! 2.5=== | ===Joomla! 2.5=== | ||
| Line 22: | Line 39: | ||
:[[Image:Global-config-3-site-offline-fr.png]] | :[[Image:Global-config-3-site-offline-fr.png]] | ||
| − | == | + | <div class="mw-translate-fuzzy"> |
| − | + | ==Remettre votre site Joomla! en ligne== | |
| + | Répétez les étapes ci-dessus en vous assurant que site hors-ligne est paramétré sur Non. | ||
| + | </div> | ||
| − | === | + | <span class="mw-translate-fuzzy">== Utilisation de la méthode htaccess (cpanel) ==</span> |
| − | + | You can limit access to certain resources of your website by password-protecting the directories they are in. To password-protect a directory with cPanel Hosting Control: | |
| − | + | # Login into your cPanel. Select the ''Files'' section and the open ''Directory Privacy''. | |
| − | + | # Once you open ''Directory Privacy'', you will see a list of directories. | |
| − | + | # Click on the directory that you wish to protect with a password. | |
| − | You can limit access to certain resources of your website by password protecting the directories they are in. | + | # Fill in a Username and Password at the bottom of the page. Then select ''Add / modify authorized user''. |
| − | + | # Once the user is created, select ''Go Back''. | |
| − | To password protect directory with | + | # Fill in the Protected Resource Name. This is the message that will show in the login window. Then highlight the user you just created from the Active Users list and click on Save button below the Protected Resource Name. |
| − | + | # Verify that your directory has been password-protected. Launch your browser and visit the folder. If the browser prompts you to login, your directory has been protected by a password. | |
| − | |||
| − | |||
| − | Once you | ||
| − | |||
| − | Click on the directory that you wish to password | ||
| − | |||
| − | Fill in a Username and Password at the bottom of the page | ||
| − | |||
| − | Once user created | ||
| − | |||
| − | |||
| − | |||
| − | Fill in Protected Resource Name | ||
| − | |||
| − | |||
| − | |||
</noinclude> | </noinclude> | ||
| + | <div class="mw-translate-fuzzy"> | ||
[[Category:Security/fr|Sécurité]] | [[Category:Security/fr|Sécurité]] | ||
| − | [[Category:Administration FAQ/fr|Administration | + | [[Category:Administration FAQ/fr|FAQ Administration]] |
| − | [[Category:Global Configuration Management/fr|Gestion de la configuration | + | [[Category:Global Configuration Management/fr|Gestion de la configuration]] |
| − | [[Category:Needs | + | [[Category:Needs updating/fr|Ayant besoin d'une mise à jour]] |
| + | </div> | ||
</noinclude> | </noinclude> | ||
Latest revision as of 01:34, 10 August 2020
Vous pouvez avoir besoin en de certaines occasions de rendre votre site Joomla! complètement inaccessible aux visiteurs pour un court moment. Il existe un simple bouton en backend vous permettant de mettre votre site hors-ligne très rapidement. Il peut être remis en service ultérieurement tout aussi facilement.
==Mettre temporairement hors-ligne votre site Joomla!==
Pour rendre votre site Joomla! inaccessible aux visiteurs, en le remplaçant par un simple message, procédez ainsi :
- Connectez-vous à l'administration en backend. Pour apprendre comment faire, veuillez consulter : Se connecter et se déconnecter de l'administration en backend.
- Cliquez sur Configuration dans le Panneau d'administration ou cliquez sur l'élément de menu Site → Configuration dans
 ou Système → Configuration dans
  .
.
- Il existe de nombreuses options de configuration divisées en groupes ou onglets séparés. L'onglet Site est normalement celui affiché par défaut. Si ce n'est pas le cas, cliquez sur cet onglet.
- Option : Changer le message hors-ligne pour donner à vos visiteurs une explication sur la raison de l'indisponibilité de votre site.
- Cliquez sur le bouton Enregistrer pour mettre en œuvre les nouveaux paramètres :
- Le bouton Enregistrer de la barre d'outils va enregistrer vos modifications tout en restant sur la page de configuration.
- Le bouton Enregistrer & Fermer va enregistrer vos modifications et retourner au panneau d'administration.
- Vous devriez voir un message confirmant les paramètres que vous avez modifiés.
- Si vous voyez un message d'erreur, reportez-vous à Impossible d'enregistrer les modifications de la configuration.
Joomla! 2.5
Joomla! 3.x
Remettre votre site Joomla! en ligne
Répétez les étapes ci-dessus en vous assurant que site hors-ligne est paramétré sur Non.
== Utilisation de la méthode htaccess (cpanel) == You can limit access to certain resources of your website by password-protecting the directories they are in. To password-protect a directory with cPanel Hosting Control:
- Login into your cPanel. Select the Files section and the open Directory Privacy.
- Once you open Directory Privacy, you will see a list of directories.
- Click on the directory that you wish to protect with a password.
- Fill in a Username and Password at the bottom of the page. Then select Add / modify authorized user.
- Once the user is created, select Go Back.
- Fill in the Protected Resource Name. This is the message that will show in the login window. Then highlight the user you just created from the Active Users list and click on Save button below the Protected Resource Name.
- Verify that your directory has been password-protected. Launch your browser and visit the folder. If the browser prompts you to login, your directory has been protected by a password.

