Ein Bild in einen Beitrag einfügen
From Joomla! Documentation
Introduction
How best to add images to an article depends on which version of Joomla and which editor are in use. This article has illustrations for Joomla 4, with notes on differences in Joomla 3, and TinyMCE the Joomla default editor. To get started, open an article for editing:
- Select Content → Articles in the Administrator menu.
- Select the title of the article you wish to edit
After inserting the article text, place the cursor at the location where the image should appear.
Adding a local image
If the image is located in the images folder of your Joomla installation you should insert the image using the CMS Content → Media button In the TinyMCE edit toolbar (In Joomla 3: Select the Image button):

In the popup window, navigate to the image you want to use and click to select it. On selection a form will appear prompting for additional data. In Joomla 4 the form is to the left. In joomla 3 the form is at the bottom (scroll down):

- Wähle die gewünschten Bildeinstellungen: Üblicherweise solltest du unbedingt das Feld Bildbeschreibung (Alt Text) ausfüllen. Die anderen Felder werden benutzt um das Aussehen des Bildes mit der eigenen css festzulegen.
- "Bild Beschreibung": Dies wird als "alt"-Eigenschaft des Bildes dargestellt, eine wichtige Funktion für Barrierefreiheit und die Erfüllung der Web-Standards. In Joomla 3 wurde es als '"Bildtitel"' bezeichnet.
- "Bild Beschreibung": Wenn ein Bild ohne Steuerelemente benutzt wird, können hier einige benutzerdefinierte Klassen eingefügt werden. Z.B. in Joomla 4 "float-end ms-2 mb-1" richtet das Bild rechts aus, umflossen vom Text mit einem Rand links und unten, damit der Text nicht das Bild berührt. In Joomla 3 entspricht das dem Stil "pull-right".
- "Figure Class" : wenn ein Steuerelement festgelegt wurde, könnte eine Ausrichtungs Klasse zur Darstellung hinzugefügt werden. Dies ist ein html tag, der den img tag umschließt. Beachte das in Cassiopeia Ränder über das Template Style Sheet geregelt werden.
- Bildbeschriftung: Wird unter dem Bild als Bild Titel angezeigt.
In Joomla 3
- Ausrichtung: Bildausrichtung festlegen. Standartmäßig ist es auf Nicht definiert gesetzt.
- Beschriftung Klasse: Fügt die eingegebene Klasse an das figcaption Element an.
- Klick den Einfügen Media Button, um das Bild einzufügen. Das Bild-Einfügefenster wird geschlossen und das Bild erscheint im Editor. Oder klick den "Abbrechen" Button um das Bild-Einfügefenster zu verlassen.
"Tip:" wähle den Umschalt Editor Button um die hinzugefügten Bild- und Beschriftungsstile zu sehen.
Using Drag and Drop for Local images
In both Joomla 4 and Joomla 3 you can drag an image from the desktop or a file browser directly into the article text and the image will be uploaded to the media folder and placed in the article. The only snag is that all such uploaded images will be placed in the same media folder. The location of the Images Directory used for upload and whether this feature is enabled (On by default) are set in the TinyMCE configuration Options.
Adding a remote image
If the image you wish to use is not in the images folder of your Joomla installation a slightly different procedure is needed.
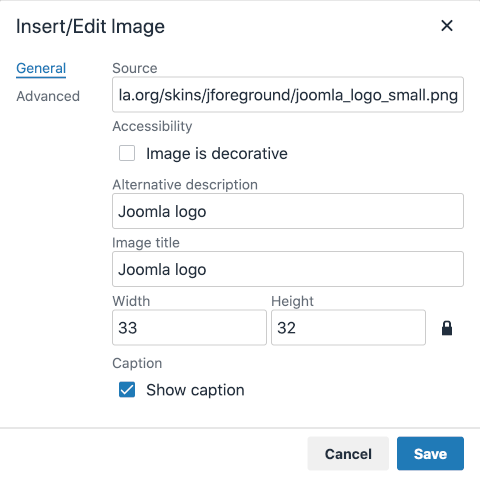
- Select Insert → Image from the TinyMCE toolbar to open a dialog box. In Joomla 3, use the Image icon and the same dialog as used for local images.
- Insert the image url in the Source field.
- Fill out the other fields as required.
- Advanced provides some formatting options applied as in-line styles. Experiment with 1rem, 2, groove. (This feature is incomplete)
Using Drag and Drop for Remote images
You can drag and drop an image from a remote web site directly into your article text. But be aware that this may also copy the image container html with class statements not valid for your site.
Bilder einfügen mit dem "Bild-Einfügefenster"
Du kannst zum Hochladen neuer Bilder das Medienfenster benutzen (das Bildfenster in Joomla 3) Öffne zuerst den Media Browser und gehe zu dem Ordner, in dem du die neuen Bilder für den aktuellen Beitrag speichern willst. Im Medien Bildschirm wähle den Hochladen Button oben links (in Joomla 3 scroll runter zum Rand zum Durchsuchen Button), um den Dateibrowser zu öffnen.
- Wähle die Bilder aus, die Du hochladen willst. Klicke auf "Öffnen" im Datei-Browser um die Auswahl zu bestätigen. Hinweis: Stil und Layout des Datei-Browsers hängt davon ab, welchen Browser und welches Betriebssystem Du verwendest.
In Joomla 4 wird sofort hochgeladen, in Joomla 3 wähle den Hochladen starten Button.
- Die ausgewählten Datei(en) erscheinen in alphabetischer Reihenfolge im Medien/Bild Fenster.
- Wenn die Datei fertig hochgeladen ist, erscheint eine grüne Bestätigungsnachricht oben im Fenster.
- Du kannst nun das hochgeladene Bild wie zuvor beschrieben auswählen und einfügen.
