建立新文章
From Joomla! Documentation
建立新文章
前言
這個教學是系列文章的一部分,關於Joomla!文章
教學涵蓋了登入後台之後,建立新文章的方法,是基於標準安裝的Joomla,以及預設的內容編輯器。
要獲得關於更多不同編輯器更多的資訊,請閱讀:內容編輯器
在開始進行文章的內容之前,您應該需要知道文章要被安排到哪個分類,以及會標註哪些標籤。 登入管理後台首頁。更多相關資訊請查閱: 登入登出管理後台the Administrator Dashboard.
開始
直接從管理後台首頁
依據您的管理後台介面在安裝之後,是否有被客製化,您需要一個或兩個步驟來建立新文章。
- 從左側選單點擊 內容 ,然後在下層選單點擊the plus (+) 符號 to the right of the Articles link.
假如有的話,在後台首頁面板點擊文章右邊的➕符號
從內容管理
上述這些動作都會開啟一個新文章的頁面 : Articles: New 準備好讓您輸入內容。
為文章做準備
看到新文章的頁面,會隨同顯示標題為內容的頁籤When a new article is generated it will open a tabbed panel with the Content tab selected. 只要輸入兩處必填資訊就可以儲存新文章I:
- Enter a title in the Title field. This is used where ever the article title is displayed. (Required) The Alias field next to the title field is not a required field as if it is left blank Joomla will create the alias when the article is saved. The alias is used to refer to the article and is important for the Search Engine Friendly Address features. The alias may also be used by other site functionality such as plugins and modules to find the article.
- Choose a Category. See Article Settings below for more information.
- Whilst not strictly required to add and save an article, enter your content using the editor.
文章參數
The other tabs above the content editor include several options or parameters for the article. You may not see all the following tabs as a Site Administrator may hide some to help maintain the consistency of article layout across the website. You may also see additional tabs for Custom Fields if they have been set up.
- Images and Links allows you to set an intro and featured image and / or links to appear in predefined positions. This may be used if your article will be displayed within a category blog.
- Options allows you to specify the layout of the article and associated information such as title, category, tags, publishing details etc. This is normally set globally but can be article specific through these options.
- Publishing allows you to set publishing dates and times to schedule publishing of an article. By default, when an article is saved it will be published straight away. You can also set the Metadata for the article.
- Configure Edit Screen allows you to show or hide parameters for the article.
- Permissions shows the permissions for each user group that control what can or cannot be done.
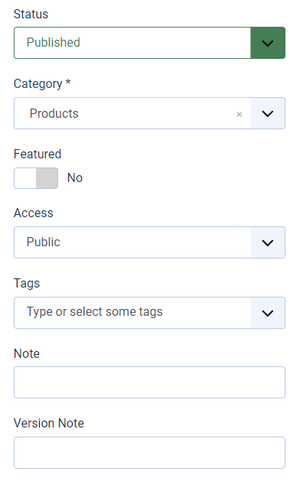
文章設定
Besides the content, an article has settings to manage publishing, how / where it will be displayed and who can see it when published. In many cases some of these will be left at their default setting:
Saving the Article
Once you have added the required information and content you can save the article.
There are a number of ways to do this depending on what you wish to do next in Joomla.
To save the article you can choose to Save, Save&Close, Save to Menu or Save&New as follows:
A system message will indicate that the article has been successfully saved.
Errors on attempting to save:
- If you have not completed the required fields, a red error message will appear indicating the missing information you must add.
- You will see an error message if the article has an alias that already exists. You can overcome this by amending the alias field.
Quick Tips
- If you are not the Super User or Administrator, take time to understand how the website is set up. Just because you have saved an article doesn't mean it is visible on the website. If Category Blog pages are being used, assigning the correct category will display the article. Otherwise an article needs to be assigned to a menu item. You can do this in the article or via Menus then Manage.
- Try to keep article titles short and specific.
- Whilst it can be done, if there are several users adding articles to the website avoid creating new categories and tags in articles. Spelling errors and differences can easily prevent articles from displaying where they were intended. Creating categories and tags in their respective list page ensures consistency across the website.
- If there is a need, make use of article notes. They can be very helpful, especially where several people add articles.
- 只要你在後台,不用回到首頁也可以建立新文章


