Adăugarea unei imagini într-un articol
From Joomla! Documentation
Introduction
How best to add images to an article depends on which version of Joomla and which editor are in use. This article has illustrations for Joomla 4, with notes on differences in Joomla 3, and TinyMCE the Joomla default editor. To get started, open an article for editing:
- Select Content → Articles in the Administrator menu.
- Select the title of the article you wish to edit
After inserting the article text, place the cursor at the location where the image should appear.
Adding a local image
If the image is located in the images folder of your Joomla installation you should insert the image using the CMS Content → Media button In the TinyMCE edit toolbar (In Joomla 3: Select the Image button):

In the popup window, navigate to the image you want to use and click to select it. On selection a form will appear prompting for additional data. In Joomla 4 the form is to the left. In joomla 3 the form is at the bottom (scroll down):

- Setați proprietățile imaginii conform cerințelor:
- Descriere Imagine: Acesta devine atributul alt al imaginii, o caracteristică importantă care ajută accesibilitatea și este în concordanță cu standardele web.
- Image Class: If an image is used without a caption some custom classes may be applied here. For example, in Joomla 4, float-end ms-2 mb-1 will align the image to the right and float text around it with margins to the left and below to prevent text touching the image. In Joomla 3 the equivalent style is pull-right.
- Figure Class: If a caption is set then an alignment class, if any, should be applied to the Figure. It is a html tag that encloses the img tag. Note that in Cassiopeia margins are applied by the template style sheet.
- Descriere: Include descrierea care afișează Titlul Imaginii, sub imagine.
In Joomla 3
- Image Float: Setează alinierea imaginii. În mod implicit acest atribut este selectat ca Nu este setat.
- Clasă Descriere: Clasa introdusă aici este aplicată elementului figcaption.
- Apăsați butonul Inserare pentru a insera imaginea. Fereastra de Inserare Imagine se va închide, iar imaginea va fi afișată în editor. Puteți face click pe butonul Anulare pentru a ieși din fereastra de Inserare Imagine.
Tip: select the Toggle Editor button to see the applied Image and Caption styles.
Using Drag and Drop for Local images
In both Joomla 4 and Joomla 3 you can drag an image from the desktop or a file browser directly into the article text and the image will be uploaded to the media folder and placed in the article. The only snag is that all such uploaded images will be placed in the same media folder. The location of the Images Directory used for upload and whether this feature is enabled (On by default) are set in the TinyMCE configuration Options.
Adding a remote image
If the image you wish to use is not in the images folder of your Joomla installation a slightly different procedure is needed.
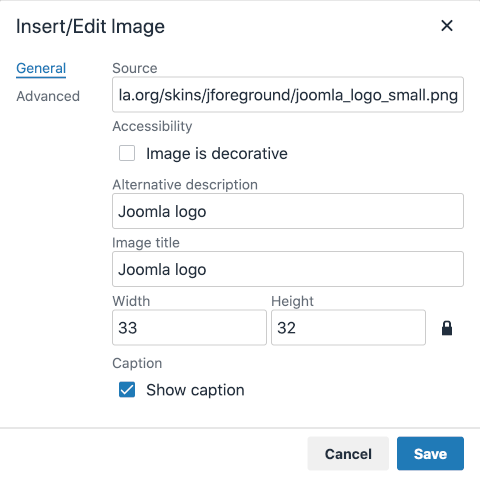
- Select Insert → Image from the TinyMCE toolbar to open a dialog box. In Joomla 3, use the Image icon and the same dialog as used for local images.
- Insert the image url in the Source field.
- Fill out the other fields as required.
- Advanced provides some formatting options applied as in-line styles. Experiment with 1rem, 2, groove. (This feature is incomplete)
Using Drag and Drop for Remote images
You can drag and drop an image from a remote web site directly into your article text. But be aware that this may also copy the image container html with class statements not valid for your site.
Încărcarea imaginilor folosind fereastra Inserare Imagine
Puteți de asemenea să încărcați imagini folosind secțiunea Urcare fișier din fereastra Inserare Imagine
- First open the Media browser and navigate to the folder where you wish to store new images for the current article.
- Apăsați butonul Browse pentru a deschide un navigator de fișiere.
- Selectați imaginile pe care doriți să le încărcați. În navigatorul de fișiere, faceți click pe butonul "Open" (Deschidere) pentru a confirma selecția. Notă: stilul navigatorului de fișiere depinde de motorul de căutare și sistemul de operare pe care le folosiți.
- Fișierele selectate apar la baza ferestrei de Inserare Imagine. Apăsați Începe urcarea pentru a începe încărcarea fișierelor.
- În momentul în care urcarea fișierelor este completă va apărea o notificare pe fundal verde în partea de sus a ecranului.
- Acum puteți selecta și insera imaginile urcate la fel ca înainte.
