Components Banners Clients
From Joomla! Documentation
Components Help Screens
- Components Associations
- Components Associations Edit
- Components Associations Options
- Components Banners Banners
- Components Banners Banners Edit
- Components Banners Categories
- Components Banners Categories Edit
- Components Banners Clients Edit
- Components Banners Tracks
- Components Check in Configuration
- Components Contacts Categories
- Components Contacts Categories Edit
- Components Contacts Contacts
- Components Contacts Contacts Edit
- Components Fields Field Groups
- Components Fields Field Groups Edit
- Components Finder Manage Content Maps
- Components Finder Manage Indexed Content
- Components Finder Manage Search Filters
- Components Finder Manage Search Filters Edit
- Components Installer Configuration
- Components Joomla Update
- Components Joomla Update Configuration
- Components Language Manager Options
- Components Menus Configuration
- Components Messages Configuration
- Components Messaging Inbox
- Components Messaging Read
- Components Messaging Write
- Components Module Manager Options
- Components Newsfeeds Categories
- Components Newsfeeds Categories Edit
- Components Newsfeeds Feeds
- Components Newsfeeds Feeds Edit
- Components Plug-in Manager Options
- Components Redirect Manager
- Components Redirect Manager Edit
- Components Redirect Manager Options
- Components Search
- Components Search Manager Options
- Components Tags Manager
- Components Tags Manager Edit
- Components Tags Manager Options
- Components Template Manager Options
- Components Version History
- Components Web Links Manager Options
- Components Weblinks Categories
- Components Weblinks Categories Edit
- Components Weblinks Links
- Components Weblinks Links Edit
- Users Access Levels
Overview
This screen is accessed from the back-end Joomla! administrator panel. It is used to add or edit banner clients.
How to Access[edit]
- Select Components → Banners → Clients from the drop-down menu of the Joomla! Administrator Panel. You can also select the 'Clients' menu link from the Banner Categories Manager, Banner Manager or the Banner Tracks Manager.
Description[edit]
The Banner Client Manager is where you can edit existing Banner Clients or create new ones. Note that you must have at least one Banner Client and one Banner Category defined before you can add your first Banner.
Screenshot[edit]
Column Headers[edit]
Click on the column heading to sort the list by that column's value.
- Checkbox. Check this box to select one or more items. To select all items, check the box in the column heading. Note: Many toolbar actions can work with multiple items.
- Client. The name of the Banner Client. You may click on the name to open the Client for editing.
- Contact. The Contact for this Client.
- Published. Whether the item has been published or not. You can change the Published state by clicking on the icon in this column.
- Active. The number of Banners defined for this Client.
- Meta Keywords. Meta keywords to be used for this client's banners.
- Purchase Type. The banner purchase type of the client. This is used to indicate how the client purchased the display time for their banners - monthly, yearly, etc...
- ID. This is a unique identification number for this item assigned automatically by Joomla. It is used to identify the item internally, and you cannot change this number.
Column Filtering[edit]
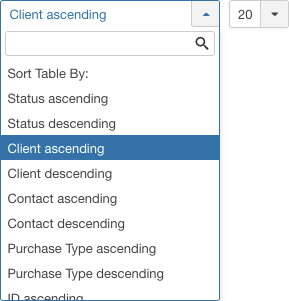
Above the column headers on the right, there are 2 drop down input fields, Sort Table by: (preset to Client ascending) and a number (preset to 20) to display.

These column sorting input fields shows the current method of sorting applied to the table. Use the drop down field choices and click the column heading name. Alternatively, click on the column heading to sort the list by that column's value. This will also change the value in the drop field to correspond with the column header name. The list will then be sorted in order by that column and a sort icon(up or down arrow) will show next to the column name. Click a second time to reverse the sort, which will change the corresponding drop field.
- Order (default). Shows ordering of selected column, ascending or descending.
This page is a candidate for deletion. The given reason is: No links here.
This notice should remain for a minimum of 1 week after it was placed on the page. If discussion is still ongoing, it should remain until a consensus is reached, after which the page will either be deleted or this notice removed. If you disagree with its deletion, please discuss your reasons on its associated talk page, as applicable.
Remember to check if anything links here and the page history before deleting.
Last edit by MarijkeS (talk · contrib) · Last edited on Sun, 01 May 2016 10:20:11 +0000
- Ascending Shows ordering of selected column, ascending or descending.
- Number of items to display. Shows the number of items to display on one page, default is 20 items. If there are more items than this number, you can use the page navigation buttons to navigate between pages.
List Filters[edit]
Search Tools[edit]
This page is a candidate for deletion. The given reason is: No links here.
This notice should remain for a minimum of 1 week after it was placed on the page. If discussion is still ongoing, it should remain until a consensus is reached, after which the page will either be deleted or this notice removed. If you disagree with its deletion, please discuss your reasons on its associated talk page, as applicable.
Remember to check if anything links here and the page history before deleting.
Last edit by MarijkeS (talk · contrib) · Last edited on Sun, 01 May 2016 10:20:11 +0000
Search Tools Above the table is a filter or search field and two buttons, as shown below.

- To filter in title, enter part of the title and click Search icon.
- Click Clear to clear the Filter field and restore the list to its unfiltered state.
- To enable more Filters, click on Search Tools.
Filter by Status or Type[edit]
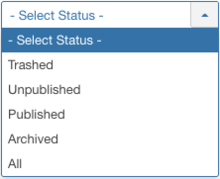
Filter by Status
Lets you show only items with the selected published status.
- - Select Status -: Show only items that are Published and Unpublished.
- Trashed: Show only items that are Trashed. Quick Tip: Permanently delete items
- Unpublished: Show only items that are Unpublished.
- Published: Show only items that are Published.
- Archived: Show only items that are Archived.
- All: Show all items regardless of published status.
Filter by Purchase Type
- Select Type. Select the Purchase Type from the drop-down list box of available Purchase Types.
Toolbar[edit]
At the top you will see the toolbar:
The functions are:
- New. Opens the editing screen to create a new client.
- Edit. Opens the editing screen for the selected client. If more than one client is selected (where applicable), only the first client will be opened. The editing screen can also be opened by clicking on the Name of the client.
- Publish. Makes the selected client available to visitors to your website.
- Unpublish. Makes the selected client unavailable to visitors to your website.
- Archive. Changes the status of the selected client to indicate that they are archived. Archived client can be moved back to the published or unpublished state by selecting "Archived" in the Select Status filter and changing the status of the client to Published or Unpublished as preferred.
- Check-in. Checks-in the selected client. Works with one or multiple client selected.
- Trash. Changes the status of the selected client to indicate that they are trashed. Trashed client can still be recovered by selecting 'Trashed' in the 'Select Status' filter and changing the status of the client to Published or Unpublished as preferred. To permanently delete trashed client, select 'Trashed' in the 'Select Status' filter, select the client to be permanently deleted, then click the 'Empty Trash' toolbar icon.
- Help. Opens this help screen.
- Options. Opens the Options window where settings such as default parameters can be edited.
Options[edit]
Toolbar Links[edit]
At the top left, above the Filter, you will see the following four links:
- Banners. Click this link to go to the Banners Manager page.
- Categories. Click this link to go to the Banner Category Manager page.
- Clients. This link is disabled, since you are already in the Clients page.
- Tracks. Click this link to go to the Banner Tracks Manager page.
Related Information[edit]
- To create or edit Banners: Banner - New/Edit
- To work with Banner Categories: Banner Category Manager


