Adaptiva bilder för Mediahanteraren
From Joomla! Documentation
Adaptiva bilder för nya Mediahanteraren
Dokumentation

Introduktion
Huvudsyftet med detta tillägg är att bevara det viktiga meddelandet kopplat till bilden genom att ge användaren ett sätt att lägga till ett fokusområde för bilden. Bilder görs responsiva med hjälp av detta tillägg. Tillägget stöds av pluginer för media-action och innehåll.
Funktioner
- Tillhandahåller en fokuseditor för att ta in fokusinformation från författaren på ett mer intuitivt sätt.
- Auto-beskärning av bilder i förhållande till bildskärmen på besökarens enhet.
- The cropping is done around the focus area selected by the author.
- Author can select particular widths for which the images need to be cropped.
- Author can select different focus for different devices.
- Author can also remove all the resized images and the previous set focus points for a particular image from the focus editor.
- If an author deletes the original image from the media manager, its resized image and the focus points would be deleted too.
Note: To Enable this Extention, Administrator has to enable two plugins from the plugin's extension manager:
- Media-Action: Smart Crop Plugin
- Content: Adaptive Image Plugin
Cropped Images


How to set focus points for a particular image?
- Go to the Media Manager, locate the image you want to add focus points to.

- Edit that image, you would be redirected to the new window, go to Smart Crop tab.
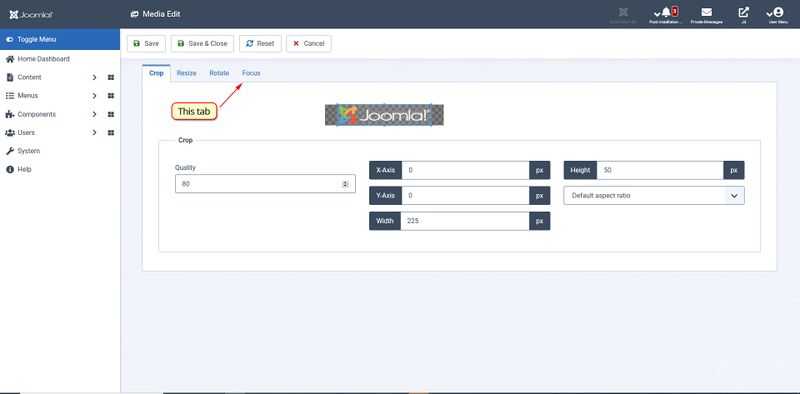
- Now Select the focus area of the image, with the help of editor provided.

- After setting up the area, Save and Close the editor, you would be redirected back to the media manager.
- Now just add that image normally to your article. Bash...!! Your image got responsive while preserving the important section of that image.


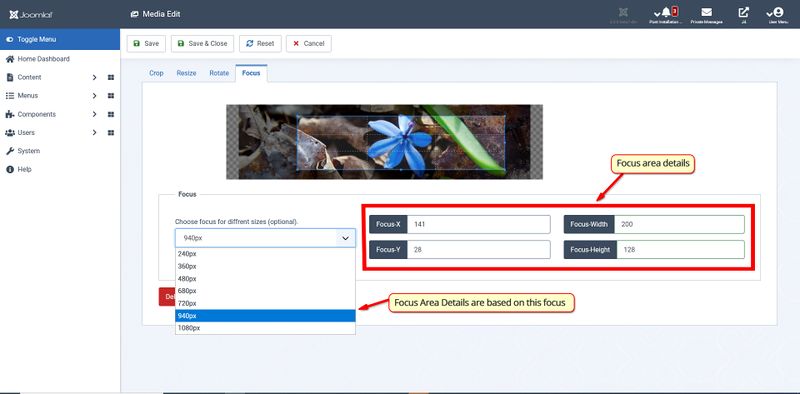
Adding Multiple Focus
- Follow the basic step to set the initial focus points.
- Now in the upper right corner of the plugin you will find a drop-down menu with different widths mentioned.

- Select a width and then select its focus point in the focus editor.
- Save and close the tab.

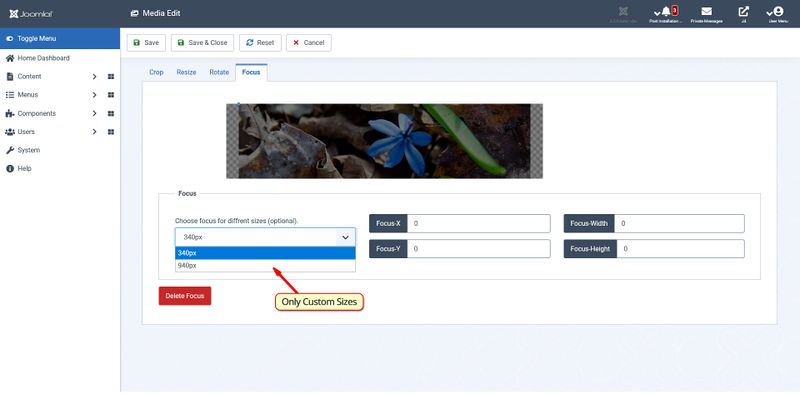
Adding custom widths
- Go to plugin's extension manager, look for Media-Action Smart Crop.

- Now add new widths over here, and save the plugin.


- You would be noticing those widths in the Smart Crop tab.


Deleting the previous set focus point
Note: This will delete all the previously saved focus and resized images of the original image generated by the plugin.
- Go to the Smart Crop tab in the Edit Image.
- In the lower right of the screen there is a delete focus button.
- After deleting the previous focus reload the page or hit cancel to go back to media-manager

Workflow
This Extension consists of two independent plugins.
Smart Crop Plugin
This is a Media-Action plugin. It is providing the UI for managing the focus points. It takes in the focus points from the user and saves it into the file storage by sending an AJAX request to the controller AdaptiveImageController.php. Finally, when the author is satisfied with the focus he hit Save and Close which raises another AJAX request, this time new images are generated with an efficient algorithm and save them into the directory /media/focus. Nomenclature of resized images is (resize image width)_(base64 encoded full path of the image).
Adaptive Image Plugin
This is a Content plugin. If the focus of a particular image is being set in the currently opened article then this plugin will add the <picture> element to that image and all the associated resized-images will be appended to it from /media/focus/. This plugin will also delete all the resized images if the original image is not found (or deleted).
Extending Extension
Changing storage for focus points
Currently, The focus area is being saved in JSON format in the file storage(JSONFocusStore Driver). This can be changed to any other storage by making a new driver class into Joomla\CMS\AdaptiveImage\.The driver class should implement Joomla\CMS\AdaptiveImage\FocusStoreInterface interface. JSONFocusStore driver class is implementing Joomla\CMS\AdaptiveImage\FocusStoreInterface. FocusStoreInterface has following methods declared:
1. setFocus($dataFocus, $width, $imgSrc)
- This method stores/updates the focus area into the storage.
- $dataFocus It has the dimensions of the focus area. It is an array with keys box-left, box-top, box-width, box-height.
- $width It is the size of image for which the focus area is being stored.
- $imgSrc It is the full path of the image corresponding to the focus area.
2. getFocus($imgSrc, $width)
- This method returns the focus area of the image. It return all the focus area associated with the image
- $imgSrc It is the full path of the image corresponding to the focus area.
- $width(optional) If the user want to take in the value of focus area for particular width then, it may be mentioned.
3. deleteFocus($imgSrc)
- It deletes all the focus associated with the image.
- $imgSrc It is the full path of the image corresponding to the focus area.