J4.x:Añadir un Artículo Nuevo
From Joomla! Documentation
Revision as of 03:06, 25 August 2021 by Pdavila2709 (talk | contribs) (Created page with "*Acceda al Inicio del Panel de Administración. Más sobre esto aquí: Logging in or out of the Administrator Dashboard.")
Añadir un Artículo Nuevo
Introducción
Este tutorial es parte de una serie que tratan cómo trabajar con Artículos en Joomla!
Abarca los métodos para añadir un artículo nuevo después de iniciar sesión en el Panel de Administración, y está basado en una instalación estándar de Joomla, utilizando el editor de contenido predeterminado.
Para más información sobre los diferentes editores disponibles en Joomla, lea: Creadores de Contenido.
Antes de comenzar, además del contenido, si lo usa, necesitará saber qué categoría y qué etiquetas asignará al artículo.
- Acceda al Inicio del Panel de Administración. Más sobre esto aquí:
Logging in or out of the Administrator Dashboard.
Getting Started
Directly from the Home Dashboard
Dependant on if your Home Dashboard has been customised after installation, you will have one or two options to generate a new article:
- In the Sidebar Menu click the Content link, then from the dropdown menu click the plus (+) symbol to the right of the Articles link.
- If it is displayed, in the Home Dashboard Site Panel click the plus (+) symbol to the right of the Articles icon.
Via the Article Manager
Either of these options will open up a page: Articles: New that is ready for input.
Preparing the Article
When a new article is generated it will open a tabbed panel with the Content tab selected. It is possible to save a new article with only two pieces of required information:
- Enter a title in the Title field. This is used where ever the article title is displayed. (Required) The Alias field next to the title field is not a required field as if it is left blank Joomla will create the alias when the article is saved. The alias is used to refer to the article and is important for the Search Engine Friendly Address features. The alias may also be used by other site functionality such as plugins and modules to find the article.
- Choose a Category. See Article Settings below for more information.
- Whilst not strictly required to add and save an article, enter your content using the editor.
Article Parameters
The other tabs above the content editor include several options or parameters for the article. You may not see all the following tabs as a Site Administrator may hide some to help maintain the consistency of article layout across the website. You may also see additional tabs for Custom Fields if they have been set up.
- Images and Links allows you to set an intro and featured image and / or links to appear in predefined positions. This may be used if your article will be displayed within a category blog.
- Options allows you to specify the layout of the article and associated information such as title, category, tags, publishing details etc. This is normally set globally but can be article specific through these options.
- Publishing allows you to set publishing dates and times to schedule publishing of an article. By default, when an article is saved it will be published straight away. You can also set the Metadata for the article.
- Configure Edit Screen allows you to show or hide parameters for the article.
- Permissions shows the permissions for each user group that control what can or cannot be done.
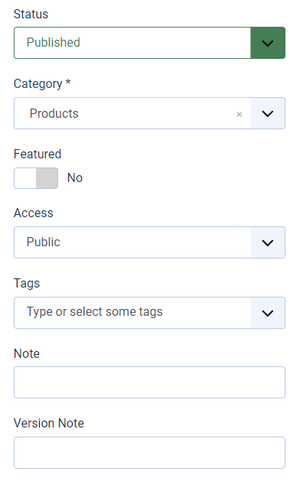
Article Settings
Besides the content, an article has settings to manage publishing, how / where it will be displayed and who can see it when published. In many cases some of these will be left at their default setting:
Saving the Article
Once you have added the required information and content you can save the article.
There are a number of ways to do this depending on what you wish to do next in Joomla.
To save the article you can choose to Save, Save&Close, Save to Menu or Save&New as follows:
A system message will indicate that the article has been successfully saved.
Errors on attempting to save:
- If you have not completed the required fields, a red error message will appear indicating the missing information you must add.
- You will see an error message if the article has an alias that already exists. You can overcome this by amending the alias field.
Quick Tips
- If you are not the Super User or Administrator, take time to understand how the website is set up. Just because you have saved an article doesn't mean it is visible on the website. If Category Blog pages are being used, assigning the correct category will display the article. Otherwise an article needs to be assigned to a menu item. You can do this in the article or via Menus then Manage.
- Try to keep article titles short and specific.
- Whilst it can be done, if there are several users adding articles to the website avoid creating new categories and tags in articles. Spelling errors and differences can easily prevent articles from displaying where they were intended. Creating categories and tags in their respective list page ensures consistency across the website.
- If there is a need, make use of article notes. They can be very helpful, especially where several people add articles.
- Wherever you are in Joomla you can add an article without going to the Home Dashboard - use the Joomla Sidebar Menu.


