Joomla! installieren
From Joomla! Documentation
Die erstmalige Installation von Joomla! ist sehr einfach. Durch den eingebauten Web Installer wird die Installation zu einem Kinderspiel.
Voraussetzungen
Hosting-Anforderungen
Bevor Du Joomla! 3.x installieren kannst müssen einige Anforderungen erfüllt sein. Das trifft sowohl für dedizierte Server, shared Server und auch für lokale Installationen zu.
- Folgende Anforderungen müssen erfüllt sein um Joomla! zu installieren und zu nutzen.

Referenzen
Vorbereitungen zur Installation
Vor der Installation musst du zwei Aufgaben durchführen. Als erstes solltest du die Joomla! Installationsdateien herunterladen. Als Nächstes muss eine Datenbank für Joomla! erstellt werden.
Download und Upload von Joomla! Installationsdateien
- Download der aktuellsten Version von Joomla! 3.x
- Verschiebe das heruntergeladene Joomla! Installationspaket auf deinen Server. Benutze am besten eine FTP Software dafür. Es gibt viele verschiedene FTP Programme, hier ist eine detaillierte Liste an FTP Software. Bitte nutze nur die offiziellen Versionen eines FTP Programms.
- Tipp - Verschiebe einfach das heruntergeladene Archiv auf deinen Server und entpacke es dort. Oder Du entpackst das Archiv lokal und lädst nur die Dateien auf Deinen Server hoch. Egal für welchen Weg Du Dich entscheidest, die Dateien müssen nachher im Rootverzeichnis Deiner Seite liegen.
Wenn die Dateien auf dem eigenen Computer entpackt und auf den Server geladen werden, überprüfe, dass Du nur die Ordner und Dateien "'INNERHALB"' des Joomla! Paketes verwendest. Wenn Du die Ordner und Dateien in einen Ordner entpackst, benenne ihn zum Beispiel, Joomla und lade dann diesen Ordner hoch. Du erreichst die Website dann unter folgender URL yoursitename.com/Joomla statt yoursitename.com.
Datenbank für die Joomla! Installation
- Wenn Du eine Datenbank erstellen mußt, lies bitte zuerst "Erstellung einer Datenbank für Joomla!" oder gehe zu Schritt #2.
- Beachte die nötigen grundlegenden Datenbank-Informationen, bevor die aktuelle Joomla! Installation gestartet wird.
- Speicherort der Datenbank, localhost? Oder ein bestimmter Host-Server wie
"dbserver1.deinwebhoster.de"? - Der Datenbank Name
- Der Datenbank Benutzer Name
- Das Datenbank Benutzer Passwort
- Speicherort der Datenbank, localhost? Oder ein bestimmter Host-Server wie
Installation Starten
Haupt-Konfiguration
Wenn die oben genannten Anforderungen erfüllt sind, eine Datenbank angelegt und die erforderlichen Joomla! Dateien hochgeladen wurden, bist Du bereit zur Installation von Joomla!. Starte den Joomla! Web-Installer, indem Du Deinen bevorzugten Browser öffnest und zu der Domain navigierst. Bei Host-Installationen verwende http://www.yoursitename.com. Wenn Du Joomla! lokal installieren möchtest, verwende http://localhost/<Pfad zu den Joomla-Dateien>, und nun solltest Du den Installations-Bildschirm sehen.

Joomla! wird versuchen, das "Sprache Wählen"' - Feld automatisch mit der vom Browser verwendeten Sprache abzugleichen. Du kannst das wenn nötig ändern.
Fülle das folgende Formular aus.
- Name der Website: der Name Deiner Webseite — dieses Feld kann später zu jedem Zeitpunkt auf der Globalen Konfiguration Seite geändert werden.
- Meta-Beschreibung: gebe eine kurze Beschreibung Deiner Webseite ein. Dieser Text ist eine globale alternative Meta Beschreibung die von Suchmaschinen genutzt wird. Generell ist ein Maximum von 20 bis 25 Wörtern optimal. Auch hier kann es später auf der Globalen Konfiguration Seite geändert werden. Für mehr Details über Metadaten, siehe Globale Metadaten Einstellungen und Eingabe von Suchmaschinen Meta Daten.
- Admin Email Adresse: die Email Adresse des Adminstrators. Gebe eine gültige Email Adresse an, für den Fall dass Du Dein Passwort vergisst. Auf diese Email Adresse erhältst Du den Link zum Ändern des Administrator Passwortes.
- Admin Nutzername: Joomla! standardmässig "admin" als den Nutzernamen für den Super Administrator. Du kannst den Namen so übernehmen oder gleich ändern (was eine gute Sicherheits-Massnahme) ist oder Du änderst es später unter Mein Profil in der Adminstrator Oberfläche.
- Administrator Passwort: bedenke, der Super Administrator hat das Maximum an Zugriff (Frontend & Backend), also solltest Du ein sicheres Passwort verwenden. Gehe über Mein Profil in der Administrations Oberfläche um es später zu ändern. Bestätige das Passwort im Feld Administrator Passwort Bestätigung.
- Seite Offline: klicke die Ja oder Nein Box. Ja - bedeutet, Deine Joomla! Webseite zeigt nach der Installation die 'Seite ist offline' Nachricht beim Aufrufen
yoursitename.comder Startseite. Nein - bedeutet die Webseite ist frei erreichbaryoursitename.combeim Aufruf der Startseite. Du kannst über die Globale Konfiguration in der Administrations Oberfläche den Status jederzeit ändern.
Wenn alles auf der ersten Seite ausgefüllt ist, klicke auf den "Weiter-Button"', um fortzufahren:
Datenbank-Konfiguration
Einstellungen
Gebe jetzt alle Informationen über die für Joomla! zu verwendende Datenbank ein. Es wird empfohlen, sich vorher alle Informationen die unter der Registerkarte ""'Vorbereiten der Installation"'" aufgelistet werden, zu notieren. Details findest Du unter Erstellung einer Datenbank für Joomla!.

For simplification, these intructions are a reference to installing with a MySQLi database. The instructions on the installation page are self explanatory, but here they are again:
- Database Type: MySQLi is the common database used
- Hostname Where is your database located? Common is
localhost, but some hosts use a specific database server such asdbserver1.yourhost.com - Username: the username used to connect to the database
- Password: the password for the database's username
- Database Name: the name of the database
- Table Prefix: one is generated automatically, but you can change it. For example,
jos3_can be used. Just don't forget to put the underscore character (_) at the end of the prefix. - Old Database Process: should the installer backup or delete existing tables during the installation of new tables? Click, Yes or No to select the choice.
All these choices can be edited on the Site Global Configuration page, under Server options after the installation is completed. Note, you will break your installation if you change these settings after installation unless you have a complete copy of the current database being used by the Joomla! installation. Common uses would be to update the username and password of the database or to complete a move of an existing installation to a new host with different parameters.
When all the information has been filled in, click the next button to proceed:
Finalise
Overview
It is now time to finalise the Joomla! installation. The last page of the web browser installation contains all the information about the installation. This includes the options(at the top) for installing sample data and the installation's configurations(at the bottom).
Install Sample Data and Email Configurations
The first options are for automatically installing sample content to the website and emailing the configuration settings.

If you are new to Joomla! it would be beneficial to install some sample data to see how Joomla! works. You can at this time choose to have the configuration settings emailed to you. If the Email Configuration choice is selected, the Email Password choice will appear. The email password is off by default for security. You can choose to have the password included, just click Yes.
Time to check the configurations of your install and the environment of the installation.
Configuration Check
Checking Your Configurations
If everything is in order, you will see the install at the top of the overview page. If not, this is the place to check and see what may be causing an issue.

The section is broken into 4 groups:
- Main Configuration: all the website specific information, such as the website name, description, admin username, etc.
- Database Configuration: contains the information about the database Joomla! will use.
- Pre-Installation Check: these requirements must all be shown as Yes, otherwise you will not be able to install Joomla! With the exception of the PHP Version, the rest are usually controlled in the php.ini. You may need assistance from your host in correcting these settings or checking to see if it is possible to adjust them. For more information, see PHP configuration file file.
- Recommended Settings: these are settings are recommended in your PHP configuration, but will not prevent Joomla! from being installed. You can refer to the above instructions on how they may be changed.
If everything is correct and all checks are passed, you may now click the Install button in the top right corner of the Overview page. This will start the actual installation process.
After you click the Install button, you should see a progress bar with additional information of the installation. Once the installation completes, you should see the success page!
Finishing Up
Success and Finishing Up the Installation
Congratulations! Joomla! 3 is now installed. If you want to start using Joomla! right way without installing extra languages there is one last step to complete the installation. You must delete the Installation Folder. Click on Remove Installation folder and a success message will appear. Now you can navigate to the Administrator log in by clicking Administrator or go right to your site by clicking Site.

Installing Extra Languages

Before you complete your installation by deleting the Installation Folder, click on:
- → Extra steps: Install languages
This will continue the installation of Joomla! by taking you to a new installation page.
Install Languages
A list of language packs is displayed.

Check the language or language packs you wish to install. Remember the following:
- Language packs included in custom distributions will not be listed at this stage as they are already installed.
- A version of the packs proposed will match the Joomla Major version (3.0.x, 3.1.x, etc.). The minor version of the pack may not correspond, e.g. you are installing version 3.3.3 and a 3.3.2 language pack is shown.
- Unmatched language packs in the above example may have untranslated strings.
- The unmatched language packs will be offered as an update when the packs are updated by the registered Translation teams. The available update will be shown in the Control panel as well as in Extensions Manager → Update. This behavior is similar to Extensions Manager → Install Languages.
Click Next and a progress bar will be display while the language pack or packs are downloaded.
Choose Default Language
When the download is complete you can choose the default language for the Site and the Administrator interface.
- Make your choices for default languages.
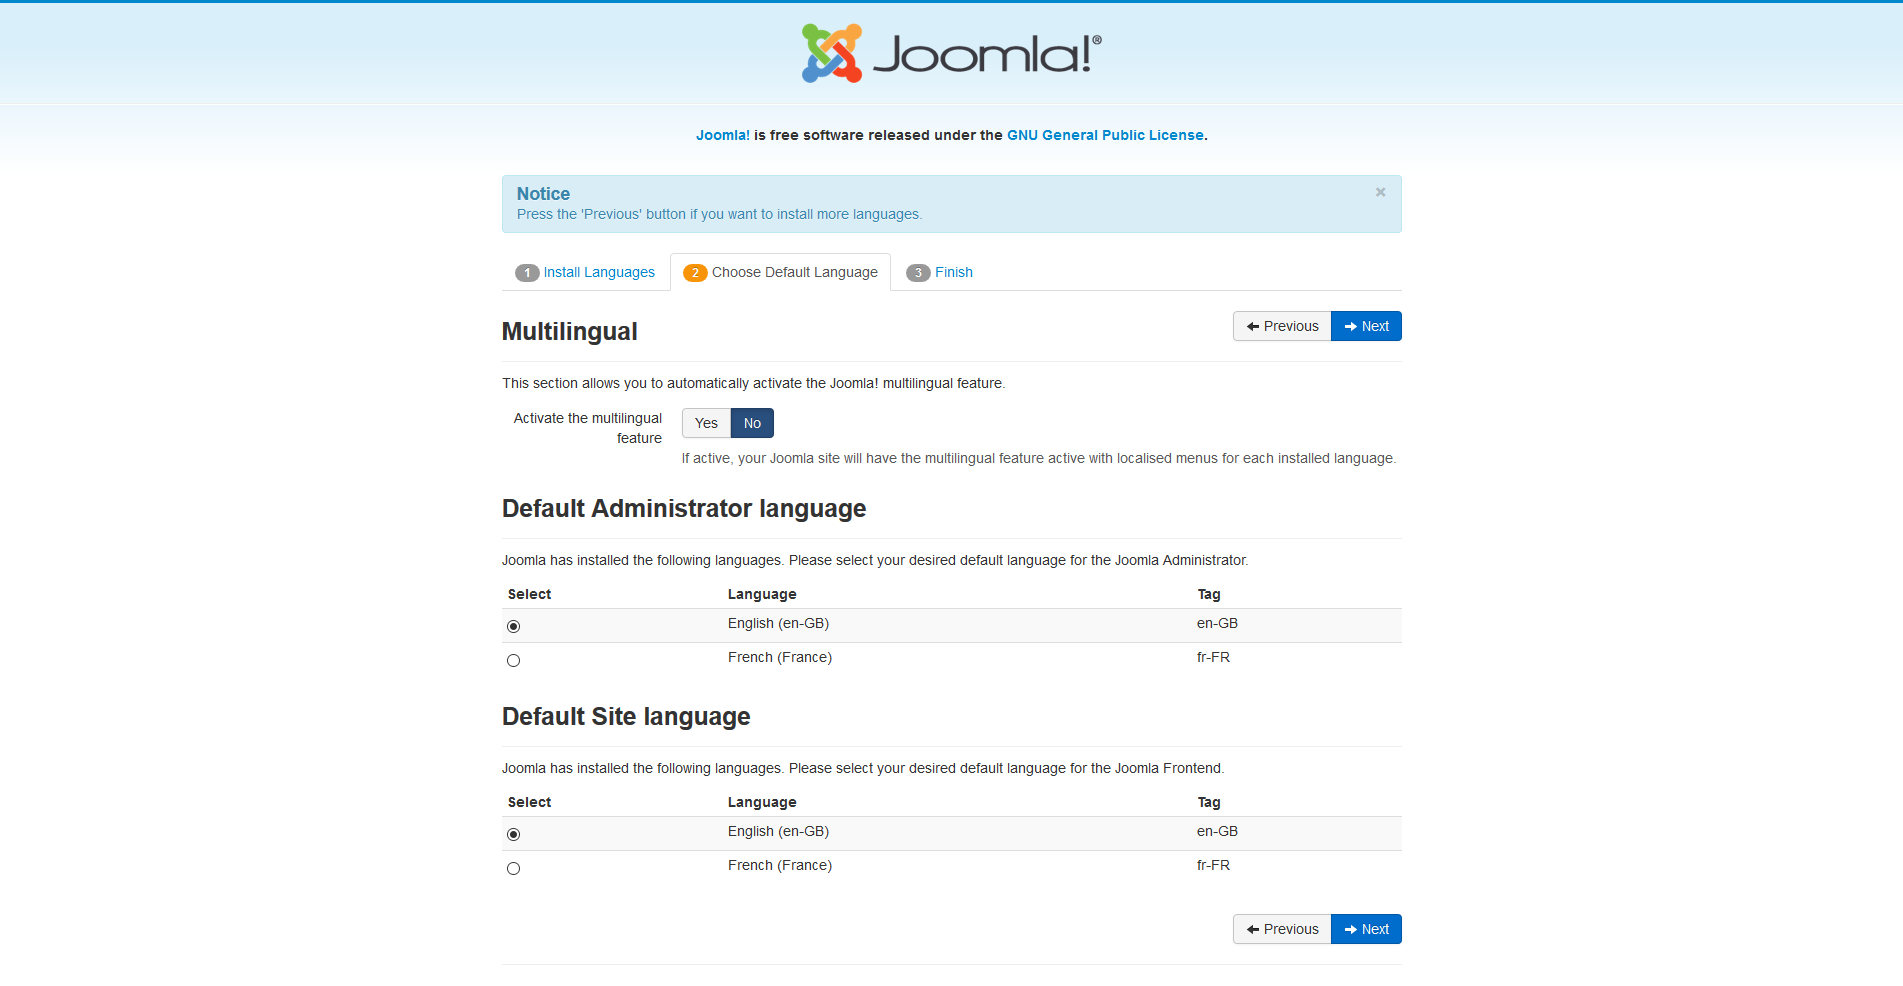

You may also choose to activate the multilingual features of Joomla! at this time too.
- Click Yes next to Activate the multilingual feature
- Two additional choice will appear.

- Install localised content, yes or no. This will automatically create one content category for each language installed and one featured article with dummy content for each content category installed.
- Enable the language code plugin, yes or no. If enabled, the plugin will add the ability to change the language code in the generated HTML document to improve SEO.

When you completed all the choices of language installation, click Next to proceed.
Finalise
You will now be presented with a very similar Congratulations! Joomla! is now installed. screen. The difference will be a notation of the default Administrator and Site language settings, if they were set. You will also not see the Extra Steps message in the bottom right.

Now you can delete the Installation Folder. Click on Remove Installation folder and a success message will appear. Now you can navigate to the Administrator log in by clicking Administrator or go right to your site by clicking Site.